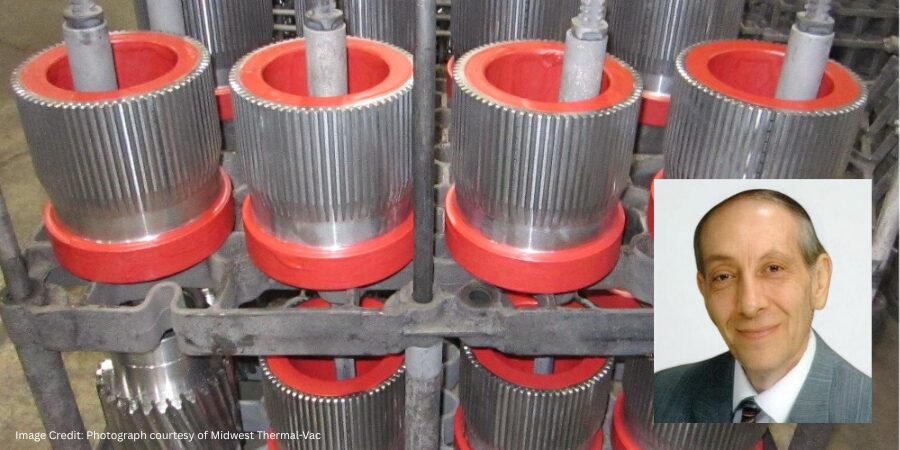
Ask The Heat Treat Doctor® has returned to bring sage advice to Heat Treat Today readers and to answer your questions about heat treating, brazing, sintering, and other types of thermal treatments as well as questions on metallurgy, equipment, and process-related issues. In this installment, Dan Herring discusses the science behind pH — what it really measures, and why it matters — and offers practical guidance on monitoring water quality in open and closed systems found throughout the heat treat shop.
This informative piece was first released in Heat Treat Today’sMay 2026 Sustainable Heat Treat Technologies print edition.
Introduction to pH
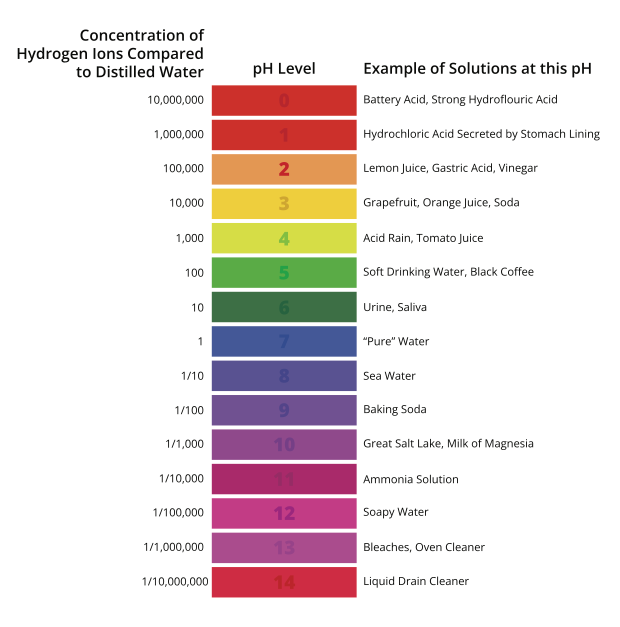
The term “pH” is used to describe a unit of measure that indicates the degree of acidity or alkalinity of a solution. It is measured on a scale of 0 to 14 (Table A). pH is an abbreviation that stands for the “potential of hydrogen”; the “p” being the symbol for potential (or power) and “H” the symbol for hydrogen.
Table A. pH Chart (Herring 2015b)
A Slightly Deeper Dive
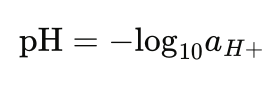
What most people don’t realize is that pH is a complex concept rooted in chemical equilibrium, thermodynamics, and electrochemistry. The formal definition of pH is “the negative logarithm of the hydrogen ion activity” and can be expressed mathematically by the following formula where au+ is the activity of hydrogen ions, a dimensionless quantity (Rumble 2024):
In this form, pH provides a way of expressing the degree of the activity of an acid or base in terms of its hydrogen ion activity. Acids and bases have, respectively, free hydrogen [H+] and free hydroxyl [OH−] ions. Since the relationship between hydrogen ions and hydroxyl ions in a given solution is constant for a given set of conditions, either one can determine the other. In other words, pH is really a measurement of both acidity and alkalinity, even though by definition it is a selective measurement of hydrogen ion activity.
Since pH is a logarithmic function, a change of one pH unit represents a tenfold change in hydrogen ion concentration, that is, of both the hydrogen ion and the hydroxyl ion at different pH values (Table A). Note that each decrease in pH by one pH unit means a tenfold increase in the concentration of hydrogen ions.
A Little Chemistry
In school, we learned that all substances are made up of millions of tiny atoms. These atoms combine to form molecules. In water, for example, each molecule is made up of two hydrogen (H) atoms and one oxygen (O) atom. The formula for a molecule of water is expressed by the familiar symbol H2O. That is, there are two hydrogen atoms needed for each oxygen atom to form a stable compound.
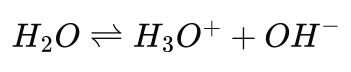
Now, the behavior of pH in aqueous systems is governed by the equilibrium of water to form positive and negative ions (so-called self-ionization), which can be expressed as:
or in the following form we more commonly think of:
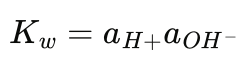
Hency, at 25°C (Kw = 1.0 x 10⁻¹⁴), the equilibrium constant for this process is:
Then for pure water, where aH+ = a0H-, we have that aH+ = 10-7 hence pH = -log10 (10-7) = 7.00 which is neutrality at 25°C (77°F).
Finally, it is important to note that Kw is temperature-dependent: it increases with temperature, meaning neutral pH decreases slightly as temperature rises (e.g., ~6.14 at 100°C). Therefore, “neutral pH” is not always 7 — it depends on thermal conditions.
A Practical Application — Water Quality in the Heat Treat Shop
Water is used in most of our heat treat shops for a variety of purposes, perhaps less than before but still vitally important. Examples include parts washers, heat exchangers, water cooled bearings on fans and rolls, seals on pit furnace covers, water cooled jackets on continuous furnaces, water cooled jackets for quench tanks, top or side cooling chambers, inner doors and plate coils, and make up water for water systems, to name a few.
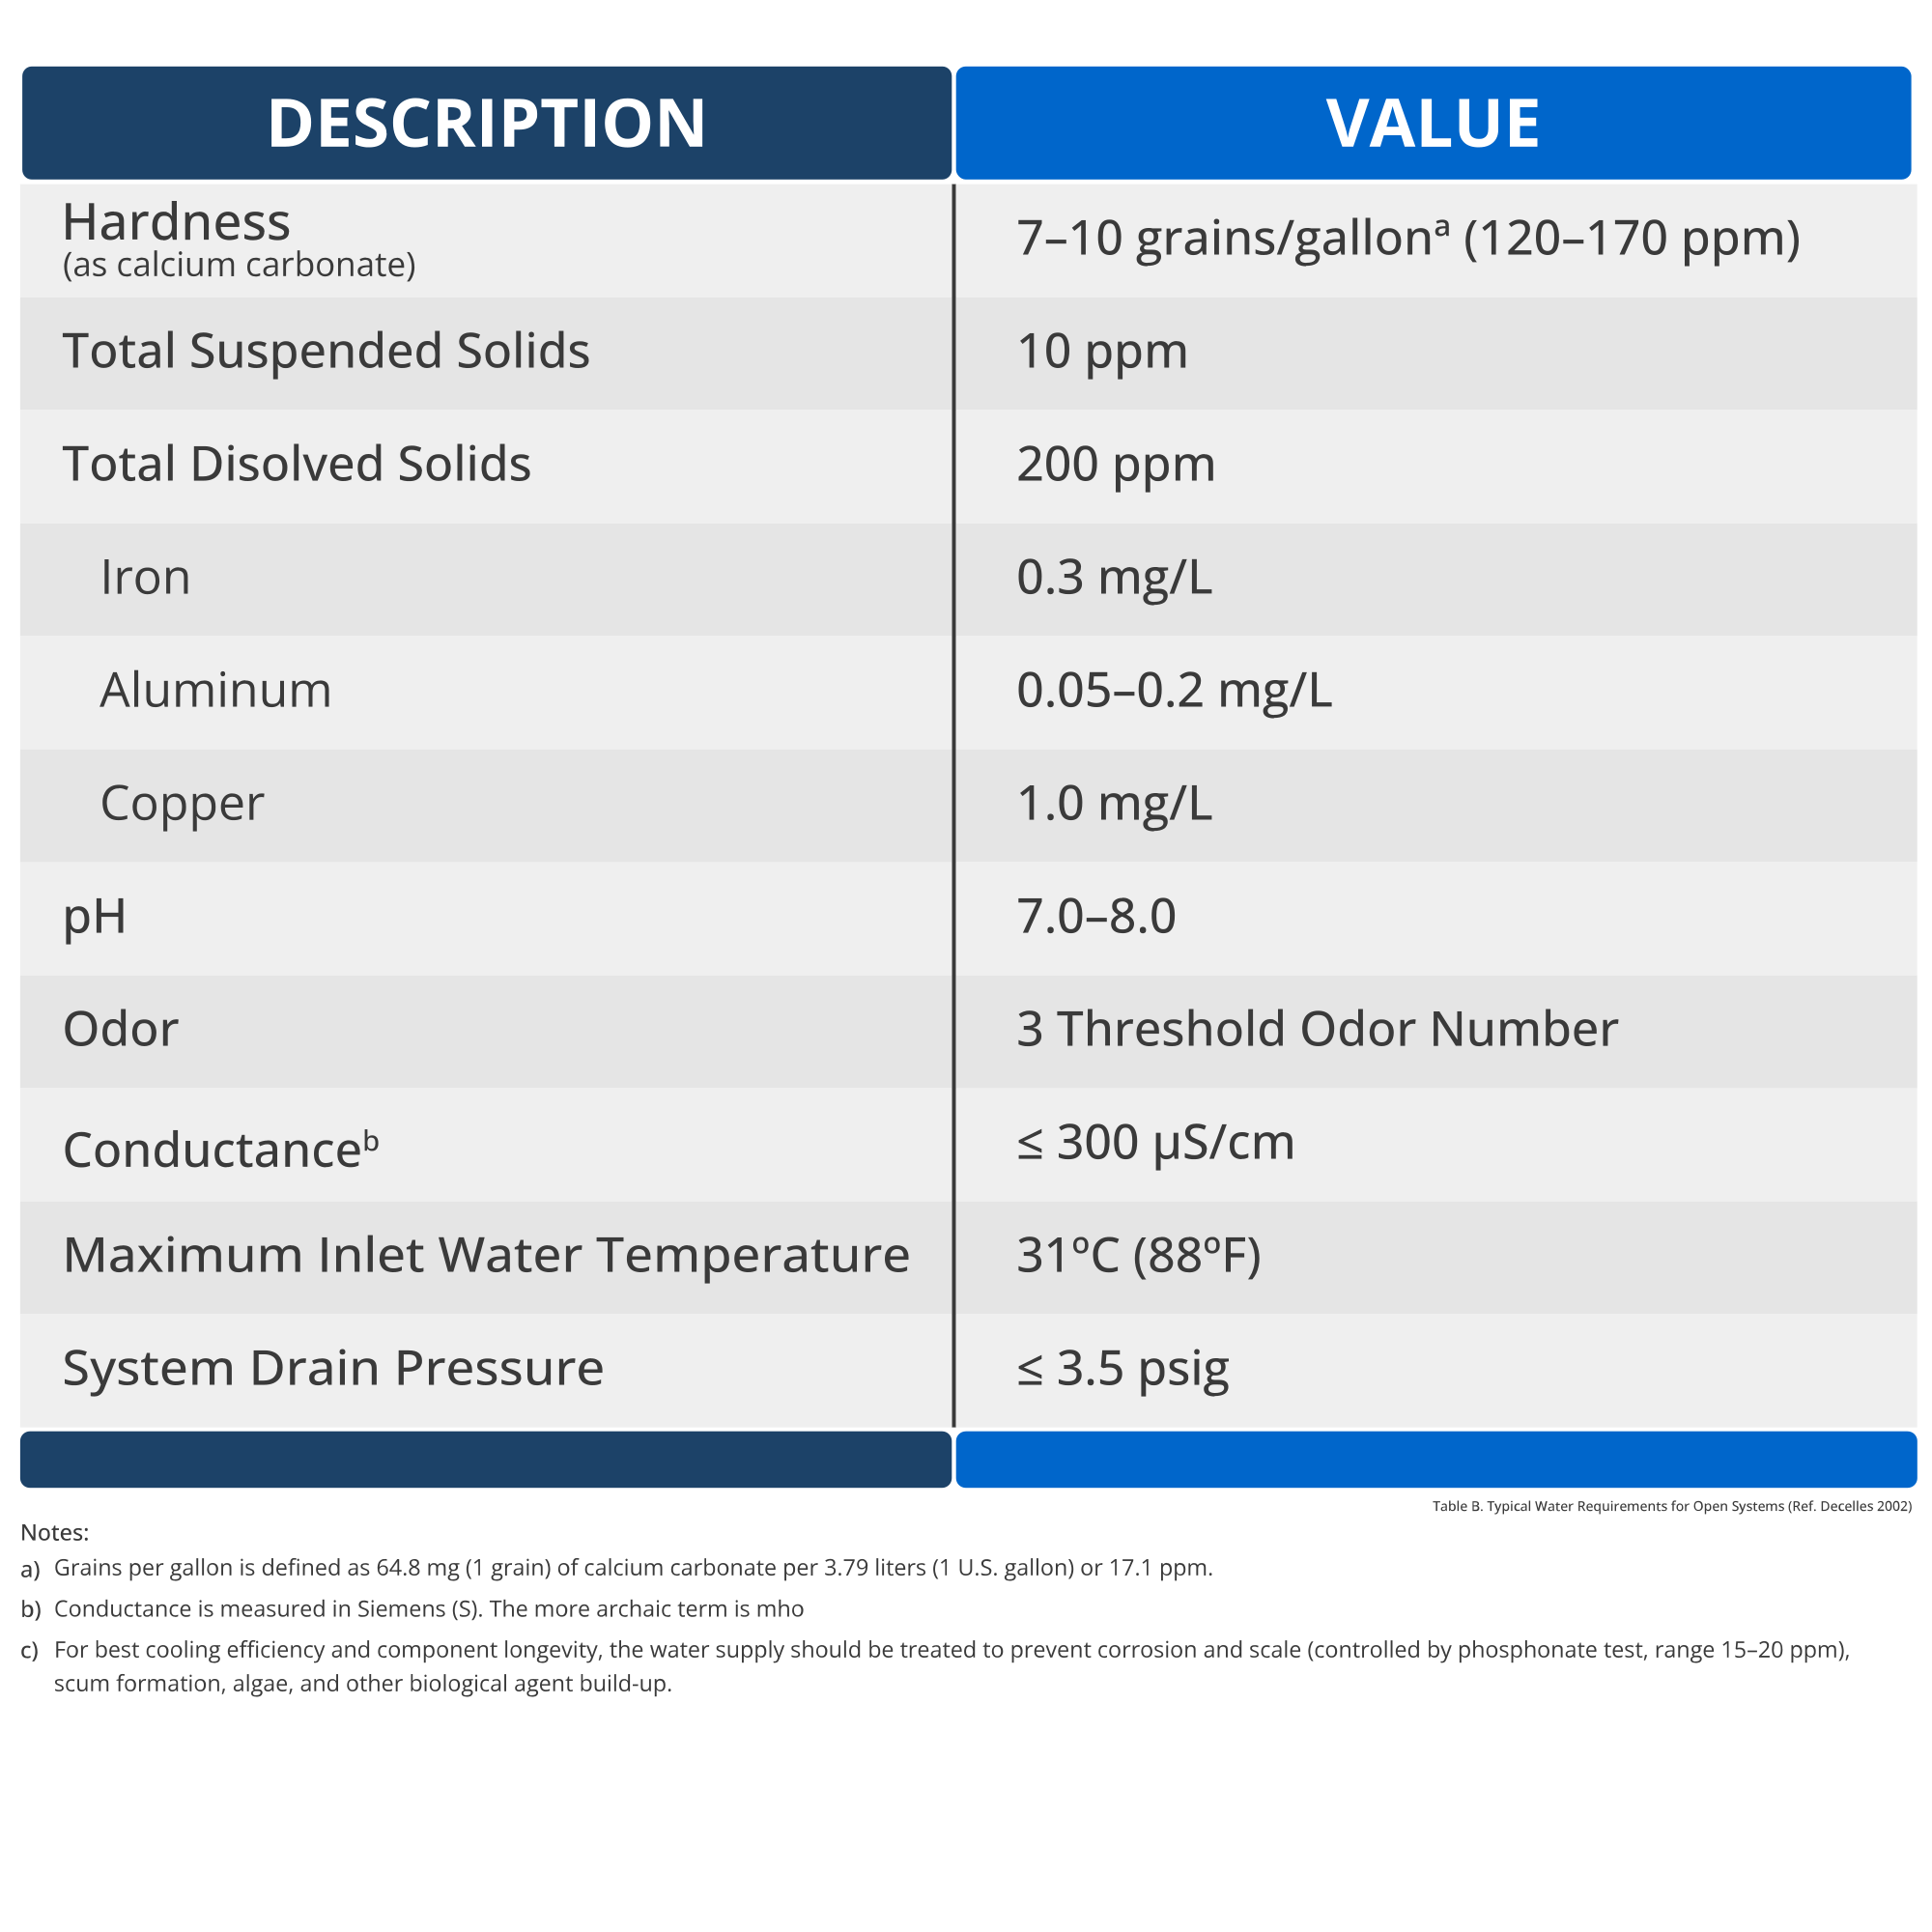
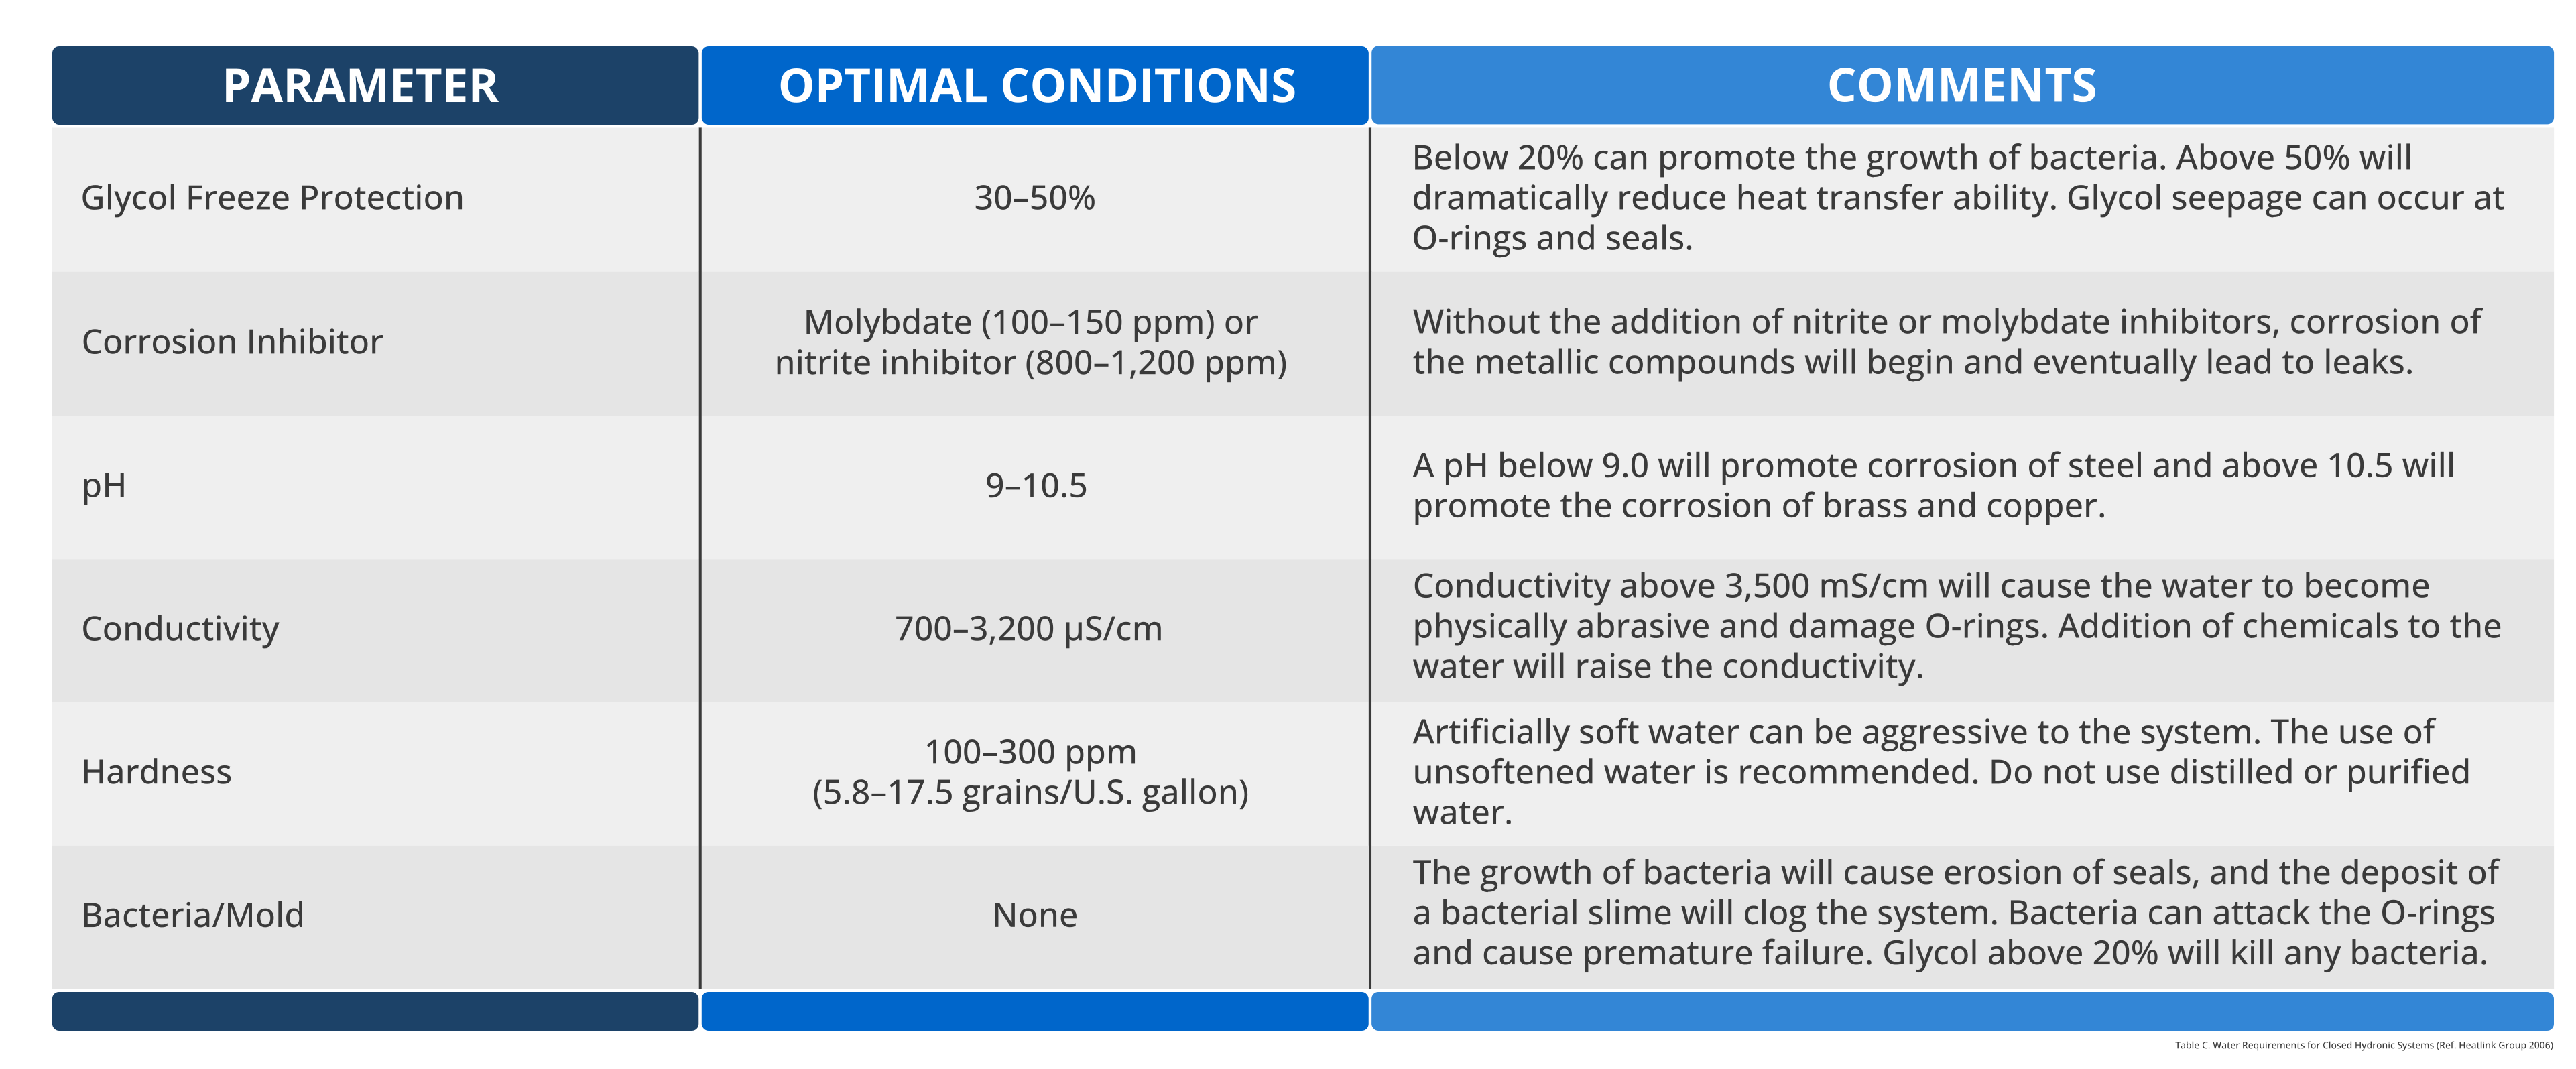
Table B. Typical Water Requirements for Open Systems (Decelles 2002)Table C. Water Requirements for Closed Hydronic Systems (Heatlink Group 2006)
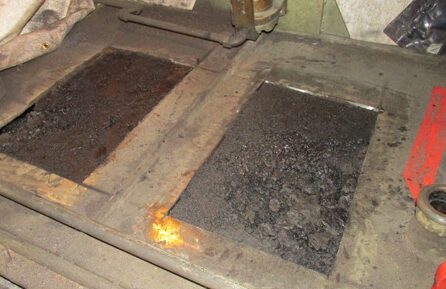
Water quality requirements are often defined differently for open systems (Table B) and closed (recirculated) systems (Table C). Open systems are typically more problematic as the issue of water quality varies. Water is often classified as “soft” or “hard” depending on its mineral content (i.e., the amount of calcium and magnesium dissolved in the water). Soft water has an ideal hardness of approximately 120 ppm (7 grains/gallon). Hard water often results in the formation of mineral deposits, which can lead to blockages in water systems (Figure 1).
Figure 1. Sludge buildup and flow blockage in the top cool of an integral quench furnace | Image Credit: The HERRING GROUP, Inc.
Furthermore, we must ensure that the water being discharged from our heat treatment operations is clean and meets EPA standards. Finally, we must be especially careful to avoid cross-contamination from other sources in the shop (e.g., polymers, quench oils, chemicals).
In Summary
Two little consonants, pH, are deceptively simple yet so profoundly important. They represent the thermodynamic state of solutions, but in reality, link microscopic interactions with real world issues. As heat treaters, our focus is to not take our water supply and water systems for granted since unexpected surprises, unwanted downtime, and expensive repairs can result. When is the last time you tested your water?
References
Herring, Daniel H. 2015a. Atmosphere Heat Treatment. Vol. 2. Southfield, MI: BNP Media.
Herring, Daniel H. 2015b. “The Importance of pH.” Industrial Heating, January.
Heatlink Group. 2006. Water Quality in Hydronic Systems. June 21, 2006. https://www.heatlink.com/sites/default/files/Info%20Sheet/L2329-Water-Quality-in-Hydronic-Systems-2006-06-21.pdf.
Decelles, P. 2002. The pH Scale. Johnson County Community College. Archived webpage. http://staff.jccc.net/pdecell/chemistry/phscale.html.
Rumble, John R., ed. 2024. CRC Handbook of Chemistry and Physics. 105th ed. Boca Raton, FL: CRC Press.
About the Author
Dan Herring “The Heat Treat Doctor” The HERRING GROUP, Inc.
Dan Herring has been in the industry for over 50 years and has gained vast experience in fields that include materials science, engineering, metallurgy, new product research, and many other areas. He is the author of six books and over 700 technical articles.
Para las operaciones de tratamiento térmico internas (in house), el objetivo principal es producir un producto confiable con un desempeño consistente en servicio. Sin embargo, la cadena de suministro y los procesos especializados pueden generar factores que comprometen la consistencia. En este artículo, Heat TreatTodaydestaca la importancia de contar con material base consistente para el tratamiento térmico por inducción interno de National Steel Rule, y cómo se puede implementar el proceso esencial de descarburización controlada en la planta proveedora de acero.
Este artículo informativo se publicó por primera vez enHeat Treat Today’sApril 2026 Annual Induction Heating & Melting print edition. Traducido por Ana Laura Hernández Sustaita.
La empresa National Steel Rule produce reglas de corte rotativas para la industria del cartón corrugado. Ubicada en Linden, Nueva Jersey, la empresa suministra productos a las industrias de troquelado a nivel mundial. La compañía ha establecido altos estándares de abastecimiento, investigación y pruebas de material para sus reglas de corte, además de contar con un completo laboratorio con equipos de troquelado rotativo y plano.
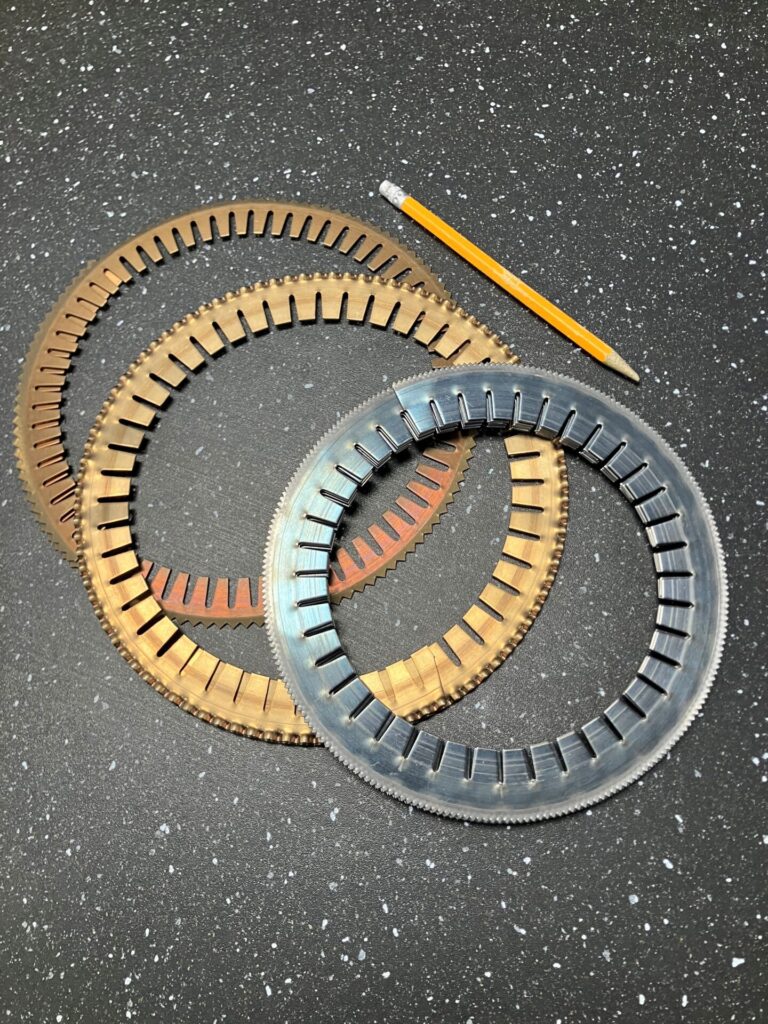
Su regla de acero se adquiere de una planta proveedora de acero que realiza una descarburización controlada en todo el material. Cuando National recibe el material, procesa el acero para generar los dientes, empleando endurecimiento por inducción como parte del proceso (ver la imagen principal al inicio de este artículo). La regla de corte terminada se vende posteriormente a fabricantes de troqueles de regla de acero, quienes montan estas cuchillas junto con una goma de expulsión sobre tableros de madera cortados con láser. El fabricante debe asegurarse de que las cuchillas de las reglas estén libres de defectos, ya que incluso grietas microscópicas se abrirán durante el troquelado.
Figura 1. Regla de acero doblada de diámetro pequeño | Crédito de la imagen: National Steel Rule
Las cuchillas rotativas y otros productos de National dependen de la compra de acero descarburizado. “La flexibilidad y la conformabilidad son fundamentales”, afirma Ed Mucci, presidente de la empresa, y Alexander Heucke, ingeniero en jefe. La regla de corte debe doblarse para formar una cuchilla circular; durante el servicio, la cuchilla rota para cortar el material corrugado. La geometría de la curvatura puede ser extrema, llegando a doblarse hasta un diámetro interior de 7 pulgadas. Por lo tanto, la compra de acero descarburizado es crítica para el negocio del fabricante. Actualmente, National obtiene el material a nivel internacional. Mucci explica: “Los fabricantes no utilizan grandes cantidades de acero descarburizado, lo que dificulta su abastecimiento, al menos a nivel nacional”.
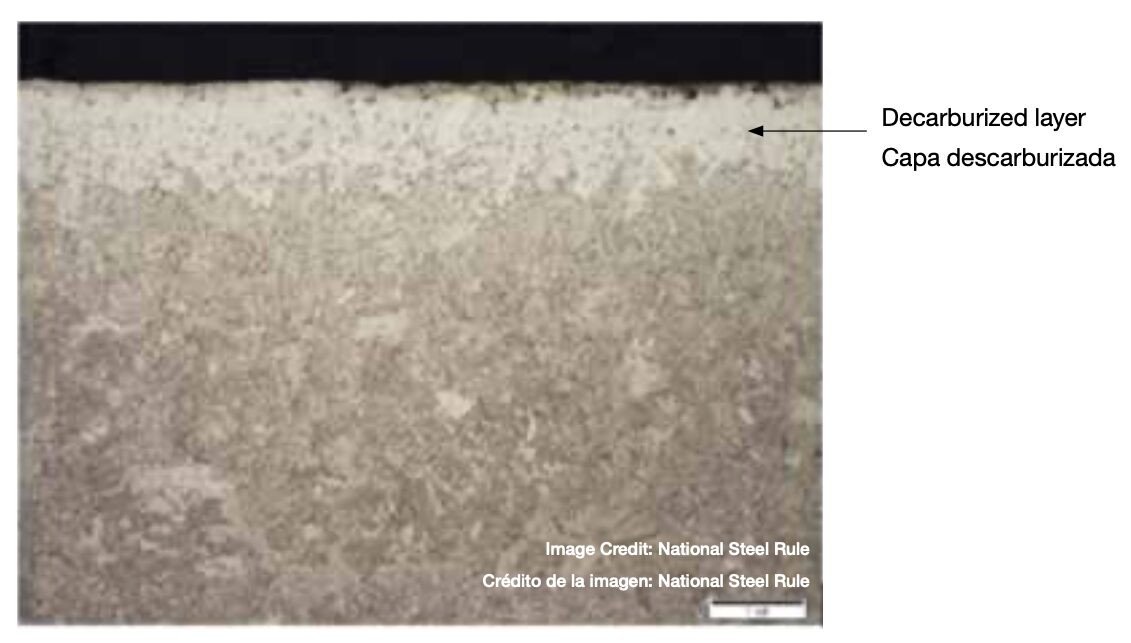
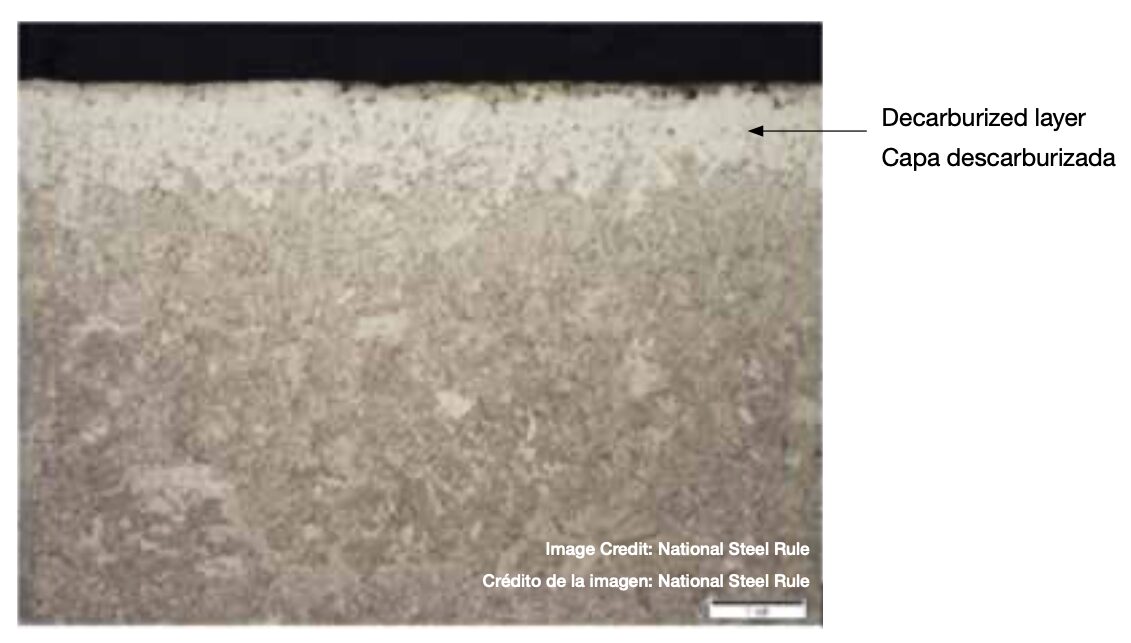
El material para las reglas rotativas suele ser acero al carbono C36 (SAE 1036) a C50 (SAE 1050) con un rango de dureza de 32–34 HRC. Mucci y Heucke señalan que el acero que utilizan presenta una capa de descarburización total de 0.0005” de profundidad, con una descarburización parcial adicional de al menos 0.0005”–0.00075”. Esto garantiza que cuando una regla se dobla, la superficie se elongue en lugar de agrietarse. Doblar la regla es, en sí mismo, una prueba para comprobar si se ha descarburado correctamente, y las pruebas metalúrgicas sirven como verificación de control de calidad para garantizar que los proveedores estén produciendo los niveles adecuados de descarburización.
Endurecimiento Preciso por Inducción de los Dientes
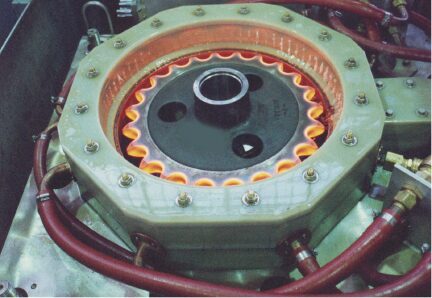
Si bien el doblado es esencial para formar la curvatura apropiada, los dientes deben ser resistentes al desgaste y la rotura. La regla de corte rotativa de National tiene una expectativa de desempeño de al menos 750,000 impresiones en papel, que es en sí mismo un material altamente abrasivo. Para lograrlo, las operaciones de tratamiento térmico internas endurecen por inducción el borde de la regla, garantizando una larga vida útil del troquel.
Existen dos métodos usados para endurecer los dientes. El método principal es maquinar el perfil de la tira de acero y posteriormente endurecer por inducción el borde. Posteriormente los dientes son rectificados. “Esto nos da un mejor control sobre la profundidad de endurecimiento”, comenta Mucci y Heuke. El segundo método consiste en endurecer por inducción después de rectificar los dientes. “Debemos asegurarnos de que el endurecimiento de los dientes no sea muy profundo, ya que esto puede afectar la capacidad de doblado”. El endurecimiento por inducción implica ciclos muy cortos, y por lo tanto requiere un control minucioso del proceso para garantizar resultados consistentes. Entre los métodos de control del proceso se utilizan crayones indicadores de temperatura, que se funden a una temperatura específica. También se realizan pruebas de dureza.
Figura 2. Detalle de la capa descarburizada | Crédito de la imagen: National Steel Rule
Revisitando la Descarburización
“Generalmente se intenta prevenir la descarburización o incluso agregar carbono a la superficie”, comenta Mark Hemsath, consultor ejecutivo en WINGENS CONSULTANTS y reconocido experto e innovador en la industria del tratamiento térmico. “La descarburización a menudo ocurre accidentalmente en sistemas de recocido mal diseñados, especialmente en hornos de tratamiento continuo.”
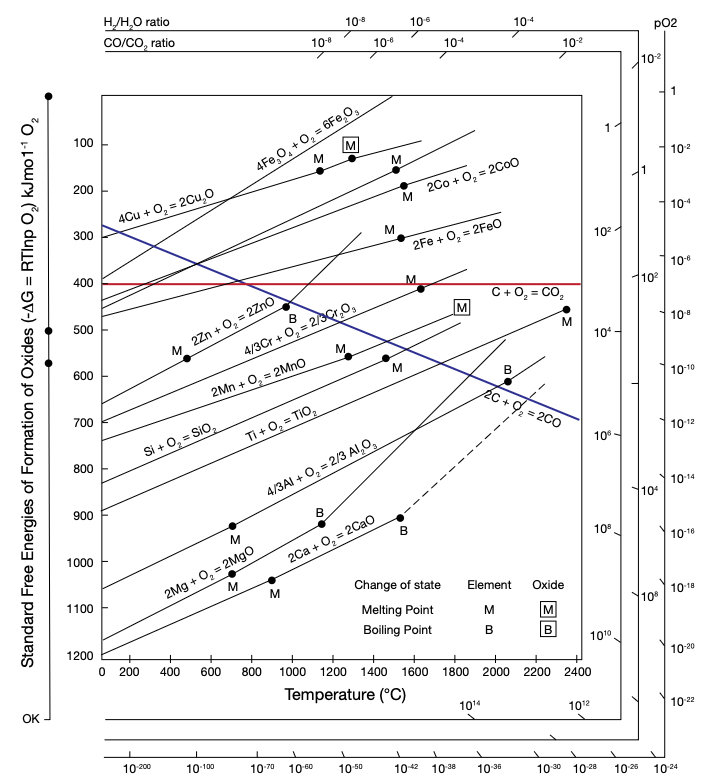
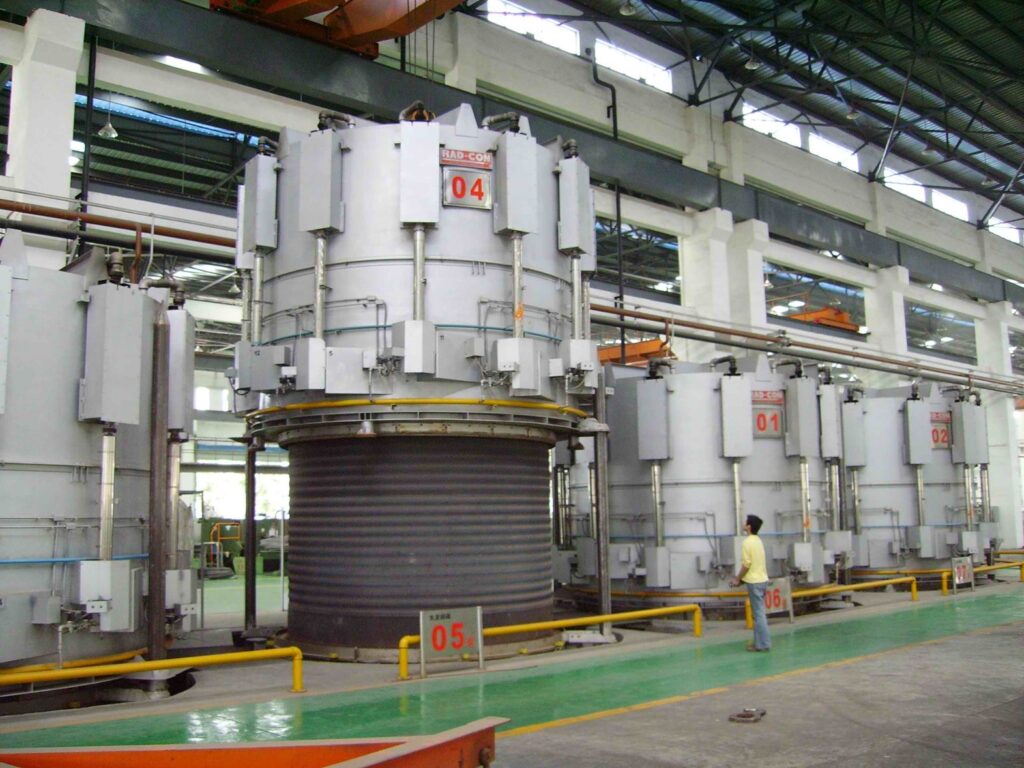
Figura 3. Diagrama de Ellingham que muestra la relación hidrógeno-vapor de agua, clave para una descarburización controlada exitosa. Figura 4. Horno típico de recocido tipo campana. | Crédito de la imagen: RAD-CON
El oxígeno en forma de aire o de vapor es la clave del proceso de descarburización. Menor porcentaje de carbono en la superficie indica un acero más blando y maleable, y si bien el arte de un proceso de descarburización controlada es bien conocido, puede resultar un desafío. El proceso de descarburización suele realizarse por debajo de 1500°F (815°C). “El método preferido es usar vapor de agua o vapor como fuente de oxígeno”, señala Hemsath. Esto se basa en la estabilidad de la relación hidrógeno-vapor de agua (H2/H2O) derivada del diagrama de Ellingham. Estas relaciones H2/H2O indican las propiedades no oxidantes de la mezcla gaseosa, lo que permite que actúe como agente reductor de carbono en la atmósfera del horno. La mayoría de las empresas fabricantes de hornos pueden proporcionar el equipo necesario y personalizar las dimensiones para hacerlos adecuados para este proceso especial. Estos hornos suelen ser de tipo campana o tipo foso con retorta.
Dos Métodos para Controlar la Descarburización
Existen dos formas de realizar intencionalmente un proceso de descarburización. La primera consiste en descarburar todo el producto. En este método, la descarburización se aplica de manera uniforme en toda la superficie de la lámina o bobina. “Este acero laminado en frío generalmente con menor contenido de carbono, se utiliza en electrodomésticos que requieren una buena adherencia del esmalte”, explica Hemsath. Empresas como U.S. Steel y AK Steel (ahora parte de Cleveland-Cliffs) han utilizado esta forma de descarburización controlada.
Otra forma es la descarburización selectiva en la superficie. Hemsath explica: “Si la descarburización solo se requiere en los bordes, se podrían mantener las bobinas enrolladas firmemente, por lo tanto, la descarburización afectaría principalmente a los bordes. Se produciría una pérdida de carbono que disminuiría hacia el centro de las superficies enrolladas”.
Conclusión
“El acero descarburizado tiene mucha demanda, ya que la mayoría de las industrias buscan endurecer y templar los aceros que utilizan”, indica Mucci. De hecho, la prevención de la descarburización del acero es más común y suele destacar en ferias industriales, presentaciones técnicas y publicaciones de procesamiento térmico. Sin embargo, existen productos que dependen de la descarburización intencional para funcionar correctamente.
La descarburización controlada en la planta proveedora de acero presenta desafíos, en parte porque lograr una descarburización exitosa y consistente no suele ser económicamente viable para el mercado norteamericano de tratamiento térmico. Estos desafíos abarcan problemas de acceso regional, acceso a nichos de mercado, necesidades de selección de equipos y ejecución de procesos técnicos.
La experiencia de National destaca los desafíos que enfrentan las plantas proveedoras de acero de América del Norte para proveer a las empresas de tratamiento térmico interno, acero descarburizado de forma fiable y bien controlada que mantenga su vida útil.
Agradecimientos: Heat TreatToday agradece a Dan Herring, The Heat Treat Doctor®, The HERRING GROUP, Inc.,quien fue fundamental en el desarrollo de este artículo.
For in-house heat treat operations, the number one goal is to produce a reliable product with consistent in-service performance. Yet supply chain and specialized processes can cause consistency stressors. In this article, Heat TreatToday underlines the importance of consistent feedstock for in-house induction heat treater, National Steel Rule, and how the essential mill process of controlled decarburization can be actualized.
This informative piece was first released in Heat Treat Today’sApril 2026 Annual Induction Heating & Melting print edition.
National Steel Rule manufactures rotary cutting rule for the corrugated box industry. Located in Linden, New Jersey, the company supplies products to the die making and die cutting industries globally. They have established a high standard of sourcing, researching, and testing material for their rule, in addition to a complete testing laboratory with both rotary and flat die cutting equipment.
Their steel rule is purchased from a mill that performs a controlled decarburization on the entire feedstock. When National receives the steel feedstock, they work the steel to create teeth, employing induction hardening as part of the process. The finished cutting rule is then sold to steel rule die makers who mount these blades and an ejection rubber on laser cut wooden boards. The manufacturer must ensure their rule blades are sound, as even microscopic cracks will open during the die cutting process.
Figure 1. Small diameter bent rule | Image Credit: National Steel Rule
National’s rotary blades and other products rely on purchasing decarburized steel. “Flexibility and formability are paramount,” states Ed Mucci, president of the company, and Alexander Heucke, chief engineer. Cutting rule must be bent to form a circular blade; in service, that blade rotates to cut into the corrugated material. The curve geometry can be extreme, often bending up to a 7-inch interior diameter. As such, the purchase of decarburized steel is critical for the manufacturer’s business. At present, National sources the material internationally. Mucci explains, “Manufacturers aren’t using large quantities of decarburized steel, making it challenging to source, at least domestically.”
Rotary rule feedstock typically involves C36 (SAE 1036) to C50 (SAE 1050) carbon steel with a hardness range of 32–34 HRC. Mucci and Heucke note that their steel of choice has a total decarburization layer to a depth of 0.0005” depth, with partial decarburization of at least another 0.0005–0.00075”. This ensures that when the rule is bent, the surface stretches versus cracks. Bending the rule is itself a test of whether it has been properly decarburized, with metallurgical testing serving as a quality control verification that suppliers are producing the appropriate decarburization levels.
Precise Induction Hardening Teeth
While bending is essential to forming the appropriate curve, the teeth must be resistant to wear and breakage. National’s rotary cutting rule has performance expectations of at least 750,000 impressions on paper, itself a highly abrasive material. To do this, their in-house heat treat operations induction harden the edge of the rule to ensure a long die life.
There are two methods used to harden the teeth. The primary method is to shave a profile into the strip steel and then induction harden this edge. Serrated teeth are then ground in. “This gives us better control of hardening depth,” according to Mucci and Heuke. The second method is to induction harden after the serrated teeth are ground in. “We have to make sure we don’t harden the teeth too deeply, or we can affect the bendability.”
Induction hardening involves short cycles, and as such requires careful process control to guarantee consistent results; temperature-indicating crayons that melt at a specific temperature are used as one of the process control methods. Hardness testing is performed as well.
Screenshot
Decarburization Revisited
“Usually, one tries to prevent decarburization or even add carbon,” states Mark Hemsath, executive consultant at WINGENS CONSULTANTS and longtime expert and innovator in the thermal processing industry. “Decarb often occurs by accident in poorly designed annealing systems, especially in continuous-type furnaces.”
Figure 3. Ellingham Diagram depicting that hydrogen-to-water vapor relationship, the key to a successful, controlled decarburization.Figure 4. Typical bell-annealing furnace | Image Credit: RAD-CON
Oxygen, in the form of air or water vapor, is key to the decarburizing process. Less carbon on the surface means a softer, more malleable steel, and while the art of a controlled decarburization process is well known, it can be challenging. Decarburization is a process usually performed below 1500°F. “The preferred method is to use water vapor or steam as a source of the oxygen,” notes Hemsath, pointing to the stability of hydrogen-to-water vapor (H₂/H₂O ratio) derived from the Ellingham diagram. These H₂/H₂O ratios indicate the non-oxidizing qualities of the gaseous mixture, which will allow it to be the carbon reducing agent in the atmosphere. Most furnace companies can provide the necessary equipment and customize size specifications to make it suitable for this special process, and these furnaces are typically retort-based bell or pit type.
Two Methods to Control the Decarb
There are two ways that a decarburization process can be intentionally completed. The first is decarburizing the entire product. In this method, even decarburization is applied to the entire coil sheet surface. “This cold rolled steel, typically with lower carbon, is used for appliances that need enamel adhesion,” Hemsath explained, noting U.S. Steel and AK Steel, now a part of Cleveland-Cliffs, have used this form of controlled decarburization.
Another form of decarburization is selective surface decarburization. Hemsath shared, “If selective decarburizing is required only on the edges, then you could keep the coils tightly wound and the decarburization would affect mainly the coil edges. There would be ingress of carbon loss, reducing towards the center of the wound coil surfaces.”
Conclusion
“Decarburized steel just isn’t in high demand,” according to Mucci, as “most industries are looking to harden and temper the steels they use.” In fact, preventative steel decarburization is more typical and often emphasized in trade shows, technical presentations, and in thermal processing publications. Yet there are products that rely on intentional decarburization to be successful.
Controlled decarburization at the mill brings challenges, in part because successful, consistent decarburization is not often cost effective for the North American thermal processing market. These challenges encompass regional access issues, niche market access, equipment selection needs, and technical process execution.
National’s experience underlines the challenges North American mills face in providing local, in-house heat treaters with reliably, well-controlled decarburized steel that will maintain service life.
Acknowledgements: Heat TreatTodayextends thanks to Dan Herring, The Heat Treat Doctor® at The HERRING GROUP, Inc., who was instrumental in the development of this article.
Aerospace firm Velontra is leveraging metal additive manufacturing (AM) technology to support hypersonic propulsion development. Their choice of laser powder bed fusion (L-PBF) for rapid prototyping is an AM method that requires post-processing technologies — hot isostatic pressing (HIP) being key to bring these types of AM parts to their full potential.
The original source was published in Metal AM, and the following content has been adapted for our Heat TreatToday audience.
Aerospace firm Velontra is using metal additive manufacturing (AM) technology to advance hypersonic engine development, signaling continued momentum in high-performance propulsion and downstream demand for post-processing capabilities.
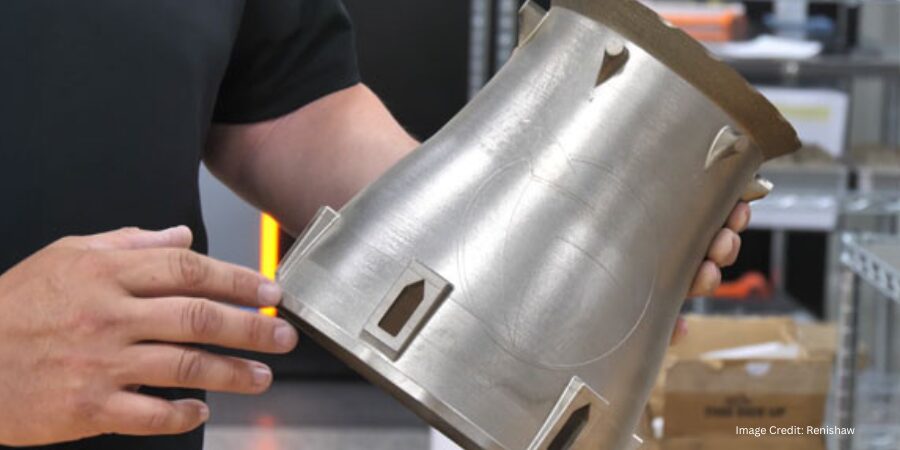
Velontra, a Cincinnati, Ohio-based startup, partnered with Innovative 3D Manufacturing, a rapid prototyping company in Franklin, Indiana, to produce propulsion system components using laser power bed fusion (L-PBF) technology from Renishaw. The approach enables rapid prototyping while addressing material use, dimensional tolerances, and cost constraints.
Joel Darin CTO Velontra
“Compact hypersonic propulsion systems are highly sought after by space companies, so, to remain competitive, we must develop parts quickly,” explained Joel Darin, CTO of Velontra. “In aerospace, we know that the best way to learn is by doing things, particularly if you want to be the first to launch a new technology.”
While the focus is on AM production, the resulting components require post-processing to achieve final material properties. Parts produced via L-PBF are typically subjected to stress relief and heat treatment to stabilize microstructures formed during rapid solidification. For high-temperature aerospace alloys, hot isostatic pressing (HIP) may also be applied to reduce internal porosity and improve structural integrity.
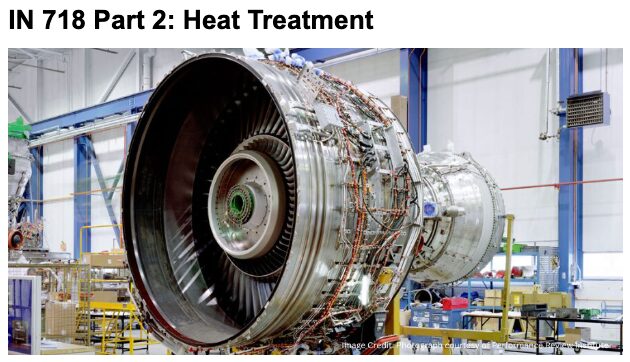
This requirement is consistent with broader industry findings for nickel-based superalloys used in propulsion systems. As noted in Dan Herring and Nikolai Alexander’s article published in Heat Treat Today’sAnnual Aerospace Heat Treating magazine (March 2026) covering IN 718 processing, powder bed fusion methods often rely on post-HIP to heal cracks and homogenize the microstructure.
To learn more about why HIP is critical for AM superalloys, read this overview of IN 718 heat treatment.Explore this look at emerging technologies to learn more about how HIP is scaling with AM.
As adoption of AM expands in aerospace applications, supporting technologies such as heat treating and HIP are expected to scale alongside it. Industry perspectives highlighted in Heat Treat Today’sMedical & Energy Heat Treat magazine (December 2025) indicate that HIP capabilities are evolving in response to increased demand from additive manufacturing and advanced materials development.
The integration of AM with post-processing underscores the role of heat treating in enabling next-generation propulsion systems, where component performance under extreme conditions remains a key requirement.
Press release is available in its original form here. Main image shows the additively manufactured afterburner casing for the hypersonic propulsion system with several components combined into one part. | Image Credit: Renishaw
Cuando una carga se atasca durante el temple, cada segundo cuenta y las decisiones improvisadas pueden aumentar el riesgo. En esta entrega de “Martes Técnico“, Bruno Scomazzon, gerente general de Precision Heat Treat Ltd., describe un procedimiento de respuesta de emergencia paso a paso para este escenario, uno de los más peligrosos en el tratamiento térmico con atmósfera. Basándose en la experiencia real, esta guía tiene como objetivo ayudar a las empresas a desarrollar sus propios procedimientos eficaces para mantener la seguridad, controlar las condiciones del horno y coordinarse con los servicios de emergencia en situaciones de alto riesgo.
Este artículo informativo se publicó por primera vez en Ingles enHeat Treat Today’sFebruary 2026 Annual Air & Atmosphere Heat Treating print edition.
Si tiene comentarios o preguntas sobre este artículo, háganoslo saber en: editor@heattreattoday.com.
Traducido por Víctor Zacarías. To read this article in English, click here.
Descripción del escenario
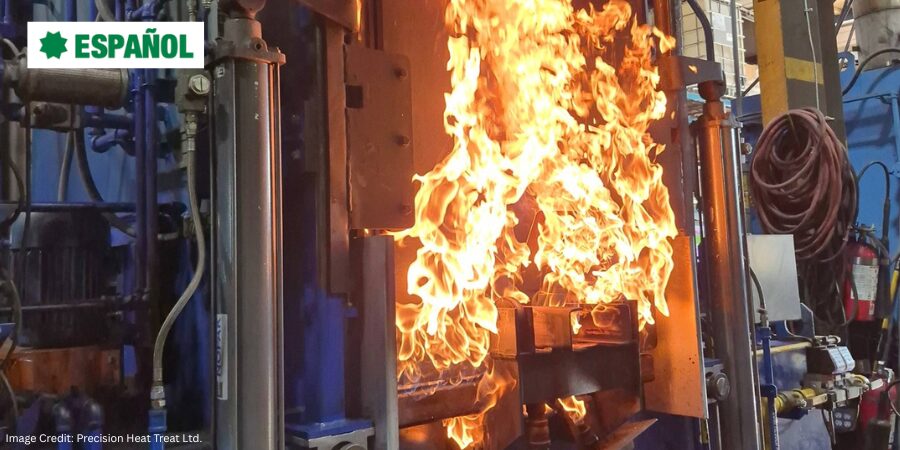
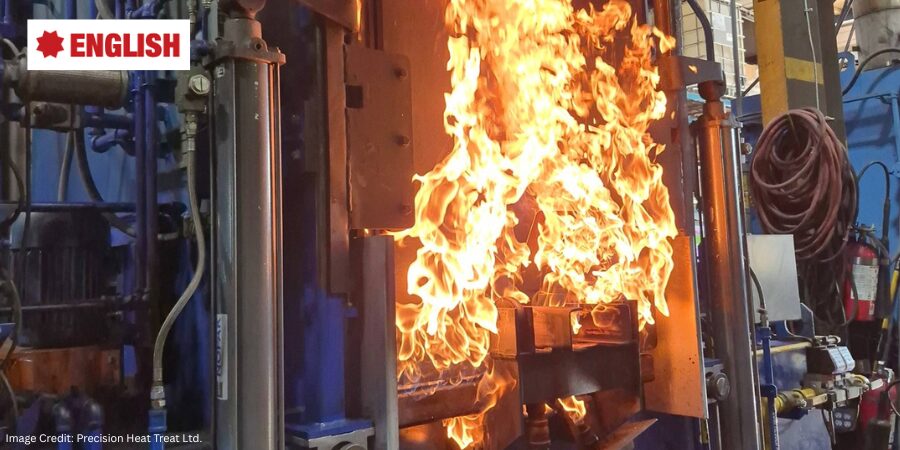
Se ha transferido una carga a la cámara de temple y el elevador está descendiendo al aceite, pero la carga se atasca y no se sumerge por completo. La puerta interior se cierra correctamente, y la puerta exterior (frontal) permanece cerrada.
Esta es una situación de altísimo riesgo que requiere el estricto cumplimiento de los procedimientos de emergencia. El objetivo es proteger: primero al personal (minimizar la posibilidad de lesiones o que la situación empeore), luego las instalaciones y, finalmente, el equipo.
1. Medidas inmediatas
NO abra la puerta exterior
Es posible que sienta la tentación de evaluar la situación, pero resista la tentación. NO se coloque frente a la puerta exterior ni justo al lado de ella, y nunca la abra mientras la carga esté “colgada”. Abrir esta puerta puede introducir oxígeno en una cámara caliente, lo que provocaría:
Explosiones o incendios repentinos (flash fire).
Pérdida de contención debido a deformación de la puerta o falla mecánica.
En casos extremos, la puerta exterior puede resultar dañada (arrancada, atascada o parcialmente abierta) y presentar llamas visibles. Esto requiere alertar inmediatamente a los bomberos.
Si la puerta exterior no se puede cerrar
En este caso, notifique inmediatamente a los bomberos e indíqueles que se preparen para una respuesta con espuma. NO permita el uso de agua. ¡Esto podría provocar reacciones violentas con el aceite o la atmósfera y propagar el fuego!
El personal de respuesta capacitado debe:
Colocarse el equipo de protección personal (EPP).
Preparar el equipo de extinción de incendios.
Estar listos para proteger los sistemas críticos hasta que lleguen los bomberos.
NO apague el horno.
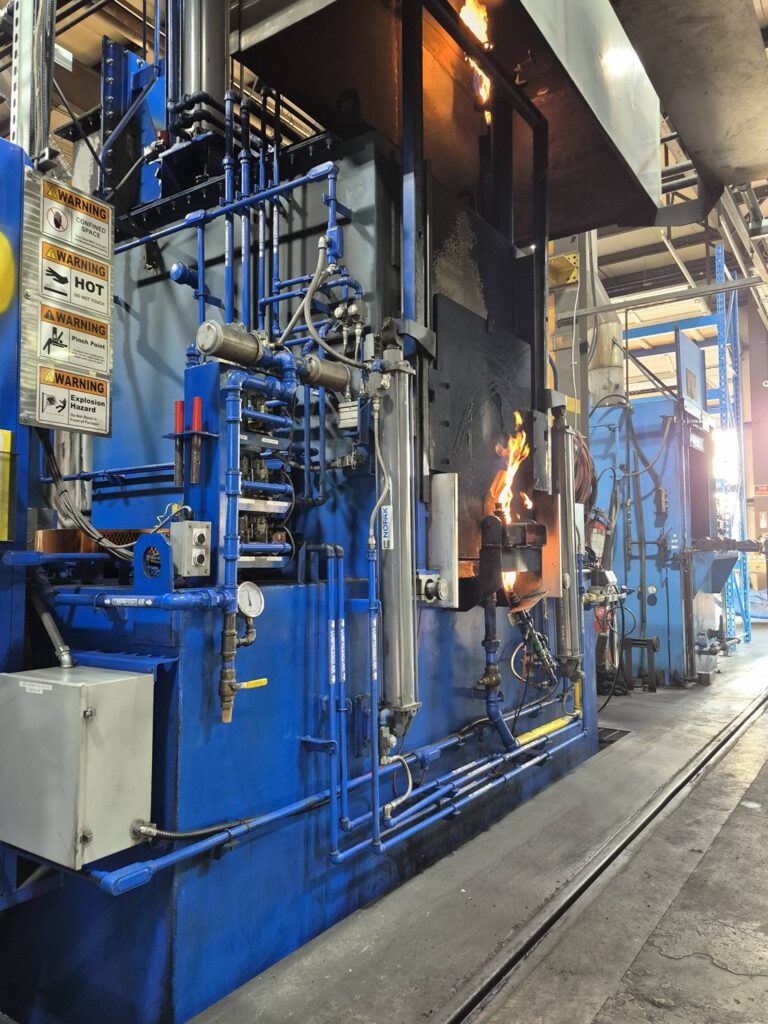
Figura 1. Horno de atmósfera durante su operación normal. | Image Credit: Precision Heat Treat Ltd.Figura 2. Puerta del vestíbulo parcialmente abierta durante una simulación controlada para | Image Credit: Precision Heat Treat Ltd.
2. Mantener el suministro eléctrico
Para garantizar que los sistemas esenciales permanezcan activos, debe mantener el suministro eléctrico. Asegúrese de que los siguientes sistemas permanezcan activos:
Cambie el modo del horno de automático a manual. Esto evitará cualquier secuenciación del PLC que active automáticamente las puertas, los elevadores y los manipuladores.
Mantenga las llamas piloto encendidas.
Mantenga el enfriamiento del aceite en funcionamiento para evitar el sobrecalentamiento del tanque.
Apague los calentadores de aceite para evitar una carga térmica adicional en el tanque de temple.
Mantenga la agitación del temple a baja velocidad durante todo el proceso para ayudar a disminuir la temperatura en la superficie de interfaz entre la carga y el aceite. Esto evita la estratificación y disipa el calor por radiación en el aceite.
Mantenga el recirculador en funcionamiento.
Mantenga la instrumentación en funcionamiento para el monitoreo.
NOTA: La pérdida de estos sistemas elimina la visibilidad, el control de la atmósfera y las opciones de respuesta seguras.
3. Gestión de la atmósfera
Mantenga una atmósfera protectora y una presión positiva en el horno para evitar la entrada de oxígeno y la combustión incontrolada:
Ajuste el control del potencial de carbono a “0”.
Cierre el suministro de gas de enriquecimiento.
Cierre el suministro de amoníaco.
Cierre el suministro de aire de dilución.
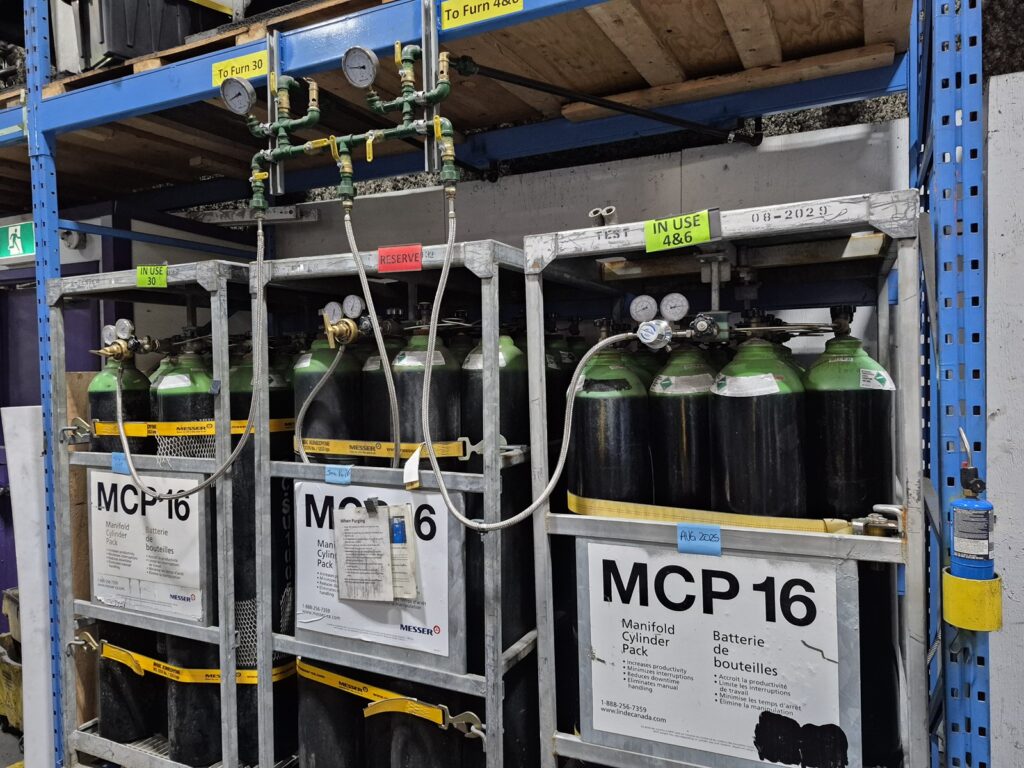
Purga de nitrógeno
Estos pasos dependen de si se dispone de una purga de nitrógeno; se recomienda encarecidamente que esté disponible para todas las unidades con temple integral o de paso directo. Asegúrese de comprender cuánto tiempo tarda su horno en purgar completamente el gas endotérmico. Si bien la norma NFPA 86 recomienda cinco ciclos de purga, algunos expertos aconsejan prever hasta diez por hora en caso de emergencia. Cada horno debe contar con datos de purga establecidos en condiciones normales para que los operadores puedan actuar con confianza cuando el tiempo es crucial.
Figura 3. Suministro de nitrógeno utilizado para purga de emergencia y control de la atmósfera. | Image Credit: Precision Heat Treat Ltd.
Inicie inmediatamente una purga de nitrógeno (si está disponible) y manténgala durante todo el evento.
Utilice al menos el flujo mínimo especificado en su documentación. Si es seguro, se puede utilizar un flujo mayor para ayudar a desplazar los gases inflamables de las cámaras de calentamiento y temple.
Mantenga la temperatura del horno a 815°C (1500°F) durante la purga.
Pueden quedar espacios residuales de gas Endo atrapados en zonas con poca ventilación. Si la temperatura de la cámara desciende por debajo del punto de ignición antes de que se haya desplazado todo el gas inflamable, la entrada de oxígeno podría provocar una explosión. En algunos casos, el Endo atrapado y los desequilibrios de presión pueden causar fugas repentinas, en las que se expulsa aceite o gas debido a la acumulación de presión interna.
Después de la purga
El objetivo de la purga con nitrógeno es desplazar el gas endotérmico con una atmósfera inerte, manteniendo una temperatura elevada para facilitar la combustión de los gases inflamables residuales y prevenir la formación de mezclas peligrosas. Este proceso debe garantizar una presión positiva en todo el horno.
Una purga seguida de enfriamiento por inmersión de nitrógeno es un método válido si la purga se ha completado de forma verificable.
Según el tamaño del horno y la velocidad de enfriamiento:
Los hornos más grandes pueden enfriarse lo suficientemente lento como para completar la purga.
Las unidades más pequeñas o de enfriamiento más rápido pueden requerir un breve mantenimiento de la temperatura antes del enfriamiento controlado o el enfriamiento por inmersión.
NOTA: Una vez que la carga suspendida se enfríe a una temperatura segura (aproximadamente 65°C), realice el apagado estándar del equipo.
Sin nitrógeno (en Endo)
Si no hay purga de nitrógeno, o esta es insuficiente, la única opción es dejar que la carga acumulada se enfríe en el vestíbulo mientras se continúa quemando Endo y se mantiene la temperatura del horno a 1500°F. Una vez que el vestíbulo/tanque de aceite se enfríe por debajo de 150°F y haya pasado el peligro, inicie el apagado estándar del horno.
4. Gestión de la seguridad
Alerte inmediatamente al cuerpo de bomberos local. Si la situación se vuelve incontrolable o si existe alguna duda sobre la capacidad de mantener el control, evacúe las instalaciones y espere a que lleguen profesionales capacitados. La seguridad del personal de la planta es primordial.
Notifique al departamento de seguridad de la planta y a la administración del sitio.
Evacúe a todo el personal no esencial del área de tratamiento térmico.
Informe a todos los departamentos que se está produciendo un incidente de alto riesgo.
Los bomberos son más eficaces cuando conocen sus instalaciones antes de que ocurra una emergencia. Asegúrese de que conozcan la distribución de sus operaciones, incluyendo:
Ubicación y tamaño de los tanques de aceite
Paneles eléctricos
Válvulas de cierre de gas
Zonas calientes
5. Periodo de enfriamiento controlado
Mantenga la protección con atmósfera durante todo el evento.
NO abra las puertas hasta que la temperatura del vestíbulo sea baja y estable.
El tiempo de enfriamiento dependerá de la masa de la carga y la retención de calor. Prevea cinco horas o más.
Utilice la estabilidad de la presión del horno, las observaciones de los efluentes y el comportamiento de los gases como indicadores indirectos de la temperatura.
6. Procedimiento de recuperación de la carga
Una vez enfriado y estabilizado, realice el apagado estándar, comenzando con la eliminación del gas endotérmico, si corresponde.
NO intente retirar la carga manualmente hasta que el sistema esté verificado como seguro.
Solo el personal de mantenimiento puede recuperar la carga, utilizando equipo de protección personal (EPP) y las herramientas adecuadas.
7. Familiarización con el cuerpo de bomberos
Toda instalación debe establecer una buena relación con el cuerpo de bomberos local antes de que ocurra una emergencia. Procure revisiones anuales e identifique lo siguiente:
Número de hornos
Volumen de los tanques de aceite de temple para extinción de incendios
Ubicación de las zonas calientes y los paneles de control
Puntos de parada de emergencia
Las puertas atascadas suelen deberse a fallos en las válvulas neumáticas. Cerrar el suministro de aire comprimido y purgarlo puede permitir que el mecanismo se reinicie. Consulte siempre el manual del equipo o al fabricante antes de intentar cualquier solución.
Considere que el inspector de bomberos que realice las revisiones no es necesariamente quien acudirá a combatir los incendios; capacite a quienes sí lo harán.
Protocolo posterior al incidente
Antes de volver a poner en funcionamiento el horno, asegúrese de:
Realizar una investigación formal.
Identificar y corregir la(s) causa(s) raíz.
Documentar todos los parámetros clave y las acciones tomadas.
Capacitar nuevamente a los operadores según sea necesario.
Señalización del horno
Es probable que un operador lea el plan de seguridad, pero podría olvidar un protocolo vital durante una emergencia. Contar con advertencias claras y llamativas, impresas y colocadas en el panel, que el operador pueda retirar y utilizar en caso de emergencia, puede ser de gran utilidad.
Reflexiones finales
No podemos predecir todas las consecuencias. Ningún procedimiento puede contemplar todas las variables posibles en una emergencia real. Una vez que un evento se pone en marcha, lo único que podemos hacer es responder con el mejor criterio, capacitación e intenciones, priorizando siempre la seguridad de las personas.
Este documento pretende ser una referencia práctica: una guía estructurada elaborada con esmero, experiencia real y buenas prácticas. No es una solución universal, sino una herramienta para ayudar a los equipos a crear o mejorar sus propios procedimientos eficaces y a responder de forma adaptativa en situaciones de alto riesgo.
La preparación contra incendios es esencial en toda planta de tratamiento térmico. Los incendios ocurren, y no siempre son pequeños. Es fundamental saber cuándo actuar, cuándo evacuar y cuándo pedir ayuda. Los manuales de equipos proporcionan una base, pero la preparación mediante capacitación y planificación es la mejor defensa.
Agradecimientos: El autor agradecer a Daniel H. Herring, “The Heat Treat Doctor,” a The HERRING GROUP, Inc., y a Avery Bell de Service Heat Treat en Milwaukee por sus valiosas contribuciones.
Acerca del autor:
Bruno Scomazzon Gerente General Precision Heat Treat Ltd.
Bruno Scomazzon es el gerente general de Precision Heat Treat Ltd. en Surrey, Columbia Británica, Canadá, y cuenta con más de 40 años de experiencia en procesos metalúrgicos y operaciones de tratamiento térmico.
Ask The Heat Treat Doctor® has returned to bring sage advice to Heat Treat Today readers and to answer your questions about heat treating, brazing, sintering, and other types of thermal treatments as well as questions on metallurgy, equipment, and process-related issues. In this installment, Dan Herring discusses practical strategies for managing distortion through oil quenching, focusing on how subtle adjustments — such as delaying agitation to extend the vapor blanket phase — can influence heat transfer behavior and improve dimensional stability in challenging geometries like thin-walled, large-diameter gears.
This informative piece was first released in Heat Treat Today’sApril 2026 Annual Induction Heating & Melting print edition.
The Question
A reader’s question caught the Doctor’s eye and will provide some valuable information we all can benefit from. Let’s learn more:
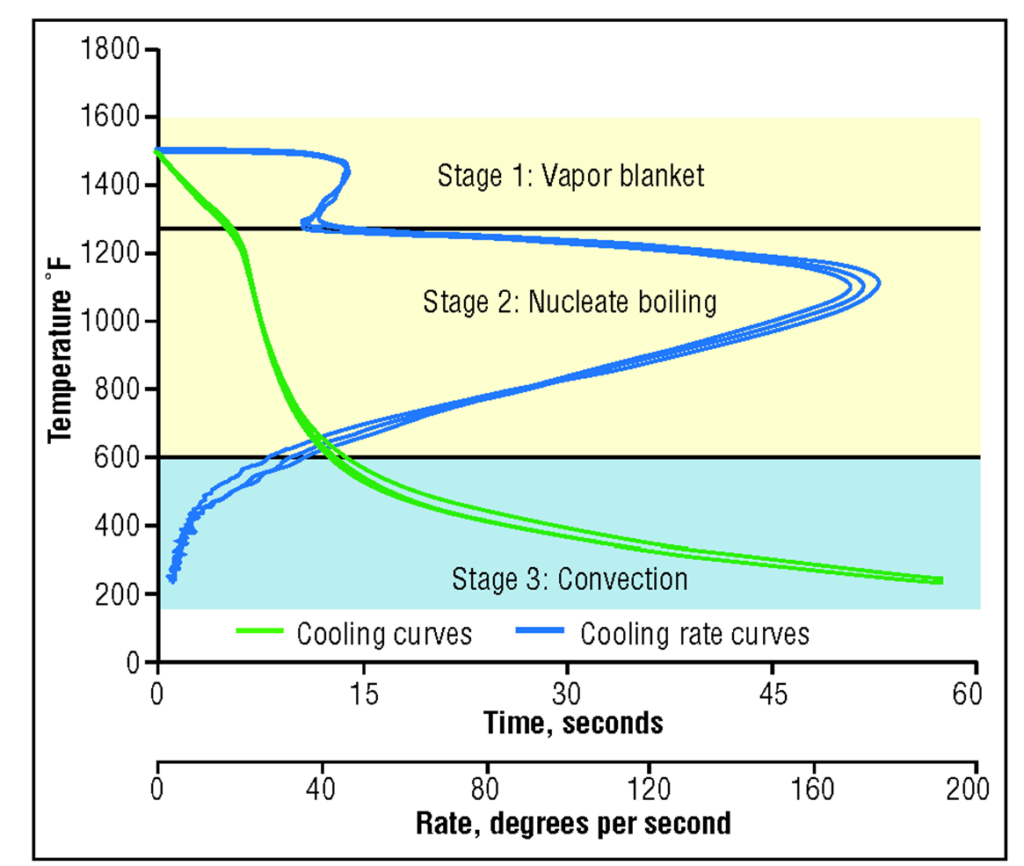
“I have a question about a technique we used sometimes in my factory for distortion reduction. As you know, in the oil quench cooling there are 3 steps: 1. Vapor Blanket Phase (≈ 840–700°C) 2. Boiling Phase (≈ 700–400°C) 3. Convection (≈ 400–40°C) In addition to [running] a martempering oil (Houghton M240) and a high oil temperature of 80–100°C, a technique we used successfully to reduce the distortion in thin wall large (> 1m) gears was to wait 1 minute without agitation just after placing the parts in the oil tank. Once the minute has passed, we start with the agitator speed at 1,700 rpm. The technical reason for this improvement is to extend the vapor blanket step and hence reduce the distortion created by the boiling step. My questions are: What effect does the vapor blanket step have on thermal uniformity, and is it possible to get a similar result in the agitator speed, for instance, start with a low rotating speed and finishing with a high speed?”
The Three Phases of Quenching
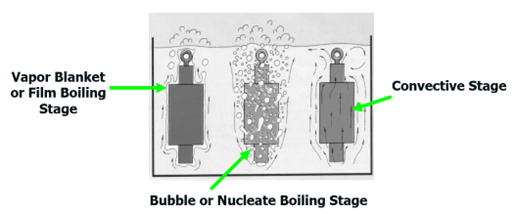
As a brief reminder, let’s revisit the three distinct stages of cooling (Figure 1). The first stage, the “vapor blanket” (or “film boiling”) stage, is characterized by the Leidenfrost phenomenon, which is the formation of an unbroken vapor blanket that surrounds and insulates the work piece. It forms when the supply of heat from the surface of the part exceeds the amount of heat that can be carried away by the cooling medium.
The stability of the vapor layer, and thus the ability of the oil to harden steel, is dependent on: the metal’s surface irregularities; oxides present; surface-wetting additives, which accelerate the breakdown and destabilize the vapor blanket; and the quench oil’s molecular composition, including the presence of more volatile oil degradation by-products (Herring 2015). In this stage, the cooling rate is relatively slow in that the vapor envelope acts as an insulator, and cooling is a function of conduction through the vapor envelope.
The second stage, the “vapor transport” (or “nucleate boiling” or “bubble boiling”) stage, is where the highest heat transfer rates are produced — and where the greatest amount of distortion occurs. The point at which this transition occurs and the rate of heat transfer in this region depend on the oil’s overall composition (base oil, speed accelerators, and antioxidant package). It begins when the surface temperature of the part has cooled enough so that the vapor envelope formed in the first stage collapses. Violent boiling of the quenching liquid results, and heat is removed from the metal at a very rapid rate, largely due to heat of vaporization. The boiling point of the quenchant determines the conclusion of this stage. Size and shape of the vapor (bubbles) are important in controlling the duration of this stage.
Figure 1. The three stages of liquid quenching | Image Credit: The Heat Treat Doctor®
The third stage of cooling is called the “convection” (or “liquid”) cooling stage. The cooling rate during this stage is slower than that developed in the second stage and is exponentially dependent on the oil’s viscosity, which will vary with the degree of oil decomposition. Heat transfer rates increase with lower viscosities and decrease with increasing viscosity. This final stage begins when the temperature of the metal surface is reduced to the boiling point (or boiling range) of the quenching liquid.
The Answer
A sage veteran once reminded the Doctor that we cannot control distortion, only manage it.
As we know, if we were able to control the heat transfer during the nucleate boiling phase, the result would be less gear distortion, especially when the geometry (in this case thin wall, large diameter gears) makes it even more challenging.
What many people do not realize is that in addition to the correct choice of oil, oil temperature, the proper size and design of the quench system (which is fixed for all part or load configurations), and the uniform removal of the vapor blanket in the first stage of quenching influences the development and type of heat transfer that will occur in the nucleate boiling phase — yes, it is uncontrolled, but it can be influenced.
A delay in the start of agitation ensures the vapor blanket phase is extended and (in a sense) more uniformly conforms to the part geometry than it would otherwise. The result is that it is easier to be uniformly swept away once the agitation begins. Interestingly, the vapor blanket begins to form within the first few seconds of quenching and begins to collapse (often in a nonuniform way) as the surface temperature drops. Agitation delay times ranging from 1 to 2 minutes have been used in industry, which are primarily a function of material, (gear) geometry, and tooth profile/thickness.
As to the other question, some manufacturers recommend quenching into slowly agitated oil (100–125 rpm) — the slower agitation only intended to push any moisture molecules around, then increasing the speed to normal agitation rates once the load is fully submerged. Appropriate safety precautions must be followed with either method. A great deal of success has been reported using this method for many of the same reasons as above.
On another note, there is some merit in vacuum oil quenching to vary the pressure over the oil. Interestingly, the characteristics (i.e., size and distribution) of the “bubbles” formed in the nucleate boiling phase changes and the end result is that they can be more easily and more uniformly swept away.
In Summary
A word or two is in order about measuring and maintaining the quench oil. Measuring the efficiency (i.e., speed) of an oil can be done in one of two ways. The first method is by measuring the oil’s cooling ability (i.e., hardening power). Since cooling ability is independent of steel selection (composition and grain size) this method is popular since it provides information about the oil itself independent of its end use application (Figure 2).
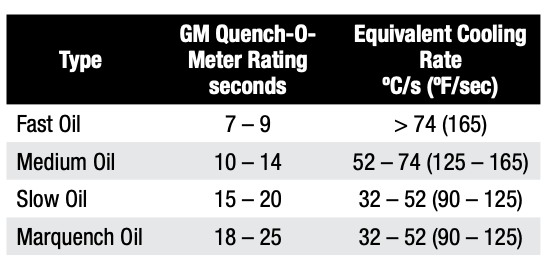
Figure 2. Typical cooling curves and cooling-rate curves for new oils | Image Credit: The Heat Treat Doctor®Table A. Classification of Quench Oils
The older GM Quench-O-Meter method (Table A) can be used as well.
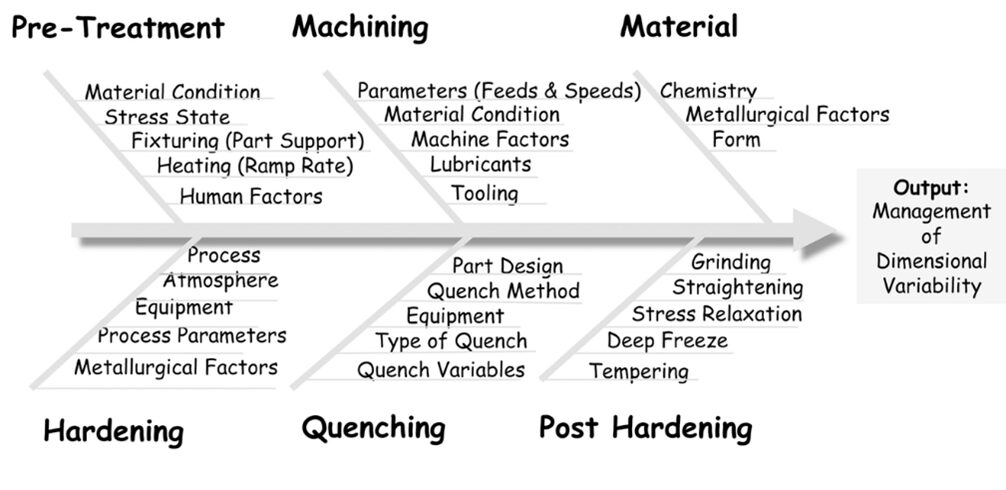
Variables Affecting Dimensional Change
A number of factors influence post-heat treat distortion, including those related to material, manufacturing, and heat treating (Figure 3).
When selecting an oil quench process, some of the many factors to consider include:
Material — form, chemistry, hardenability, grain size, homogeneity, cleanliness, microstructure
Heat treatments performed at the mill
Starting microstructure — mill or third-party heat treating prior to manufacturing
Manufacturing process — sequence of operations, tooling, speeds & feeds
Part orientation during manufacturing, as opposed to grain orientation
Grids, baskets, and fixtures — both material & design
Load configuration — part spacing, orientation, arrangement (load density)
Load weight (gross or net)
Maximum quench fixture size, weight, shape
Part geometry and mass — maximum/minimum part section thickness, consideration for whether the component part is uniform in thickness or has thin and thick sections next to one another
Residual stress state before heat treatment
Targeted hardness range (initial or final)
Type of process being run (e.g., hardening, case hardening)
Free quenching or restricted (press or roll) quenching
Oil type — quenching characteristics, cooling curve data
Oil speed, condition, viscosity (fast, 7–9 second oil; medium, 10–14 second oil; slow, 15–18 second oil; or marquench, >20 second oil)
Oil temperature (initial, instantaneous rate of rise, recovery time to initial temperature)
(Effective) quench tank volume
Height of oil above the load
Agitation — agitators or pumps
Quench tank design factors
Agitation method and number of agitators or pumps
Type of quench tank baffling
Location/size of agitators or pumps
Type of agitators (e.g., fixed, two speed, variable)
Propeller size (e.g., diameter, clearance in draft tube)
Internal tank baffling (e.g., draft tubes, directional flow vanes)
Flow direction
Flow restrictions (quench elevator and baffling design)
Volume of oil
Maximum (design) temperature rise
Heat exchanger-type, size, heat removal rate (instantaneous and total demand)
Quench elevator design (e.g., hearth type, sidewalls, flow restrictions)
Flow velocity (with and without a load present)
Number of furnaces to be served by the quench system
Duty cycle (i.e., the frequency of quenching or time between quenches)
Post heat treatment operations, if applicable
Furnace temperature uniformity
Furnace repeatability
Type of furnace atmosphere
Post processing (e.g., washing, deep freeze or cryogenic treatment, number of tempers)
Time delay between heat treat operations (especially important for high hardenability materials to avoid cracking)
References
Herring, Daniel H. 2015. Atmosphere Heat Treatment. Volume 2, BNP Media II.
About the Author
Dan Herring “The Heat Treat Doctor” The HERRING GROUP, Inc.
Dan Herring has been in the industry for over 50 years and has gained vast experience in fields that include materials science, engineering, metallurgy, new product research, and many other areas. He is the author of six books and over 700 technical articles.
Ask The Heat Treat Doctor® has returned to bring sage advice to Heat Treat Today readers and to answer your questions about heat treating, brazing, sintering, and other types of thermal treatments as well as questions on metallurgy, equipment, and process-related issues. In this installment, Dan Herring continues his discussion on gear heat treatment, exploring vacuum and induction hardening methods for gears — from low-pressure carburizing for advanced materials to single shot and tooth-by-tooth induction techniques — and how each can be matched to the specific demands of any gear application.
This informative piece was first released in Heat Treat Today’sMarch 2026 Annual Aerospace Heat Treating print edition.
In Part One of this discussion (Air & Atmospheres Heat Treating, February 2026), we discussed various gear types, materials, and how they can be atmosphere heat treated. This month, we are focusing on vacuum and induction heat treating methods. Let’s learn more.
Vacuum Heat Treatment Processing Methods
Table A. Advanced Materials Processed by LPC
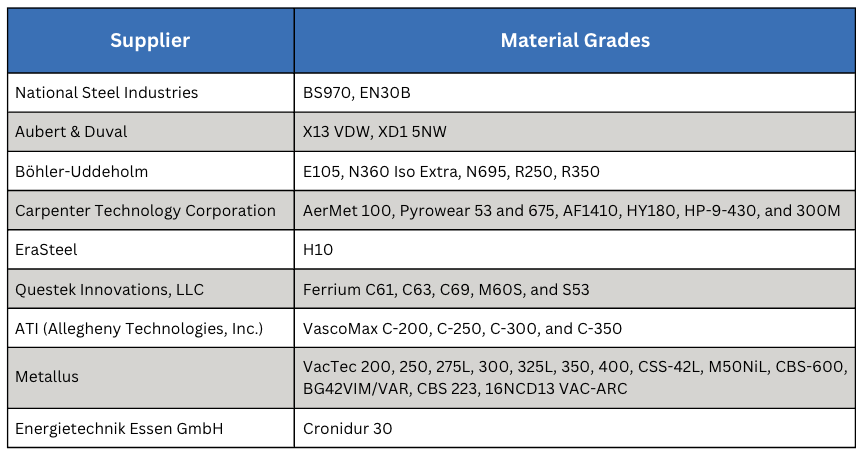
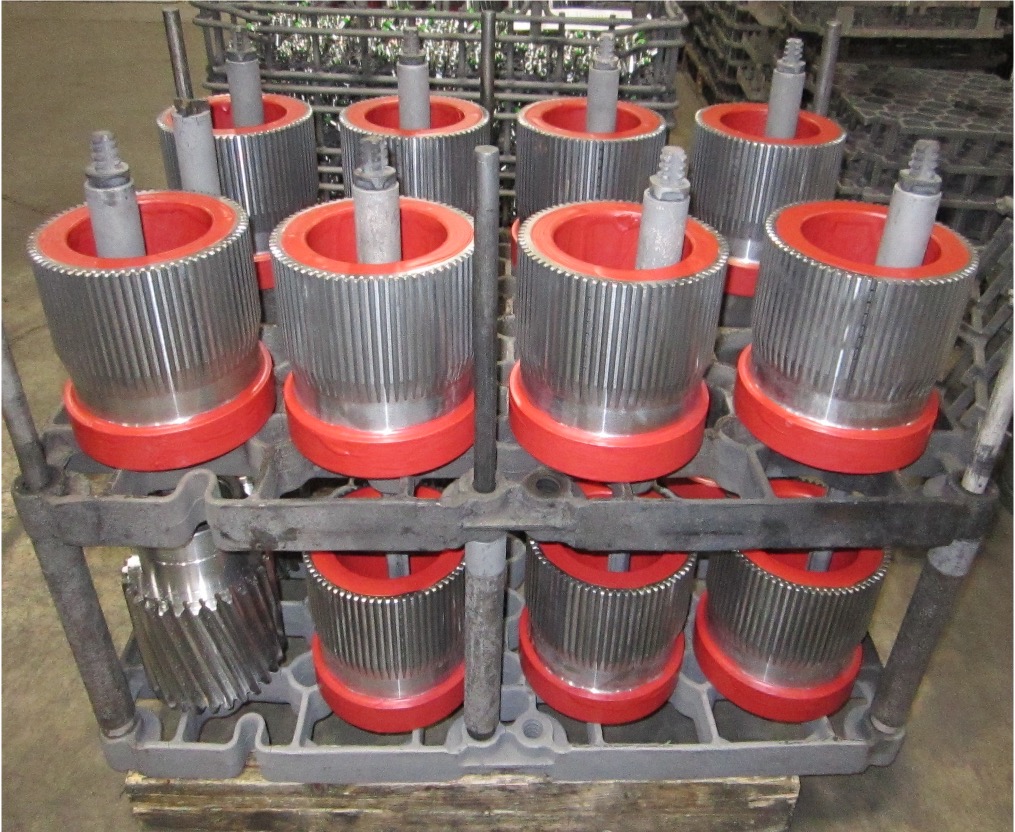
Vacuum processing can be used for most of the atmosphere treatments mentioned in Part One including carburizing (Figure 1). Low pressure carburizing (LPC) is a proven technology and the choice for many advanced applications in aerospace, automotive, off-highway, and motorsports markets, as well as the development of carburizing cycles for high-performance materials (Table A).
Figure 1. Typical commercial heat treat load of gears for vacuum carburizing (Otto and Herring 2007) | Image Credit: Photo courtesy of Midwest Thermal-VacFigure 2. Pyrowear 675 – LPC – anneal – double normalize – harden – anneal – deep freeze – double temper | Image Credit: The HERRING GROUP, Inc.
The range of effective case depths for most of these grades can range up to 2.0–3.0 mm (0.080–0.120 inches) without significant sacrifice of microstructure (Figure 2). Furnace variables, such as temperature uniformity (± 3°C or ± 5°F), control of cycle parameters (boost/diffuse times, gas flow rate, pressure, hydrocarbon type) and surface carbon optimize the microstructure, producing case uniformities of ± 0.05 mm (± 0.002 inches). Where permitted, the range of carburizing temperatures now includes the use of high temperature (> 980°C, or 1800°F) techniques.
All these advanced materials required extensive development testing to produce custom designed recipes to optimize cycle parameters. Also, quenching methods (Otto and Herring 2002) have improved, allowing us to achieve desired core properties with quenching parameter selection (high-pressure gas or oil) for distortion-sensitive and distortion-prone part geometries (Otto and Herring 2005, 2008).
Induction Hardening Methods
Various methods of hardening via applied energy are used in manufacturing gears, including flame hardening, laser surface hardening, and induction hardening.
Of the various types of applied energy processing, induction hardening is the most common. Induction heating is a process that uses alternating electrical current that induces a magnetic field, causing the surface of the gear teeth to heat. The area is then quenched resulting in an increase in hardness within the heated area. This process is typically accomplished in a relatively short time. The final desired gear performance characteristics are determined not only by the hardness profile and stresses but also by the steel composition and prior microstructure. External spur and helical gears, bevel and worm gears, racks, and sprockets are commonly induction hardened. Typical gear steels include AISI/SAE grades 1050, 1060, 1144, 4140, 4150, 4350, 5150, and 8650.
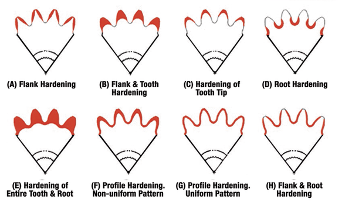
Figure 3. Patterns produced by induction hardening (Rudnev 2000)
The hardness pattern produced by induction heating (Figure 3) is a function of the type and shape of inductor used, as well as the heating method. Quenching or rapidly cooling the workpiece can be accomplished by spray or submerged quench. The media typically used for the quench is a water-based polymer. The severity of this quenchant can be controlled by the polymer’s concentration. Cooling rates are usually somewhere in between what would be obtained from pure water and oil. In some unusual situations compressed air or nitrogen is used to quench the part.
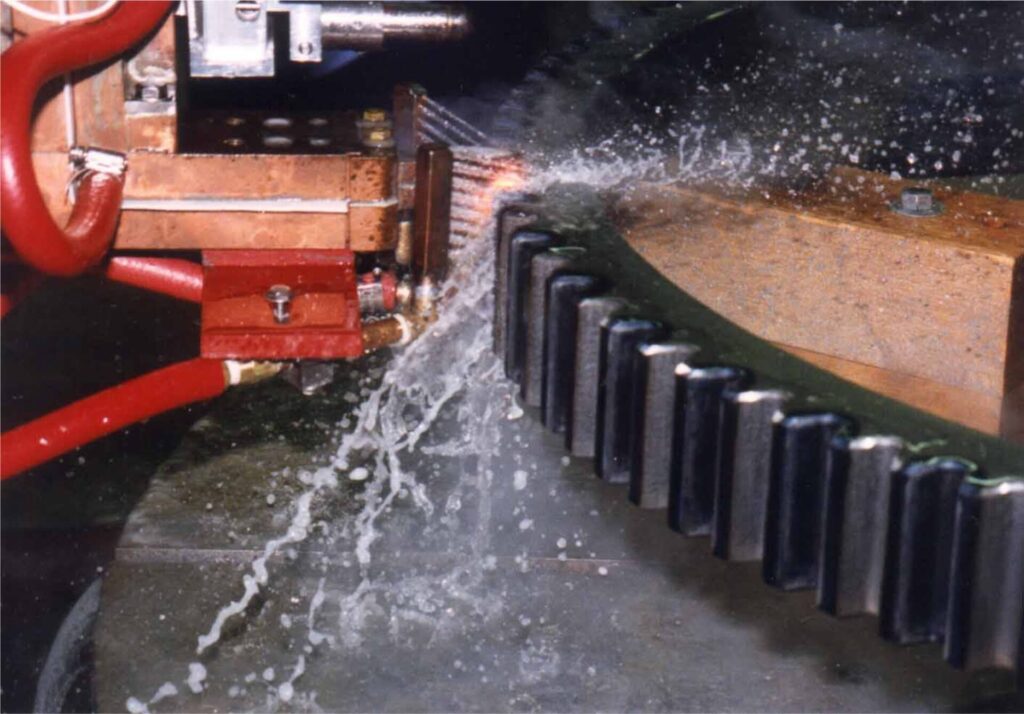
The most common methods for hardening gears and sprockets are by single shot (Figure 4) or the tooth-by-tooth method (Figure 5). Single shot often requires large kW power supplies but results in short heat/quench times and higher production rates. This technique uses a circumferential copper inductor, which will harden the teeth from the tips downward.
Figure 4. Typical single shot induction hardening operation | Image Credit: Photo courtesy of Ajax-Tocco-MagnethermicFigure 5. Tooth-by-tooth induction hardening of a helical gear | Image Credit: Photo courtesy of Ajax-Tocco-Magnethermic
The larger and heavier loaded gears (where pitting, spalling, tooth fatigue, and endurance are issues) need a hardness pattern that is more profiled like those produced by carburizing, which can be obtained by tooth-by-tooth hardening. This method is limited to gear tooth sizes with modulus 4.23–5.08 (6 or 5 DP) using frequencies from 2 to 10 kHz and about 2.54 (10 DP) using a range of 25 to 50 kHz.
The lower the frequency, the deeper the case depth. Tooth-by-tooth hardening is a slow process and usually reserved for gears and sprockets that are too large to single shot due to power constraints. The process involves heating the root area and side flanks simultaneously, while cooling each side of the adjacent tooth to prevent temper-back on the backside of each tooth. The induction system moves the coil at a pre-programmed rate along the length of the gear. The coil progressively heats the entire length of the gear segment while a quench follower immediately cools the previously heated area. The distance from the coil to the tooth is known as coupling or air gap. Any changes in this distance can yield variation in case depth, hardness, and tooth distortion. The gear is indexed after each tooth has been hardened, often skipping a tooth. This requires at least two full revolutions in the process to complete the hardening of all teeth. Straight, spur, and helical gears up to 5.5 m (210 inches) weighing 6,800 kg (15,000 lb) have been processed with this method. The entire process yields a repeatable soft tip of the tooth with hard root and flank. In other applications, the tip and both flanks can be hardened simultaneously and yield a soft root.
In Summary
Today’s design engineer has the good fortune of being able to choose from a number of heat treatment technologies for any given type of gear material and design. When selecting a gear hardening method, it is essential to specify not only the desired mechanical and metallurgical properties, but the critical dimensions that must be held and even the desired stress state of the gears themselves. The secret to success is understanding the advantages and limitations of each technology and taking these into consideration when determining the overall cost of gear manufacturing.
References
Herring, Daniel H. 2004a. “Gear Heat Treatment: The Influence of Materials and Geometry.” Gear Technology, March/April.
Herring, Daniel H. 2004b. “Reducing Distortion in Heat-Treated Gears.” Gear Solutions, June.
Herring, Daniel H. 2007a. “Oil Quenching Technologies for Gears.” With Steven D. Balme. Gear Solutions, July.
Herring, Daniel H. 2007b. “Heat Treating Heavy Duty Gears.” With Gerald D. Lindell. Gear Solutions, October.
Herring, Daniel H. 2012–2016. Vacuum Heat Treatment. Vols. 1–2. BNP Media Group.
Herring, Daniel H. 2014–2015. Atmosphere Heat Treatment. Vols. 1–2. BNP Media Group.
Herring, Daniel H., Gerald D. Lindell, D. J. Breuer, and B. Matlock. 2001. “Atmosphere vs. Vacuum Carburizing.” Heat Treating Progress, November.
Herring, Daniel H., Gerald D. Lindell, D. J. Breuer, and B. Matlock. 2002. “An Evaluation of Atmosphere and Vacuum Carburizing Methods for the Heat Treatment of Gears.” In Off-Highway Conference Proceedings. SAE International.
Otto, Frederick J., and Daniel H. Herring. 2002a. “Gear Heat Treatment: Today and Tomorrow, Part 1.” Heat Treating Progress, June.
Otto, Frederick J., and Daniel H. Herring. 2002b. “Gear Heat Treatment: Today and Tomorrow, Part 2.” Heat Treating Progress, July/August.
Otto, Frederick J., and Daniel H. Herring. 2005. “Vacuum Carburizing of Aerospace and Automotive Materials.” Heat Treating Progress, January/February.
Otto, Frederick J., and Daniel H. Herring. 2007. “Advancements in Precision Carburizing of Aerospace and Motorsports Materials.” Heat Treating Progress, May/June.
Otto, Frederick J., and Daniel H. Herring. 2008. “Improvements in Dimensional Control of Heat Treated Gears.” Gear Solutions, June.
Rudnev, V. 2000. “Gear Heat Treating by Induction.” Gear Technology, March/April.
About the Author
Dan Herring “The Heat Treat Doctor” The HERRING GROUP, Inc.
Dan Herring has been in the industry for over 50 years and has gained vast experience in fields that include materials science, engineering, metallurgy, new product research, and many other areas. He is the author of six books and over 700 technical articles.
Today’s Technical Tuesday highlights the second installment in a multi-part series by Nikolai Alexander and The Heat Treat Doctor® Daniel H. Herring, diving into the controlled heat treatment strategies required to unlock IN 718’s exceptional high-temperature strength, toughness, and corrosion resistance. From solution annealing and duplex aging to hot isostatic pressing and additive manufacturing considerations, the authors explore how precise process control and equipment selection directly shape microstructure and performance in critical applications.
This informative piece is from Heat Treat Today’sMarch 2026 Annual Aerospace Heat Treating print edition. For part 1 on the history, production, and general applications, read Heat Treat Today’sFebruary 2026 Annual Air & Atmosphere Heat Treating print edition.
Introduction
IN 718 was developed for and is extensively used in the aerospace industry. Today, the superalloy and its modifications are heavily relied upon, including IN 718Plus® (US Patent No. 6.730.264 B2), which is designed for operating service temperature to 705°C (1300°F), approximately 55°C (100°F) above that of IN 718. (IN 718Plus will be the subject of a future article by the authors). This article reviews the heat treatment of IN 718 and the need to control both equipment and process variability. Also discussed is the method of additive manufacturing (AM) to produce component parts and the heat treat challenges it poses, including the need to HIP (hot isostatically press) the material to achieve maximum property benefits.
Heat Treatment of IN 718
Figure 1. Typical vacuum furnace used for heat treating IN 718 | Image Credit: Solar Manufacturing
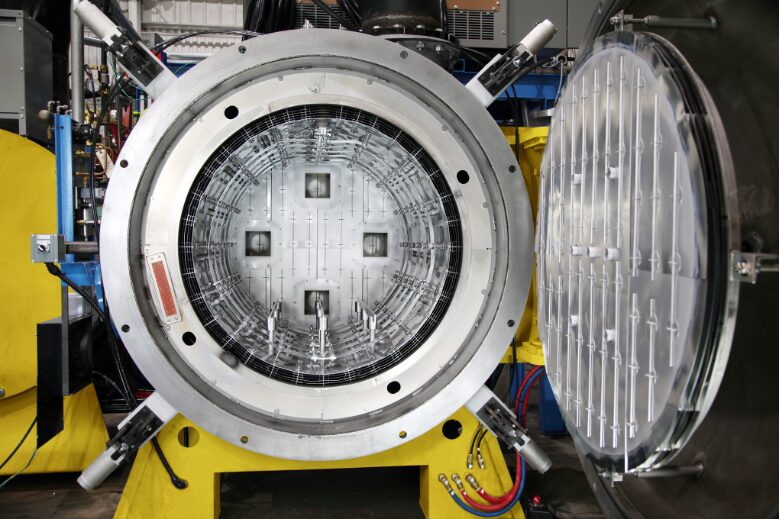
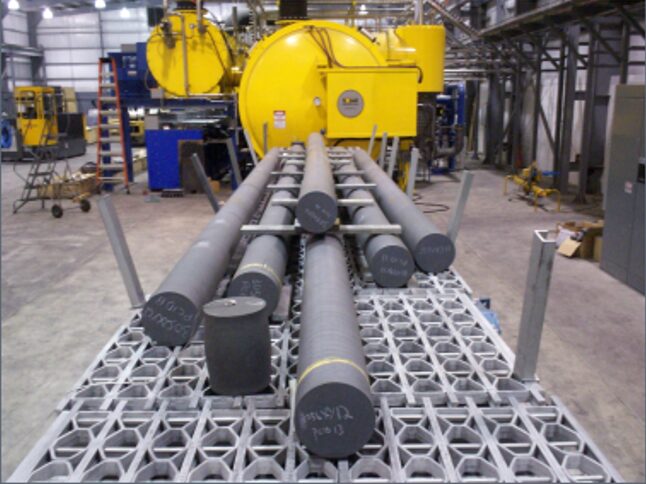
IN 718 is typically heat treated in a vacuum furnace given that it is a sensitive alloy and easily oxidized. Processing in an all-metal shielded furnace (Figure 1) offers advantages for keeping the parts bright after the aging process, without the need to wrap them.
Graphite-lined vacuum furnaces, often with molybdenum heating elements, can also be used provided appropriate precautions are taken. The furnace must be extremely leak tight with a rate of rise under 5 microns Hg per hour. Processing in vacuum is typically done in the 10⁻⁵ torr range. Argon as a partial pressure or cooling gas is necessary to avoid nitriding or oxidation. An alternative, albeit older technology, approach is the use of a vacuum-purged argon atmosphere box furnace with a retort.
From a metallurgical perspective, the amount, morphology, and distribution of the delta (δ) phase have a great influence on the properties of IN 718. During heat treatment, delta phase is extremely important for optimizing mechanical properties, particularly at high temperatures to control migration and precipitation in IN 718. The delta phase inhibits grain growth (by pinning the grain boundaries) and enhances creep and fatigue performance. However, excessive or poorly controlled precipitation is detrimental to other properties like ductility and fracture toughness.
Optimization of delta phase distribution includes selecting the proper solutionizing temperature, between 980–1040°C (1800–1900°F) depending primarily on nickel content, where the delta phase is stable (and thus precipitates out). Thermomechanical working can also achieve this effect by forming more globular-shaped particles rather than acicular (needle-like) ones (Guan, et al. 2023).
There are a number of heat treatments that can be performed on IN 718, including stress relief, homogenizing, solution annealing, precipitation hardening (aka aging), and HIP.
Stress Relief
Stress relief is typically performed at the mill and is a compromise between the amount of residual stress one would like to remove and the possibly harmful effects to both high temperature properties and corrosion resistance. For wrought alloys, stress relief at full annealing temperature is recommended since intermediate temperatures might cause aging. Hold times are one hour per inch of section thickness. For castings, stress relief is especially important when dealing with complex shapes, which may be prone to cracking in subsequent operations or when dimensional control is important.
Homogenization
Homogenization heat treatment is applied to IN 718 for the uniform distribution of alloying elements and dissolution of detrimental phases after its processing through casting and additive manufacturing (AM) routes. There is a definite relationship between laves phase fraction (i.e., the brittle intermetallic compound formed due to niobium segregation during solidification) and homogenization time at various temperatures 1140–1170°C (2085–2140°F). With an increase in homogenization temperature, the time required for dissolution of laves phase and reduction in laves phase fraction reduces drastically. Also, at a given temperature the reduction in laves phase fraction has been shown to occur with the increase of time (Eliasen and Somers 2010).
Full Annealing
Figure 2. Full annealing of IN 718 alloy bars | Image Credit: Solar Atmospheres, Inc.
The process of full annealing involves complete recrystallization and dilution of all or most of the secondary phases to reach maximum softness (Figure 2).
The process is typically run at 955°C (1750°F) holding one hour per inch of cross-sectional area. If welding is to be performed on the component, annealing should be performed immediately after the welding operation. It is noteworthy that niobium additions help overcome cracking problems during welding.
Solution Annealing
Solution annealing (aka solution heat treating) is designed to dissolve secondary phases to prepare the alloy for age hardening and produce maximum corrosion resistance. An added benefit is homogenization of the microstructure.
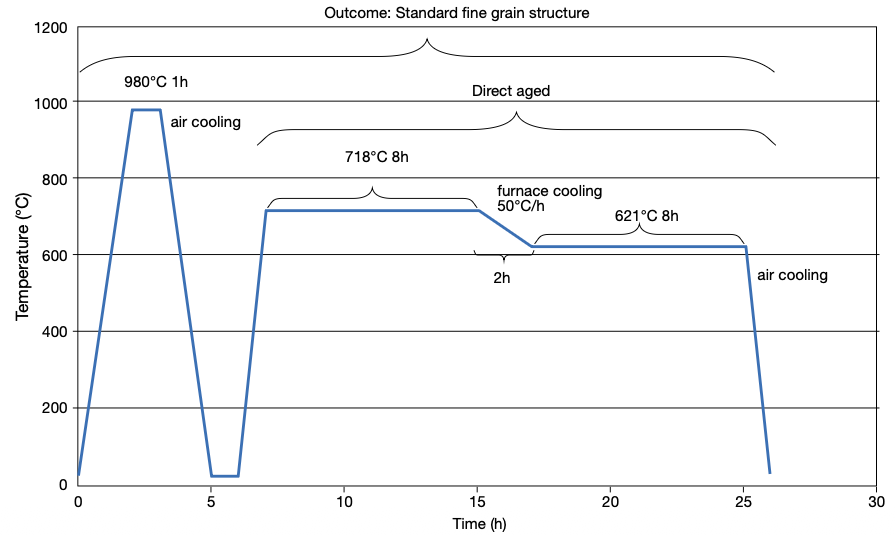
Figure 3. Standard heat treatment cycle of IN 718 | Image Credit: Polasani and Dabhade 2024
A typical heat treatment of IN 718 involves a two-step process — solution heat treating and then age hardening — to control the mechanical property response of the material (Figure 3).
For bar stock, a typical cycle might involve solution annealing at 955°C (1750°F) followed by a 2-bar quench under argon or nitrogen (which can be used if post machining will be performed). This is followed by duplex aging at 730°C (1350°F) for eight hours followed by a vacuum or rapid cool to avoid surface reactions (such as oxidation) and (depending on whether further precipitation is needed) to 650°C (1150°F) and another hold for eight hours followed by a gas fan quench.
Solution annealing at 925–1010°C (1700–1850°F) with its corresponding aging treatment is considered the optimum heat treatment for IN 718, where a combination of rupture life, notch rupture life, and rupture ductility is of greatest concern. The highest room-temperature tensile and yield strengths are also associated with this treatment. In addition, because of the fine grain developed, it produces the highest fatigue strength (Herring 2019).
By contrast, solution annealing at 1040–1065°C (1900–1950°F) with its corresponding aging treatment is the treatment preferred in tensile-limited applications because it produces the best transverse ductility in heavy sections, impact strength, and low-temperature notch tensile strength. However, this treatment tends to produce notch brittleness in stress rupture (Herring 2019).
Aging/Duplex Aging
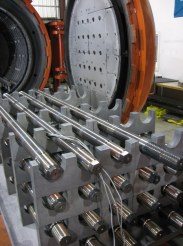
Figure 4. Duplex aging of IN 718 land-based turbine rods | Image Credit: Solar Atmospheres, Inc.
The aging process is designed to strengthen the material, forming precipitates from the supersaturated solid solution mastic from the solution annealing step.
Duplex aging (Figure 4) involves a two-step heat treatment process and on IN 718 is performed around 730°C (1350°F) for eight hours followed by a vacuum cool or in some cases a rapid cool to avoid surface reactions (such as oxidation) and (depending on whether further precipitation is needed) down to 620°C (1150°F) and another hold for eight hours. This is followed by a gas fan quench. The first soak temperature is intended to initiate precipitation of phases influencing strength and hardness properties. The second soak temperature further refines the microstructure and optimizes the material’s properties based on the phases developed in the initial aging and cooling stages.
Hot Isostatic Pressing
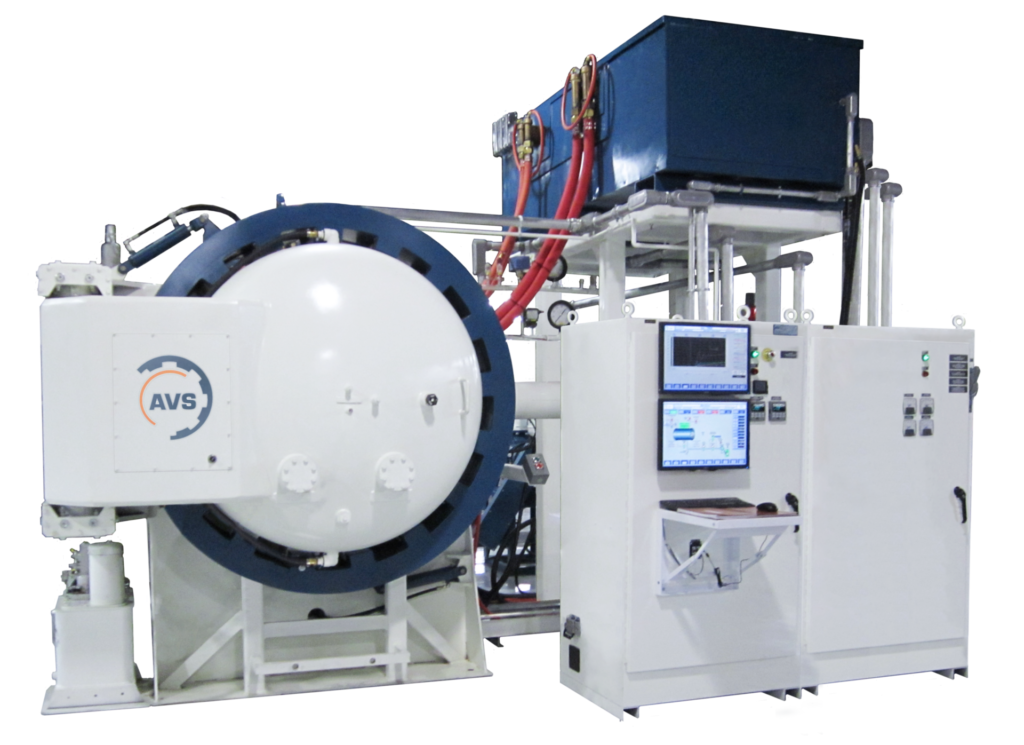
Figure 5. Typical HIP furnace capable of high temperature/pressure | Image Credit: AVS Inc.
Hot isostatic pressing (HIP) combines high pressure and high temperature to influence the density and microstructure of IN 718 (Figure 5). It is critically important to improve the mechanical strength of shape cast and additive manufactured components to homogenize the as-built microstructure and minimize variation in mechanical properties. It helps to eliminate residual stresses, close pores, close cracks and ensures the material is properly fused (Shipley 2023).
For example, it has been reported (Lee, et al. 2006) that four hours at 2155°F (1180°C) under a pressure of 25.5 ksi (175 MPa) is optimal to improve the microstructure (grain size and segregation) along with tensile properties of IN 718 castings.
Future Outlook
Additive manufacturing (AM) of IN 718 (and superalloys in general) is becoming an increasingly important method for component part manufacturing. It allows complex 3D shapes to be formed without the difficulties inherent in casting, forming, and machining of these alloys.
Electron beam-powder bed fusion (E-PBF) and laser-beam powder bed fusion (L-PBF) have shown great promise for processing IN 718 and other nickel-based superalloys. An absolutely necessary, if not critical, step in the process is post-HIP to heal cracks and homogenize the microstructure.
Heat treating will continue to play an important role in enhancing the properties of IN 718. It will be necessary to update the standard heat treatment requirements (e.g., AMS5662 and AMS5663) to incorporate powder metallurgy (PM) and AM technologies to optimize properties for components made by these methods.
More investigation is needed to optimize solutionizing and aging temperatures for modified IN 718 chemistries. For example, the effect of the cooling rate after aging treatments on the precipitate size and morphology and subsequent mechanical properties of the alloy must be explored in more detail (Eliasen and Somers 2010). And from a heat treatment perspective there is interest in case hardening (nitriding, low-temperature carburizing) of IN 718 (Sharghi-Moshtaghin, et al. 2010, Eliasen and Somers 2010).
Finally, AM processes rely on layer-upon-layer melting. As such, modeling, sensor technology, process temperature monitoring and control of surface displacement improve the build. Emerging trends suggest that the integration of machine learning and artificial intelligence for real-time quality control and process optimization will be a key part of the manufacturing strategy moving forward (Babu, et al. 2018).
References
Akca, Enes, and Gursel, Ali. 2015. “A Review on Superalloys and IN718 Nickel-Based INCONEL Superalloy.” Periodicals of Engineering and Natural Sciences 3 (1): 15–27.
Babu, S. S., N. Raghavan, J. Raplee, S. J. Foster, C. Frederick, M. Haines, R. Dinwiddie, M. K. Kirka, A. Plotkowski, Y. Lee, and R. R. Dehoff. 2018. “Additive Manufacturing of Nickel Superalloys: Opportunities for Innovation and Challenges Related to Qualification.” The Minerals, Metals & Materials Society and ASM International: 3764–3780.
del Bosque, Antonio, Fernández-Arias, Pablo, and Vergara, Diego. 2025. “Advances in the Additive Manufacturing of Superalloys.” Journal of Manufacturing and Materials Processing 9 (215): 1–31.
Chandler, Harry, ed. 1996. Heat Treater’s Guide: Practices and Procedures for Nonferrous Alloys. ASM International.
Croft Systems. n.d. “The Difference between a Wellhead & Christmas Tree.” https://www.croftsystems.net/oil-gas-blog/the-difference-between-a-wellhead-christmas-tree/.
Decker, R. F. 2006. “The Evolution of Wrought Age-Hardenable Superalloy.” Journal of The Minerals, Metals & Materials Society, September: 32–36.
Eliasen, K. M., T. L. Christiansen, and M. A. J. Somers. 2010. “Low-Temperature Gaseous Nitriding of Ni-Based Superalloys.” Surface Engineering 26 (4): 248–255.
Guan, Hao, Wenxiang Jiang, Junxia Lu, Yuefie Zhang, and Ze Zhang. 2023. “Precipitation of δ Phase in Inconel 718 Superalloy: The Role of Grain Boundary and Plastic Deformation.” Materials Today Communications 36 (August).
Herring, Daniel H. 2011. “Stress Corrosion Cracking.” Industrial Heating, October: 22–24.
Herring, Daniel H. 2012. Vacuum Heat Treating: Principles, Practices, Applications. BNP Media II, LLC.
Herring, Daniel H. 2019. “The Heat Treatment of Inconel 718.” Industrial Heating, June: 12–14.
Lee, Gang Ho, Ang Ho, Minha Park, Byoungkoo Kim, Jong Bae Jeon, Sanghoon Noh, and Byung Jun Kim. 2023. “Evaluation of Precipitation Phase and Mechanical Properties According to Aging Heat Treatment Temperature of Inconel 718.” Journal of Materials Research and Technology 27 (Nov–Dec): 4157–4168. https://doi.org/10.1016/j.jmrt.2023.10.196.
Lee, Shin-Chin, Shih-Hsien Chang, Tzu-Piao Tang, Hsin-Hung Ho, and Jhewn-Kuang Chen. 2006. “Improvements in the Microstructure and Tensile Properties of Inconel 718 Superalloy by HIP Treatment.” Materials Transactions 47 (11): 2877–2881.
Loria, Edward A. 1988. “The Status and Prospects of Alloy 718.” Journal of Materials, July: 36–41.
Polasani, Ajay, and Vikram V. Dabhade. 2024. “Heat Treatments of Inconel 718 Nickel-Based Superalloy: A Review.” Metals and Materials International: 1204–1231.
Sharghi-Moshtaghin, Reza, Harold Kahn, Yindong Ge, Xiaoting Gu, Farrel J. Martin, Paul M. Natishan, Arrell J. Martin, Roy J. Rayne, Gary M. Michal, Frank Ernst, and Arthur H. Heuer. 2010. “Low-Temperature Carburization of the Ni-Base Superalloy IN718: Improvements in Surface Hardness and Crevice Corrosion Resistance.” Metallurgical and Materials Transactions A 41A (August): 2022–2032.
Shipley, Jim. 2023. “Hot Isostatic Pressing and AM: How to Improve Product Quality and Productivity for Critical Applications.” Metal AM 9 (3).
U.S. Patent No. 3,046,108.
Acknowledgments:This paper would not have been possible without discussions, guidance and contributions from a number of individuals in both the heat treat industry and academia.
Dan Herring “The Heat Treat Doctor®” The HERRING GROUP
Dan Herring, who is most well known as The Heat Treat Doctor®, has been in the industry for over 50 years. He spent the first 25 years in heat treating prior to launching his consulting business, The HERRING GROUP, in 1995. His vast experience in the field includes materials science, engineering, metallurgy, equipment design, process and application specialist, and new product research. He is the author of six books and over 700 technical articles.
Nikolai Alexander Hurley Intern The Heat Treat Doctor®
Nikolai Alexander Hurley is a young academic, interning with The Heat Treat Doctor®.
Ask The Heat Treat Doctor® has returned to bring sage advice to Heat Treat Today readers, answer questions about heat treating, brazing, sintering, and other types of thermal treatments, as well as metallurgy, equipment, and process-related issues. In this installment, Dan Herring examines the essential role of heat treatment in gear performance: exploring the key material and design considerations for power transmission gears, the difference between through hardening and case hardening, and the atmosphere heat treatment processes — from carburizing and carbonitriding to nitriding and nitrocarburizing — that determine how well a gear handles load, wear, and fatigue in heavy-duty applications.
This informative piece was first released in Heat Treat Today’sFebruary 2026 Annual Air & Atmosphere Heat Treating print edition.
Have questions or feedback? We’d love to hear from you — reach out to our editorial team at editor@heattreattoday.com.
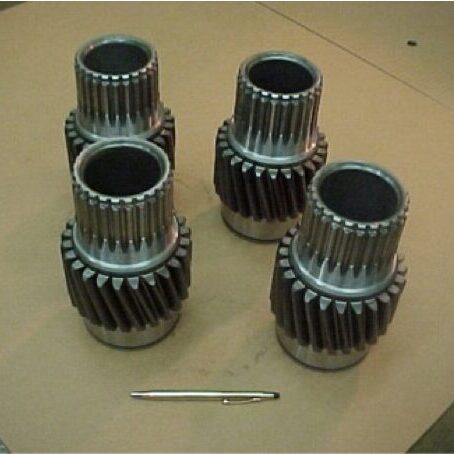
Gears play an essential role in the performance of many products that we rely on in our everyday lives. When we think about gears, we generally separate them into two categories: motion-carrying and power transmission. Motion-carrying gears are generally nonferrous alloys or plastics, while load bearing power transmission gears (Figure 1) are usually manufactured from ferrous alloys and are intended for heavy-duty service applications.
Figure 1. Typical off-highway truck power transmission gears | Image Credit: The Heat Treat Doctor®
Gear Materials & Engineering
Power transmission gears involve a wide variety of steels and cast irons. In all gears, the choice of material must be made only after careful consideration of the performance demanded by the application end-use and total manufactured cost, taking into consideration such issues as pre- and post-machining economics.
Key design considerations require an analysis of the type of applied load, whether gradual or instantaneous, and the desired mechanical properties, such as bending fatigue strength or wear resistance — all of which will define core strength and heat treating requirements.
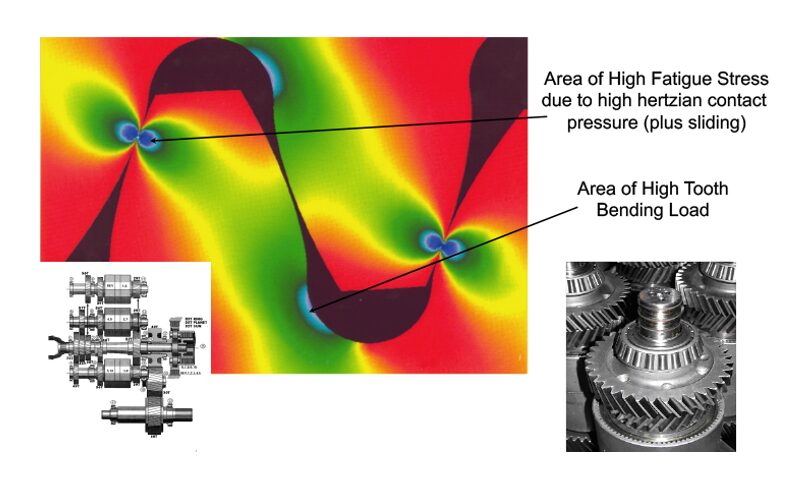
Figure 2. Stress profile in a heavy-duty transmission gear | Image Credit: The Heat Treat Doctor®
It is important for the designer to understand that each area in the gear tooth profile sees different service demands (Figure 2). Consideration must be given to the forces that will act on the gear teeth with tooth bending and contact stress, resistance to scoring and wear, and fatigue issues being paramount. For example, in the root area, good surface hardness and high residual compressive stress are desired to improve endurance or bending fatigue life. At the pitch diameter, a combination of high hardness and adequate subsurface strength are necessary to handle contract stress and wear and to prevent spalling.
Some of the factors that influence fatigue strength are:
Hardness distribution, a function of:
Case hardness
Case depth
Core hardness
Microstructure, a function of:
Retained austenite percentage
Grain size
Carbide size, type, and distribution
Non-martensitic phases
Defect control, a function of:
Residual compressive stress
Surface finish and geometry
Intergranular toughness
In the total manufacturing scheme, a synergistic relationship must exist between the material selection process, engineering design, and manufacturing (including heat treatment). A balance of the priorities in each discipline must be reached to achieve the optimization necessary for the ultimate performance of the gear design. This is often not an easy task.
Various atmosphere heat treatment methods are used for most types of gears including pre-hardening steps (e.g., annealing, normalizing, stress relief) and hardening processes (e.g., neutral hardening and case hardening).
Hardening
Neutral (aka through hardening) refers to heat treatment methods that do not produce a case. Examples of commonly through-hardened gear steels are AISI/SAE grades 1045, 4130, 4140, 4145, 4340, and 8640. It is important to note that hardness uniformity should not be assumed throughout the gear tooth. Since the outside of a gear is cooled faster than the inside, there will be a hardness gradient developed. The final hardness is dependent on the amount of carbon in the steel. The depth of hardness depends on the hardenability of the steel.
Through hardening can be performed either before or after the gear teeth are cut. When gear teeth will be cut after the part has been hardened, machinability becomes an important factor based on final hardness. The hardness is achieved by heating the material into the austenitic range, typically 815°C–875°C (1500°F–1600°F), followed by quenching and tempering.
Case Hardening
By contrast, case hardening is used to produce a hard, wear resistant case (surface layer) on top of a ductile, shock resistant interior (core). The idea behind case hardening is to keep the core of the gear tooth at a level under 40 HRC to avoid tooth breakage while hardening the outer surface to increase pitting resistance.
Carburizing
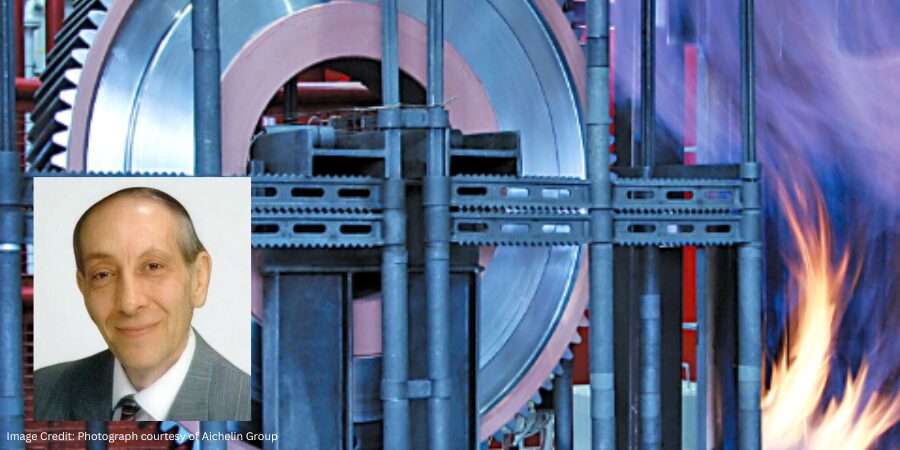
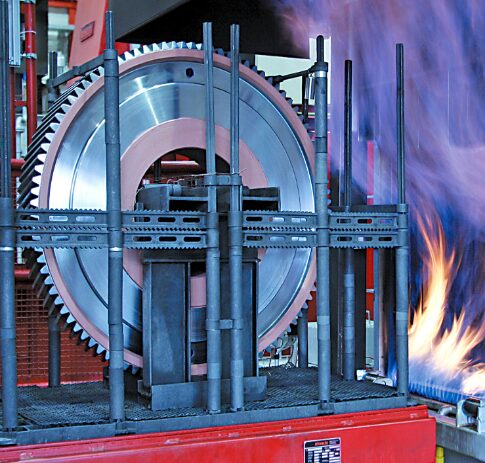
Figure 3. Atmosphere carburizing of large gears | Image Credit: Photograph courtesy of Aichelin Group
Atmosphere carburizing is the most common of the case hardening methods in use today and can handle a diverse range of part sizes and load configurations (Figure 3). In general, a properly carburized gear will be able to handle somewhere between 30–50% more load than a through-hardened gear. Examples of commonly carburized gear steels include AISI/SAE grades 1018, 4320, 5120, 8620, and 9310, as well as international grades, such as 20MnCr5, 17CrNiMo6, 18CrNiMo7-6, and 20MoCr4.
Atmosphere carburizing is typically performed in the temperature range of 870°C–955°C (1600°F–1750°F) although temperatures up to 1010°C (1800°F) are used for deep case work. Carburizing case depths can vary over a broad range, typically 0.13–8.25 mm (0.005–0.325 inches).
Carbonitriding
Carbonitriding is a modification of the carburizing process, not a form of nitriding. This modification consists of introducing ammonia into the carburizing atmosphere to add nitrogen to the carburized case as it is being produced. Examples of gear steels that are commonly carbonitrided include AISI/SAE 1018, 1117, and 12L14.
Carbonitriding is done at a lower temperature than carburizing, typically between 790°C–900°C (1450°F–1650°F), and for a shorter time. Combine this with the fact that nitrogen inhibits the diffusion of carbon, and what generally results is a shallower case than is typical for carburized parts. A carbonitrided case is usually between 0.075–0.75 mm (0.003–0.030 inches) deep.
Nitriding
Nitriding is another surface treatment process that has as its objective increasing surface hardness. One of the appeals of this process is that rapid quenching is not required, hence dimensional changes are kept to a minimum. It is not suitable for all gear applications; one of its limitations is that the extremely high surface hardness case produced has a more brittle nature than say that produced by the carburizing process. Despite this fact, in a number of applications, nitriding has proved to be a viable alternative. Examples of commonly nitrided gear steels include AISI/SAE 4140, 4150, 4340, and Nitralloy® 135M.
Nitriding is typically done in the range of 495°C–565°C (925°F–1050°F). Case depth and case hardness properties vary not only with the duration and type of nitriding being performed but also with steel composition, prior structure, and core hardness. Typically, case depths are between 0.20–0.65 mm (0.008–0.025 inches) and take from 10 to 80 hours to produce.
Nitrocarburizing (Ferritic or Austenitic)
Nitrocarburizing is a modification of nitriding, not a form of carburizing. In the process, nitrogen and carbon are simultaneously introduced into the steel while it is in a ferritic or at times an austenitic condition. A very thin “white” or “compound” layer is formed during the process, as well as an underlying “diffusion” zone. Like nitriding, rapid quenching is not required. Examples of gear steels that are commonly nitrocarburized include AISI/SAE grades 4140, 5160, 8620, and certain tool steels, such as H11 and H13.
Nitrocarburizing is normally performed at 550°C–600°C (1025°F–1110°F) and can be used to produce a 58 HRC minimum hardness, with this value increasing dependent on the base material. White layer depths range from 0.0013–0.056 mm (0.00005–0.0022 inches) with diffusion zones from 0.03–0.80 mm (0.0013–0.032 inches) being typical.
In Summary
There are many ways to heat treat gears. While atmosphere heat treatment (discussed above) is perhaps the most widely used technology today, other types of heat treatments, namely vacuum and induction hardening, are becoming more and more common methods. These will be discussed in Part Two.
About the Author
Dan Herring “The Heat Treat Doctor” The HERRING GROUP, Inc.
Dan Herring has been in the industry for over 50 years and has gained vast experience in fields that include materials science, engineering, metallurgy, new product research, and many other areas. He is the author of six books and over 700 technical articles.
When a load hangs up during quenching, seconds matter and improvised decisions can escalate risk. In this Technical Tuesday installment, Bruno Scomazzon, general manager of Precision Heat Treat Ltd., outlines a step-by-step emergency response procedure for exactly this scenario, which is one of the most dangerous in atmosphere heat treating. Drawing on real-world experience, this guide is intended to help companies develop their own effective procedures for maintaining safety, controlling furnace conditions, and coordinating with emergency responders in high-risk situations.
This informative piece was first released in Heat Treat Today’sFebruary 2026 Annual Air & Atmosphere Heat Treating print edition.
If you have comments or questions about this article, please let us know at: editor@heattreattoday.com
A load has been transferred to the quench and the elevator is lowering into the oil, but the load becomes hung up and fails to fully submerge. The inner door successfully closes, and the outer (front) door remains closed.
This is an extremely high-risk situation requiring strict adherence to emergency procedures. The goal is to protect: first the personnel (minimize the chance of injury or escalation of the situation), then the facility, and finally the equipment.
1. Immediate Actions
DO NOT Open Outer Door
There may be a natural urge to assess the situation but resist temptation. DO NOT stand in front of or directly beside the outer door and never open it during an active hang-up. Opening this door can introduce oxygen to a hot chamber, causing:
Explosions or flash fires.
Loss of containment due to door warping or mechanical failure.
In extreme cases, the outer door may be compromised (blown off, stuck open, or partially open) with visible flames. This warrants immediate escalation to the fire department.
If Outer Door Cannot Be Closed
In this scenario, immediately notify the fire department and advise them to prepare for a foam response. DO NOT allow the use of water. This may trigger violent reactions with oil or atmosphere and spread the fire!
Internal trained responders should:
Don PPE.
Retrieve fire suppression gear.
Be ready to protect critical systems until responders arrive.
DO NOT shut down the furnace.
Figure 1. Atmosphere furnace during normal operation | Image Credit: Precision Heat Treat Ltd.Figure 2. Vestibule door partially opened during a controlled simulation to illustrate gas release behavior — not an actual incident | Image Credit: Precision Heat Treat Ltd.
2. Maintain Electrical Power
To ensure essential systems stay active, you must maintain electrical power. Ensure these systems stay active:
Set the furnace cycle to manual mode from auto mode. This will bypass any PLC sequencing from auto cycling doors, elevators, and handlers.
Keep the pilots lit.
Keep the oil cooler running to prevent tank overheating.
Shut off oil heaters to prevent additional heat loading in the quench tank.
Keep quench agitation on low during the entire period to assist in lowering the temperature at the interface surface area between the hot load and the oil. This prevents stratification and dissipates radiant heat into the oil.
Keep the recirculating fan running.
Keep the instrumentation functioning for monitoring.
NOTE: Loss of these systems eliminates visibility, atmosphere control, and safe response options.
3. Atmosphere Management
Maintain a protective atmosphere and positive furnace pressure to prevent oxygen ingress and uncontrolled combustion:
Set the carbon control to “0”.
Shut off the enriching gas.
Shut off the ammonia.
Shut off the dilution air.
Nitrogen Purge
These steps depend on whether a nitrogen purge is available; it is highly advised that nitrogen purge be available for all IQ or straight through units. Be sure you understand how long it takes for your specific furnace to fully purge endothermic gas. While NFPA 86 recommends five volume turnovers, some experts advise planning for up to ten per hour in an emergency. Each furnace should have established purge data under normal conditions so operators can act with confidence when time is critical.
Figure 3. Bulk nitrogen supply used for emergency purging and atmosphere control | Image Credit: Precision Heat Treat Ltd.
Begin a nitrogen purge immediately (if available) and maintain it throughout the event.
Use at least the minimum flow rate specified in your documentation. If safe, higher flow may be used to help displace flammable gases from the heating and quench chambers.
Maintain furnace temperature at 1500°F during the purge.
Residual pockets of Endo gas may remain trapped in less ventilated areas. If the chamber temperature drops below the ignition point before all flammable gas has been displaced, the introduction of oxygen could trigger an explosion. In some cases, trapped Endo and pressure imbalances can lead to sudden releases (“furnace burp”), where oil or gas is expelled due to internal pressure buildup.
After the Purge
The goal of the nitrogen purge is to displace Endothermic gas with an inert atmosphere while maintaining elevated temperature to assist in burning off residual flammable gases and preventing dangerous mixtures. This process must ensure positive pressure throughout the furnace.
A purge followed by plunge cooling in nitrogen is a valid approach if the purge is verifiably complete.
Depending on furnace size and cooling rate:
Larger furnaces may cool slowly enough for a complete purge.
Smaller or faster-cooling units may require a brief temperature hold before controlled cooling or plunge cooling.
NOTE: Once the hung-up load cools to a safe temperature (~150°F), perform a standard shutdown.
Without Nitrogen (in Endo)
If there is no nitrogen purge, or it is insufficient, the only option is to let the hung-up load cool in the vestibule while continuing to burn Endo and maintain the furnace temperature at 1500°F. Once the vestibule/oil tank cools below 150°F and the danger has passed, initiate a standard furnace shutdown.
4. Safety Management
Alert the local fire department immediately. If the situation becomes unmanageable, or if there is any doubt about the ability to maintain control, evacuate the facility and wait for trained professionals. The safety of plant personnel is paramount.
Notify plant safety and site management.
Evacuate all non-essential personnel from the heat treat area.
Inform all departments that a high-risk incident is in progress.
Fire departments are most effective when they are familiar with your facility before an emergency occurs. Make sure they know the layout of your operation, including:
Oil tank locations and sizes
Electrical panels
Gas shutoffs
Hot zones
5. Controlled Cooling Period
Maintain atmosphere protection throughout the event.
DO NOT open doors until the vestibule’s temperature is low and stable.
Cooling time will depend on load mass and heat retention. Expect five or more hours.
Use furnace pressure stability, effluent observations, and gas behavior as indirect temperature indicators.
6. Load Recovery Procedure
Once cooled and stabilized, perform a standard shutdown, starting with the removal of endothermic gas if applicable.
DO NOT attempt manual load removal until the system is verified safe.
Only maintenance personnel may retrieve the load, using PPE and appropriate tools.
7. Fire Department Familiarization
Every facility should build rapport with the local fire department before an emergency ever happens. Schedule annual walkthroughs and identify the following:
Number of furnaces
Quench oil tank volumes
Hot zone and live panel locations
Emergency shutoff points
Stuck doors are commonly caused by failed pneumatic valves. Shutting off and bleeding compressed air may allow the mechanism to reset. Always consult your equipment manual or the manufacturer before attempting corrective action.
The fire inspector conducting walkthroughs is not the one coming to fight your fires — train the ones who are.
8. Post-Incident Protocol
Before returning the furnace to service:
Conduct a formal investigation.
Identify and correct root cause(s).
Document all key parameters and actions taken.
Re-train operators as needed.
Furnace Signage
An operator is likely to read your safety plan but may forget a vital protocol during an emergency. Having bold, brightly colored warnings printed and posted at the panel that the operator can remove and use in an emergency can be invaluable.
Final Reflections
We cannot predict every consequence. No procedure can account for every possible variable in a live emergency. Once an event is in motion, all we can do is respond with the best judgment, training, and intentions — always with the safety of people as the highest priority.
This document is intended as a working reference: a structured reference developed with care, real-world experience, and best practices. It is not a one-size-fits-all solution, but a tool to help teams create or enhance their own effective procedures and respond adaptively in high-risk situations.
Fire preparedness is essential in every heat treating facility. Fires happen, and they are not always small. It is critical to know when to act, when to evacuate, and when to call for help. Equipment manuals provide a foundation, but preparedness through training and planning is the best defense.
Acknowledgments: The author would like to thank Daniel H. Herring, “The Heat Treat Doctor,” The HERRING GROUP, Inc., and Avery Bell with Service Heat Treat in Milwaukee for their valuable input.
About The Author:
Bruno Scomazzon General Manager Precision Heat Treat Ltd.
Bruno Scomazzon is the general manager of Precision Heat Treat Ltd. in Surrey, British Columbia, Canada, with over 40 years of experience in metallurgical processes and heat treating operations.