
Ask The Heat Treat Doctor® has returned to bring sage advice to Heat Treat Today readers and to answer your questions about heat treating, brazing, sintering, and other types of thermal treatments as well as questions on metallurgy, equipment, and process-related issues. In this installment, Dan Herring discusses practical strategies for managing distortion through oil quenching, focusing on how subtle adjustments — such as delaying agitation to extend the vapor blanket phase — can influence heat transfer behavior and improve dimensional stability in challenging geometries like thin-walled, large-diameter gears.
This informative piece was first released in Heat Treat Today’s April 2026 Annual Induction Heating & Melting print edition.
The Question
A reader’s question caught the Doctor’s eye and will provide some valuable information we all can benefit from. Let’s learn more:
“I have a question about a technique we used sometimes in my factory for distortion reduction. As you know, in the oil quench cooling there are 3 steps:
1. Vapor Blanket Phase (≈ 840–700°C)
2. Boiling Phase (≈ 700–400°C)
3. Convection (≈ 400–40°C)
In addition to [running] a martempering oil (Houghton M240) and a high oil temperature of 80–100°C, a technique we used successfully to reduce the distortion in thin wall large (> 1m) gears was to wait 1 minute without agitation just after placing the parts in the oil tank. Once the minute has passed, we start with the agitator speed at 1,700 rpm.
The technical reason for this improvement is to extend the vapor blanket step and hence reduce the distortion created by the boiling step. My questions are: What effect does the vapor blanket step have on thermal uniformity, and is it possible to get a similar result in the agitator speed, for instance, start with a low rotating speed and finishing with a high speed?”
The Three Phases of Quenching
As a brief reminder, let’s revisit the three distinct stages of cooling (Figure 1). The first stage, the “vapor blanket” (or “film boiling”) stage, is characterized by the Leidenfrost phenomenon, which is the formation of an unbroken vapor blanket that surrounds and insulates the work piece. It forms when the supply of heat from the surface of the part exceeds the amount of heat that can be carried away by the cooling medium.
The stability of the vapor layer, and thus the ability of the oil to harden steel, is dependent on: the metal’s surface irregularities; oxides present; surface-wetting additives, which accelerate the breakdown and destabilize the vapor blanket; and the quench oil’s molecular composition, including the presence of more volatile oil degradation by-products (Herring 2015). In this stage, the cooling rate is relatively slow in that the vapor envelope acts as an insulator, and cooling is a function of conduction through the vapor envelope.
The second stage, the “vapor transport” (or “nucleate boiling” or “bubble boiling”) stage, is where the highest heat transfer rates are produced — and where the greatest amount of distortion occurs. The point at which this transition occurs and the rate of heat transfer in this region depend on the oil’s overall composition (base oil, speed accelerators, and antioxidant package). It begins when the surface temperature of the part has cooled enough so that the vapor envelope formed in the first stage collapses. Violent boiling of the quenching liquid results, and heat is removed from the metal at a very rapid rate, largely due to heat of vaporization. The boiling point of the quenchant determines the conclusion of this stage. Size and shape of the vapor (bubbles) are important in controlling the duration of this stage.
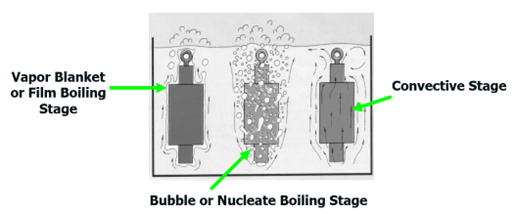
The third stage of cooling is called the “convection” (or “liquid”) cooling stage. The cooling rate during this stage is slower than that developed in the second stage and is exponentially dependent on the oil’s viscosity, which will vary with the degree of oil decomposition. Heat transfer rates increase with lower viscosities and decrease with increasing viscosity. This final stage begins when the temperature of the metal surface is reduced to the boiling point (or boiling range) of the quenching liquid.
The Answer
A sage veteran once reminded the Doctor that we cannot control distortion, only manage it.
As we know, if we were able to control the heat transfer during the nucleate boiling phase, the result would be less gear distortion, especially when the geometry (in this case thin wall, large diameter gears) makes it even more challenging.
What many people do not realize is that in addition to the correct choice of oil, oil temperature, the proper size and design of the quench system (which is fixed for all part or load configurations), and the uniform removal of the vapor blanket in the first stage of quenching influences the development and type of heat transfer that will occur in the nucleate boiling phase — yes, it is uncontrolled, but it can be influenced.
A delay in the start of agitation ensures the vapor blanket phase is extended and (in a sense) more uniformly conforms to the part geometry than it would otherwise. The result is that it is easier to be uniformly swept away once the agitation begins. Interestingly, the vapor blanket begins to form within the first few seconds of quenching and begins to collapse (often in a nonuniform way) as the surface temperature drops. Agitation delay times ranging from 1 to 2 minutes have been used in industry, which are primarily a function of material, (gear) geometry, and tooth profile/thickness.
As to the other question, some manufacturers recommend quenching into slowly agitated oil (100–125 rpm) — the slower agitation only intended to push any moisture molecules around, then increasing the speed to normal agitation rates once the load is fully submerged. Appropriate safety precautions must be followed with either method. A great deal of success has been reported using this method for many of the same reasons as above.
On another note, there is some merit in vacuum oil quenching to vary the pressure over the oil. Interestingly, the characteristics (i.e., size and distribution) of the “bubbles” formed in the nucleate boiling phase changes and the end result is that they can be more easily and more uniformly swept away.
In Summary
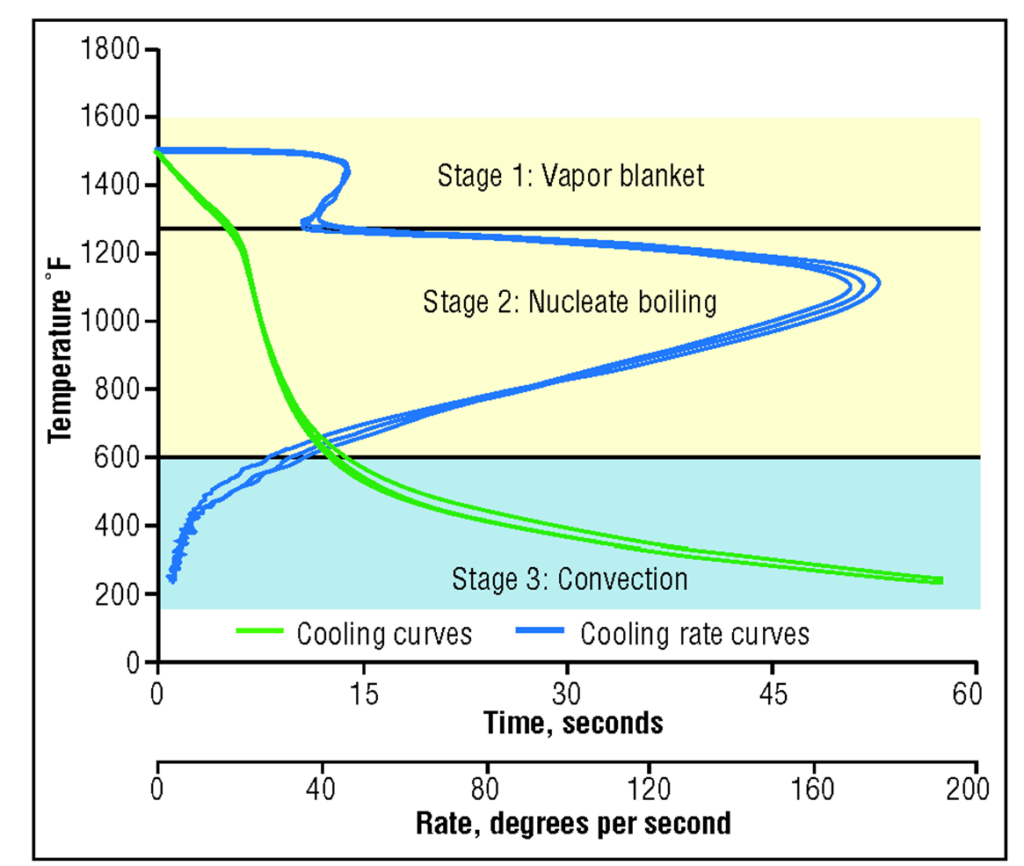
A word or two is in order about measuring and maintaining the quench oil. Measuring the efficiency (i.e., speed) of an oil can be done in one of two ways. The first method is by measuring the oil’s cooling ability (i.e., hardening power). Since cooling ability is independent of steel selection (composition and grain size) this method is popular since it provides information about the oil itself independent of its end use application (Figure 2).
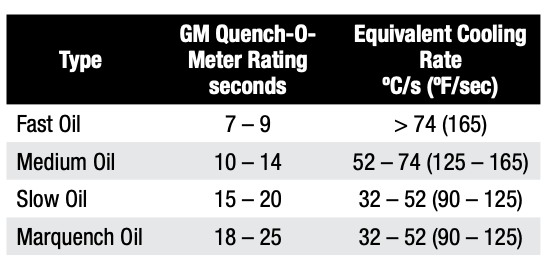
The older GM Quench-O-Meter method (Table A) can be used as well.
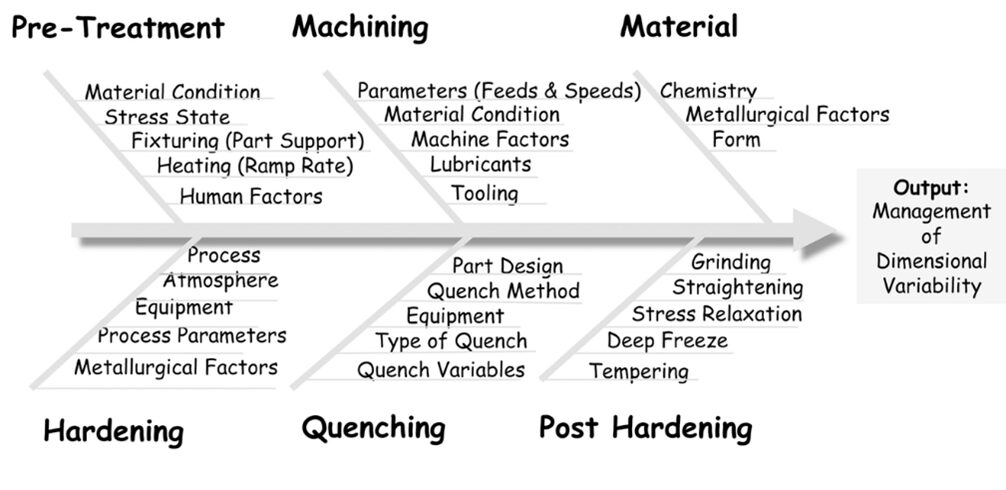
Variables Affecting Dimensional Change
A number of factors influence post-heat treat distortion, including those related to material, manufacturing, and heat treating (Figure 3).
When selecting an oil quench process, some of the many factors to consider include:
- Material — form, chemistry, hardenability, grain size, homogeneity, cleanliness, microstructure
- Heat treatments performed at the mill
- Starting microstructure — mill or third-party heat treating prior to manufacturing
- Manufacturing process — sequence of operations, tooling, speeds & feeds
- Part orientation during manufacturing, as opposed to grain orientation
- Grids, baskets, and fixtures — both material & design
- Load configuration — part spacing, orientation, arrangement (load density)
- Load weight (gross or net)
- Maximum quench fixture size, weight, shape
- Part geometry and mass — maximum/minimum part section thickness, consideration for whether the component part is uniform in thickness or has thin and thick sections next to one another
- Residual stress state before heat treatment
- Targeted hardness range (initial or final)
- Type of process being run (e.g., hardening, case hardening)
- Free quenching or restricted (press or roll) quenching
- Oil type — quenching characteristics, cooling curve data
- Oil speed, condition, viscosity (fast, 7–9 second oil; medium, 10–14 second oil; slow, 15–18 second oil; or marquench, >20 second oil)
- Oil temperature (initial, instantaneous rate of rise, recovery time to initial temperature)
- (Effective) quench tank volume
- Height of oil above the load
- Agitation — agitators or pumps
- Quench tank design factors
- Agitation method and number of agitators or pumps
- Type of quench tank baffling
- Location/size of agitators or pumps
- Type of agitators (e.g., fixed, two speed, variable)
- Propeller size (e.g., diameter, clearance in draft tube)
- Internal tank baffling (e.g., draft tubes, directional flow vanes)
- Flow direction
- Flow restrictions (quench elevator and baffling design)
- Volume of oil
- Maximum (design) temperature rise
- Heat exchanger-type, size, heat removal rate (instantaneous and total demand)
- Quench elevator design (e.g., hearth type, sidewalls, flow restrictions)
- Flow velocity (with and without a load present)
- Number of furnaces to be served by the quench system
- Duty cycle (i.e., the frequency of quenching or time between quenches)
- Post heat treatment operations, if applicable
- Furnace temperature uniformity
- Furnace repeatability
- Type of furnace atmosphere
- Post processing (e.g., washing, deep freeze or cryogenic treatment, number of tempers)
- Time delay between heat treat operations (especially important for high hardenability materials to avoid cracking)
References
Herring, Daniel H. 2015. Atmosphere Heat Treatment. Volume 2, BNP Media II.
About the Author
“The Heat Treat Doctor”
The HERRING GROUP, Inc.
Dan Herring has been in the industry for over 50 years and has gained vast experience in fields that include materials science, engineering, metallurgy, new product research, and many other areas. He is the author of six books and over 700 technical articles.
For more information: Contact Dan at dherring@heat-treat-doctor.com.
For more information about Dan’s books: see his page at the Heat Treat Store.