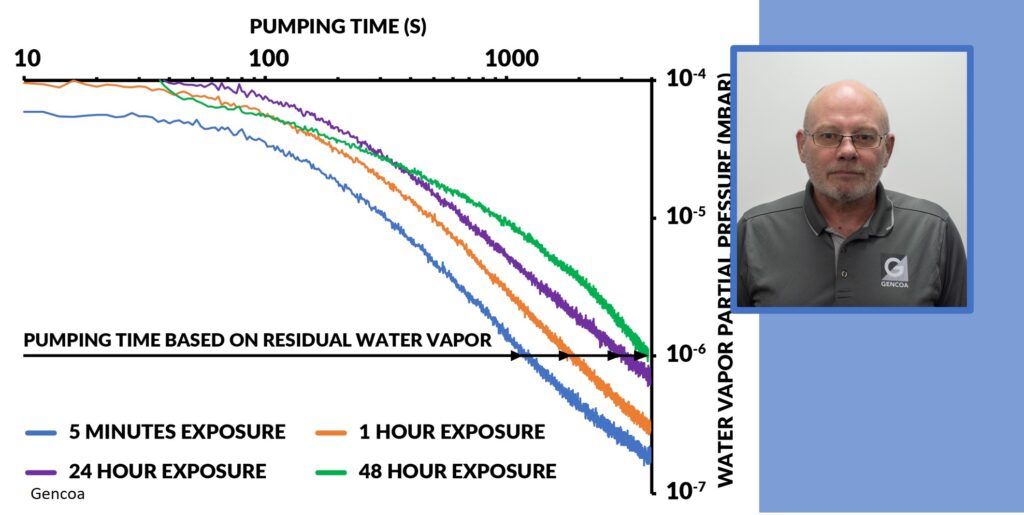
Retech Systems LLC welcomed participants to its Buffalo, NY, facility for a leak testing seminar last month, unveiling best practices and the basics of equipment on December 4-5, 2024. Vacuum technologies provider Busch Group co-hosted the event, which was open to employees and clients of both companies.
Leak detection expert Ron Ligthart in the classroom portion of the Retech – Busch Group seminar
Retech Systems LLC, which manufacturers metallurgical furnaces, is a daughter company of SECO/WARWICK Group. Busch Group brands include Busch Vacuum Solutions, Pfeiffer Vacuum+Fab Solutions and centrotherm clean solutions.
Ron Ligthart from the Busch Group, a leak detection expert with over three decades of experience in the industry, presented the seminar on the first day of the event to Retech and other SECO/WARWICK employees. Attendees learned the basics of how a helium mass spectrometer leak detector works and best practices on the techniques for leak testing large vacuum systems. After a few hours of classroom-based material, students were able to put their knowledge to the test on a vacuum furnace on Retech’s shop floor using a Pfeiffer leak detector.
On day two, local Retech, Busch Group and Pfeiffer Vacuum clients were invited in for a similar activity. Overall, the event focus was on:
best practices for tracer gas leak testing
how to properly spray helium and identify leak locations
minimizing the time spent leak testing
connecting the leak detector to the ideal location and using features of the instrument (i.e. zeroing) correctly
“We had a great time partnering with Retech on this event,” said John McLaren of the Business Development – Leak Detection division at Pfeiffer Vacuum, Inc. “We’re always happy to share the knowledge we’ve gained and help customers improve their leak testing process.”
Main image caption: Ron Ligthart, presenter, leak detection seminar
In this Heat TreatRadioepisode, Dave Deiwert, a seasoned expert in leak detection, shares key steps to locate leaks in a vacuum furnace. Host Doug Glenn and his guest specifically look at helium as a tracer gas. From Dave’s extensive experience starting as a field service engineer to founding his own company, Tracer Gas Technologies, listen as he identifies systematic approaches, the influence of air currents, and cost-effective strategies for effective leak detection.
Below, you can watch the video, listen to the podcast by clicking on the audio play button, or read an edited transcript.
The following transcript has been edited for your reading enjoyment.
Meet Dave Deiwert (01:10)
Doug Glenn: Welcome to another episode of Heat TreatRadio. We’re talking today about leak detection in vacuum, and we’re happy to have Dave Deiwert with us who is a leak detection expert.
Dave, would you give our listeners a little bit of background about you and your qualifications in the industry, and then we’ll jump into some questions about leak detection?
Dave Deiwert: I’ve been in leak detection since 1989. I started off my career as a field service engineer. I did that for about 10 years, then moved into sales engineering for probably the second third of my career. And for the last number of years, I’ve been a product manager and applications manager, working with several of the major vacuum and leak detection companies in the world. I thoroughly enjoy what I do and helping others with their leak testing applications.
Doug Glenn: And now you’ve got your own company. Could we hear a bit about that?
Dave Deiwert: Sure, Tracer Gas Technologies had its birth in September of this year. My focus will be on providing training and applications assistance to industrial clients, research and development labs, and government and university labs.
Doug Glenn: What’s the best way for people to reach you?
Doug Glenn and Dave Deiwert discuss his new position as president of Tracer Gas Technologies.
Dave Deiwert: We are new and still working on the website, but in the meantime, you can reach me at my phone at (765) 685-3360 or email me at DDeiwert@gmail.com.
Doug Glenn: Dave recently published an article in the November 2024 print issue ofHeat TreatTodaycalled, “Basics of Vacuum Furnace Leak Detection, Part One.” The article includes ten tips for vacuum leak detection using a helium leak detector.
Indicators of Leaks (03:45)
We’re going to cover some of those tips today. But before we get started, what are the most common symptoms that we have a leak when operating a vacuum furnace?
Dave Deiwert: I’ve been helping these clients for a number of years. And typically, one or two things happen: So, the client is following the furnace manufacturer’s recommendations to do a periodic “leak up test,” where they pump the furnace down towards base vacuum; they isolate the pumps to look for the pressure to rise after the pump’s been isolated, and if the pressure rises at a faster rate over a test period of time, which might be ten minutes, then they determine they have a leak that they should be looking for.
It’s either during that test that they discover they have a leak that they should be looking for before it impacts quality. Or the problem develops while they’re using the furnace, and it begins to affect the quality of the product. They start to see a difference in the appearance of the product because there’s some type of contaminant gas from atmosphere, water vapor, or maybe their product is sensitive to oxygen and such. It also could be as simple as they used to pump down to base pressure for the process in “x” amount of time, and it seems like it’s taking longer.
One of those two things will get their attention, and that’s okay. Let’s look for the leaks.
Isolating the Source of the Leak (05:11)
Doug Glenn: Most of the discussion we’re going to have today is going to be on using helium leak detectors. But let’s assume you don’t have a helium leak detector. What would be your checklist of things to run through to try to isolate the source of the leak?
Dave Deiwert: My perception is that end users that only have maybe one or two furnaces might not have their own leak detector, and calling for help might be quite a pricey option. They may try to do some things on their own without the leak detector or help from somebody outside the organization.
The first thing you’re going to do is consider where most leaks typically would be on a furnace. You’re going to think of things like the door is opened and closed on every cycle of the furnace, so the gasket or O-ring type material there can get worn over time.
Or maybe while the door was open, something came to rest on the O-ring: a piece of fuzz, hair, or slag metal. Something may be there that creates a leak path when they close the door. To look at that in greater detail, they get some extra light on it and see if they can determine something there. They may go ahead and remove that O-ring and just clean it up really well. Many might put a light coating with some vacuum grease or some type on it and then reinstall it.
Of course, we recommend that you try not to use vacuum grease. That could be a whole other discussion. But many will try that and see if it’s helpful to them.
The vent valve for the system also opens up after every test. So, there’s another gasket that can get worn or dirty.
Another thing would be process gases. If they filled their furnace with some back stream with argon or something, those process gas valves can leak past the seal.
So they think about each of these things and go through them one at a time and inspect them. And if they’re not quite sure what they’re seeing, they might replace the gasket or seal and then hope that they’re successful. And if they continue to not be successful, they ultimately end up calling for help.
Somebody could get very frustrated looking for leaks if you don’t know for sure that it’s only picking up helium. It’s not reacting to Dave Deiwert’s aftershave or cologne, or something else… the fork truck that went by, or something else. I can say with 100% certainty it’s reacting to helium.
Understanding Leak Detector Technology (07:14)
Doug Glenn: I want to ask for a further explanation on the first tip in this article.You say, “Understand how your leak detector works to the point that you can confirm it is working properly.” How does a company do that?
Dave Deiwert: If you’re going to go to the expense of having a leak detector — which many should — they should understand how it works properly and how to tell that it’s working properly or not before you start spraying helium to look for leaks.
Every manufacturer of leak detectors today, and for quite a number of years, has a leak detector that will let you know whether you’re in the test mode or in a standby mode. If you ever approach somebody that is leak testing and the leak detector is in standby mode and they’re spraying helium, you can suggest, “I bet you haven’t found any leaks yet, have you? Well then, you might want to put your leak detector in test mode.”
Understanding it’s in test mode and understanding how to calibrate the leak detector are good tools to help your success in finding leaks on the system. You have to at least be familiar enough with the leak detector to understand its operation and knowing that it’s sensitive to helium and the calibrating procedure increases and supports this understanding.
Doug Glenn: That makes a lot of sense: Make sure it’s turned on.
Dave Deiwert: Right, turned on and connected to your system. If you don’t have a hose going from the leak detector to the furnace and you’re spraying helium, that’s also going to be a problem.This might sound silly, but sometimes people think, “Hey, this sounds easy. You just spray helium and look for leaks.” They may ask some person who doesn’t really have much experience, “Hey, go over and test the furnace.” They may be embarrassed to say that they don’t know how to use the leak detector, so they may give it a go. Because they don’t understand the leak detector, they might not be successful.
Doug Glenn: That leads me to my next question because I would be that guy that doesn’t really know how they work. When you’re performing a leak detection using a helium leak detector, how does that process work? Where is the leak detector? Where are you spraying the helium?
Dave Deiwert: Sure. In my career I’ve seen people choose a few different points of connection to the furnace, but you’ll find our industry that we teach people that the best place would be to connect the hose from the leak detector to point in front of the blower if they’ve got a blower on their system. If they don’t have one, it’s going to go at a connection point near the inlet of the pump of gas pumping through this system. But you want to sample that flow of gases from the furnace towards the pumps. That way, you can get a sample to the leak detector as you’re spraying the helium.
When you talk about how the leak detectors work… at every class I teach, I think it’s important to at least give enough information so that you have confidence that the leak detector can help you. How’s it sensitive to helium and why? With these leak detectors, no matter who manufactures them, typically you’ll see that inside there’s a mass spectrometer that’s tuned to the gas mass weight of a helium molecule. And because it’s dependent on the mass weight of a helium molecule, not the mass weight of oxygen, nitrogen, argon, or whatever, you can be 100% sure that when the leak detector reacts, it’s getting helium from somewhere.
I stress that because somebody could get very frustrated looking for leaks if you don’t know for sure that it’s only picking up helium. It’s not reacting to Dave Deiwert’s aftershave or cologne, or something else… the fork truck that went by, or something else. I can say with 100% certainty it’s reacting to helium.
You might be surprised how often in my career somebody said, “Dave, the leak detector’s reacting, and I haven’t even started spraying helium yet.” I will tell them helium is coming from somewhere, and it could be the tank of helium that you’ve rolled up to the furnace is spraying helium and you didn’t realize it. Maybe the spray gun is still spraying helium even though the trigger is not pulled. Maybe the regulator’s leaking.
Leak detector hooked up to vacuum furnace Source: Dave Deiwert
And if that furnace has got a leak, it’s the whole reason you brought the leak detector over. You’re not spraying helium yet, but helium is being sprayed by the tank or the regulator. The leak detector is going to react to the helium regardless of how it got into the system. So that can be very frustrating.
Let me back up: If you know beyond the shadow of a doubt the leak detector will only respond to helium and you haven’t sprayed helium yet, you know immediately it’s coming from somewhere.That is to say, I need to figure out what’s going on there. Otherwise I might spin my wheels looking for a leak while something else is a distraction for me.
Does that make sense?
Understanding Helium (11:53)
Doug Glenn: Yes, it does. Let me ask you this, though, because I’ve never done a helium leak detection as a publisher of a magazine — we don’t have a lot of helium in this business. You’ve got this box called the helium leak detector. It’s got a hose. You connect the hose near the blower or someplace close to the vacuum pump. I assume the leak detector is sampling the air as it’s coming towards the pump or towards the blower. Correct?
Dave Deiwert: Absolutely.
Doug Glenn: Then you’re spraying helium on the outside of the furnace somewhere to see if it’s being pulled into the furnace through some hole and therefore heading towards the pump.Correct?
Dave Deiwert: Yes.
Doug Glenn: I wasn’t ever sure how that worked — whether you spray the helium inside the furnace then you’re checking around the outside of the furnace with the leak detector; I know that sounds silly, but I thought that might be how it worked. But the truth is you’re sampling the air inside, and you’re spraying helium on the outside. If that’s the case, with a canister of helium on the outside of the furnace, won’t the detector be detecting the gas because it is going from that helium canister through and into the furnace, right?
Dave Deiwert: Yes, that’s correct.
When we get into the idea of spraying helium — where does the helium go when I spray it? When I started my career way back in 1989 as a field service engineer, I was taught that helium rises because it’s the lightest gas. And so I was taught, as were many other people, to start at the top of the furnace and work your way down.
The problem with teaching that is (remember, there’s five parts per million of helium naturally in the air we breathe) that if I start spraying helium, I can tell you with 100% confidence that the air currents in the room are going to impact that helium. If you can feel the air blowing from your right towards your left, and when someone’s got a floor fan on you can be sure of it, the predominant helium you’re spraying is going to move that way. It’s going to dissipate over time, but starting somewhere methodical to spray the helium is important and to not spray too much.
Be Patient with Leak Detection! (13:14)
Doug Glenn: I did want to ask a little bit about that because in your second and third tip in this article you expressed the need to be patient when doing a leak detection. Just exactly how patient do we need to be, and why do we need to be so patient?
Dave Deiwert: Frequently throughout my career, I’ve run into people who say, “I’m not sure if I’ve got a leak, so I’m going to spray a lot of helium so I can determine it pretty quickly.” But if you spray that helium like you’re trying to dust off the equipment, you will have so much helium in the air the leak detector will definitely react if there’s a leak. However, now you have to wait forever and a day; it could be quite a while until the helium that you just sprayed all over the system and in the room dissipates before you can continue looking for a leak.
I always ask this question when I’m teaching a class with people who have been doing leak testing: “How do you set your helium spray nozzle?” The ones that’ve been doing it for quite a while will say that they’ll get a glass of water, for example, and they’ll put the spray nozzle down in the water and adjust the flow to where they get one bubble every two to three seconds. I see some variation on that, one to ten seconds. But they’ll try to meter it down. Somebody might say, “I’ll put the nozzle up to my lip and spray so I can barely feel it.”
I’ve run into people who say, “I’m not sure if I’ve got a leak, so I’m going to spray a lot of helium so I can determine it pretty quickly.” But if you spray that helium like you’re trying to dust off the equipment, you will have so much helium in the air the leak detector will definitely react if there’s a leak. However, now you have to wait forever and a day.
To those people, I’ll say, “That’s a good start. If you put that nozzle in that glass of water and it looks like a Ken and Barbie jacuzzi, you’re spending way too much helium into that.” I would meter that down to a very small amount, whether it’s a bubble every three seconds or you can barely feel it on your lip is a good place to start.
And because I made the comment that helium doesn’t necessarily rise but can go different directions based on the wind, air currents in the room, and fresh air makeup, eventually somebody says, “Where should I start?” I’ll say, “I don’t have a problem with you starting at the top of the furnace and working your way down. Be methodical.”
Some people will start at the leak detector they just hooked up because they might have put a leak in the bellows connection from the leak detector. You might start there to make sure the assembly you just did is leak tight.
But start somewhere, be methodical as you move across the system, and remember that helium can go up, down, left, back, or forward depending on what the air currents are.
Doug Glenn: I was actually going to ask you about the air currents, because I thought that was an interesting tip that you had made. In fact, I think that’s like tip four and five in this article. I think we’re dealing with air currents and things of that sort. So, we’ll skip over that, because I think you’veaddressed that.
The Dead Stick Method (16:48)
Doug Glenn: You mention an interesting thing called a “dead stick method” in tip number six. Can you explain what that is?
Dave Deiwert: I’m glad you asked that because I looked back on that later and thought I don’t think I elaborated on that enough for somebody that’s never done the dead stick method. That is a term for when you spray just a little squirt of helium away from you and the furnace, and then stop spraying. Then you’re going to rely on the residual helium that’s coming out of the tip of the nozzle for some period of time.
In my training classes, I typically have a plastic bottle that has a little right-angle nozzle on it. You may have used them back in high school in chemistry; it might have had alcohol in it. I will squirt a little helium in that plastic bottle and then screw the cap on; that will last me for two or three days at a trade show or a training event. I don’t have to squeeze the bottle. There’s enough helium coming out of the nozzle that you can detect leaks.
To demonstrate, I’ll put hair on an O-ring on a test for the leak detector. (It’s the cause of my receding hairline.) I can take that nozzle without squeezing the bottle and move it near the hair that I put in there, and it will detect it very impressively every single time, at least over the course of two to three days.
Perspective looking up into the world’s largest vacuum chamber at NASA’s facility in Sandusky, Ohio Source: Dave Deiwert
My point of demoing that is people tend to spray away too much helium. If there’s five parts per million naturally in the air we breathe, you only need enough delta difference so that as you go past where the leak’s at you can see a reaction from the leak detector and pinpoint it.
Backtrack to if somebody sprays a lot of helium to prove they have a leak. Now they have to wait a long time for the helium to dissipate. And by the way it’s not just dissipating from the room. You’ve sprayed a lot of helium that is now feeding that leak. And as it goes through the leak path in the furnace, it expands back out in front of you. It’s got to pump away from the furnace, too. It’s also got to clear the system and go out to the pumps before you get back to baseline so that you can continue leak checking.
Therefore, if you spray just very small amounts,, you have to get close to where the leak is before you start to get a response. This way you have less concern of helium drifting to the opposite side of the furnace and going through a leak path there — that can really distract. You may think you’re near the leak, but it’s really on the other side of the furnace because you’ve sprayed way too much helium.
Spraying little amounts might make you feel like it’s taking longer. But the fact is, when you start to get a reaction at the leak detector, you can be comfortable that you’re getting close to the where the leak is.
Doug Glenn: If you know you’re in a room with air currents in it (let’s just say there’s a flow of some sort from left to right), does it make sense to always start downwind, and then work your way back across the system?
Dave Deiwert: Yes. If I can feel a fan — Joe’s got his fan on because it’s keeping him cool, and it’s blowing over towards where I’m leak testing, I might say, “Hey Joe, could you turn your fan off a little bit while I’m testing?” He may say, “No, it’s making me comfortable.” All right, now I’ve got to work with that. I know that I can feel the air currents moving from my right towards my left. So, yes, starting downwind and working my way up could be helpful. You want to pay attention to what the air is doing if you can tell. It may be a very calm environment, and you’re not sure what the air currents are doing; just be methodical. Pick somewhere to start in the furnace.
Here’s something else about spraying helium: Once you think you know where the leak is at, every time you put the spray nozzle there you should get the same response. You spray the helium, you get a response, you stop spraying and wait until it drops back to baseline, and then you go back to where you think the leak is. If that’s where the leak is, every time you put the probe there, you should get the same response time at the leak detector. If even one time you put the spray gun there and don’t get a response or not nearly the same, then that’s not where the leak is at. Yeah, you should know beyond a shadow of a doubt when you pinpoint the leak.
Doug Glenn: How often do you see more than one leak at a time? Let’s say you isolate a leak, you think you got it, then say you take the gasket off or whatever you do, do the test again, and there’s still a leak.How often does that happen?
Dave Deiwert: It happens most of the time. When I was a field service engineer and somebody called me in to help, I almost never found one leak. That tells me they were working with one leak that maybe wasn’t large enough to affect their quality or the cycle time, and they were living with it. And the day comes where they have a leak that gets their attention or the leak got larger. It can be more challenging if you’ve got more than one leak. It’s a short-lived celebration when you think you found a leak and then you go to start the process, and, oh, it looks like you still have a leak. That wasn’t the one. So, you might make a case for looking to see if you can pinpoint another leak while you’re in the leak testing mode.
Doug Glenn displays the cover of the November 2024 issue of Heat Treat Today, in which Dave Deiwert’s article, “Basics of Vacuum Furnace Leak Detection, Pt 1,” is featured.
Saving on Helium Gas (21:35)
Doug Glenn: Besides the fact that a helium leak detector can save you all kinds of time because typically you can find a leak faster with a helium leak detector then in a process of elimination, you also mentioned a tip for saving money regarding the mixing of the gas. Could you elaborate on that and any other cost savings tips?
Dave Deiwert: I already mentioned that people tend to spray way too much helium at least until they’re sensitive to that concern and cut back. But when they buy the tanks of helium, they’re buying 100% helium. And remember my comment that you just need enough delta increase in the helium that you’re applying to where the leaks at to be able to pinpoint it. The possibility that you could buy your tanks of helium at a lesser percentage, maybe 25% helium and 75% nitrogen, would help you save on some helium and help your efforts to not be spraying too much.
People have not been saying that in this industry, and so that can make folks nervous. “I don’t know, Dave. We’ve never done that before. I’ve never heard anybody else say that before.” I suggest if you are going through a lot of helium, you could cut down how much helium you’re spraying. You could save some significant money, especially these larger facilities with many furnaces and so forth. Give it a try. Buy one tank of it with a mix gas and pick something that you’re comfortable trying, whether it be 25% or 50% helium and buy one bottle. And the next time you test your furnace and find a leak, then try to look at that leak with the lower percentage helium and prove to yourself whether using a lower percentage of helium is going to save you money.
Doug Glenn: You’re suggesting people get themselves comfortable with it, use their 100% until they find the leak, and then try the lower helium.
Dave Deiwert: When they show the proof to themselves, that they can still have the capability to find leaks like that, then they could save a little money. Plus, there’s the added benefit of not spraying so much helium and having to wait as long for the area to clear up before you can start spraying again to continue to pinpoint a leak.
Doug Glenn: And that would save you additional time. Dave, thank you very much. Is there anything else you’d like to add before we wrap up?
Dave Deiwert: Only that if you know you’ve got a leak in the system — it failed the leak up test or quality or whatever, you sprayed it around the entire system, and you can’t find any leaks — then you’re probably looking at an internal leak most likely past the seat of a valve. Or maybe you’ve got a vent valve that’s leaking past the seat, but your plumbing to that vent valve maybe goes out of the building, so you don’t really have an easy access to spray helium past that.
For example, with an argon valve, you may need to disconnect the argon supply from that valve so you can get access to that side of the valve to spray helium to see if you can detect a leak past the seat of that valve.
Doug Glenn: Dave, thanks very much, I appreciate it. I’m sure we’ll be talking again. I know vacuum leak detection is an important thing.
About The Guest
Dave Deiwert President Tracer Gas Technologies
Dave Deiwert has over 35 years of technical experience in industrial leak detection gained from his time at Vacuum Instruments Corp., Agilent Vacuum Technologies (Varian Vacuum), Edwards Vacuum, and Pfeiffer Vacuum. He leverages this experience by providing leak detection and vacuum technology training and consulting services as the owner and president of Tracer Gas Technologies.
If you have the right leak detection equipment, the process of detecting leaks can be more time efficient. In this Technical Tuesday installment, learn more about the practical side of leak detection, from potential sources of leaks to equipment and methods of effective leak detection. Guest columnist Dave Deiwert, president of Tracer Gas Technologies, also provides 10 tips for identifying the most common sources of leaks. Stay tuned for his follow-up article that will focus on operating and maintaining a helium leak detector and repairing the leaks that are found.
This informative piece can be found inHeat Treat Today’sNovember 2024 Vacuum print edition.
When leaks develop in a vacuum furnace, they can inhibit the furnace’s ability to achieve the desired process vacuum level. Without an appropriate leak detector, an operator and maintenance team are limited to guessing where the leak might be, a time-consuming process of elimination evaluating each component or possible leak point one at a time. Alternatively, if you have the right leak detection equipment, the process of detecting leaks can be more time efficient.
First, a team needs to know the possible sources for leaks — especially if they are troubleshooting without a leak detector. Then, selecting the appropriate equipment can speed up the leak detection process. Ultimately, that equipment is most useful if a team is informed on how to best use and maintain the equipment.
Troubleshooting Without a Leak Detector
If a team does not have a leak detector, they first must disassemble potentially leaking components to clean and replace gaskets and seals. For some products, like valves and pumps, they might use a supplier-provided repair kit.
After reassembling, if they discover they still have a leak in their furnace, they will continue to select possible leaking components for maintenance.
The team would then start with the components most likely to be leaking — for example, the door seal. The door to the furnace is opened and closed every cycle of the furnace as the operator removes products that were under process for the previous cycle and then places the next product, or batch of products, into the furnace. This opening and closing of the door creates wear on the gasket and also provides opportunity for foreign materials and debris to land on the seal and cause a leak. As this is just one possible source of a leak, continuing to troubleshoot can become a lengthy process. (See sidebar for more information on possible sources for leaks.)
Selecting Equipment To Support Vacuum Furnace Leak Detection
Having a leak detector on-site allows a team to identify the source of the leak more efficiently. Typically, major OEM furnace suppliers, their field service teams, and major end-users of vacuum furnaces have selected “fixed magnetic sector mass spectrometers” optimized for using helium as a tracer gas to look for leaks in vacuum furnaces. These are also the tool of choice for OEM companies and end-users in other vacuum applications such as glass coaters, solar panel manufacturing, automotive, medical, aerospace, and others. In industrial manufacturing plants and R&D, we commonly call these tools “helium leak detectors.”
Helium leak detectors are the well-established method for leak testing because helium — the second smallest molecule and a safe, inert gas that does not react with other gasses or material — is useful for finding the smallest of leaks.
Figure 1. Leak detector hooked up to vacuum furnace Source: Dave DeiwertFigure 2. Perspective looking up into the world’s largest vacuum chamber at NASA’s facility in Sandusky, Ohio Source: Dave Deiwert
10 Practical Tips for Leak Detection
The following tips for leak detection pertain to using helium leak detectors:
Understand how your leak detector works to the point that you can confirm it is working properly.
A common question is, “How long after I spray a point on the furnace should I wait for a reaction on the leak rate meter to ensure that point doesn’t leak?” The answer is to characterize your system so that you know what the longest time constant can be for a leak to be detected. For example, purposefully apply a leak at the furthest point on the furnace from where the leak detector is installed. Then, spray helium and count the seconds to when the leak detector reacts to helium from the leak. Now you will know that you never have to wait longer than that without a reaction before moving on to the next point of leak testing.
Avoid moving along too quickly around the furnace as you spray helium. If there is a reaction at the leak detector when you stop spraying, you may have passed the point of leakage. After the leak detector leak rate drops back to baseline, you will try respraying the point of concern. If there is no reaction, consider that you may have moved along too quickly, and retrace the area you had sprayed more slowly. If you do not get a reaction again, it is very possible that the air currents of the room had carried the helium towards a point that you have not even reached yet.
Remember: There are naturally five parts per million of helium in the air we breathe. Therefore, when you spray helium, it becomes the victim of the air currents in the air and the fresh air makeup of the room. Helium can go up, down, left, right, away from you, and towards you depending on the air currents of the room.
Because helium spreads so pervasively, it is better to spray very small amounts of helium so that when you get a reaction from the leak detector, you know you are getting closer to the leak. If you spray helium like you are trying to dust off the system at the same time, you will quickly confirm there is a leak but will be forced to wait forever and a day for the helium to clear up in the room to the point that you can continue looking for the leak.
If you have confirmed the location of the leak to a small area, but there are still several points of possibility within it and you are unable to pinpoint the leak, diminish the amount of helium you are spraying. You can try to further restrict the flow of helium by using the “dead stick” method. This is where you spray helium from the spray nozzle away from the area of interest, then you place the nozzle near the potential leak points one at a time, relying on the residual helium that is present at the nozzle. This can still work well because (if you remember that there are 5 parts per million of helium in the air we breathe) there could still be hundreds, if not thousands or more, parts per million of helium present at the tip of the nozzle — at least long enough for using the dead stick method.
If you are looking to minimize the costs of helium, consider buying your tanks of helium at a lower percentage using nitrogen as the balance gas in the cylinder. People already tend to spray too much helium when conducting leak detector tests, and we are not trying to measure the severity of the leaks. So, decreasing the percentage of helium will save money without negatively impacting leak detection. If you are not yet comfortable with this but interested in testing it, simply buy one tank with a lower percentage of helium. Next time you find a leak with your 100% tank of helium, roll the tank with a lower percentage of helium over, spray the same leak on your system, and determine the difference (if any) in the effectiveness of detecting any leaks found.
Learn the “wellness” checks from your leak detector’s manufacturer. This can help you establish preventative maintenance for your leak detector before it has a problem that makes it unavailable for use when your furnace needs a leak check. Your leak detector manufacturer should be able to recommend what points of interest on their leak detector need regular scrutiny.
Calibrate your leak detector when you start it up and check calibration when you are finished to confirm it is working properly.
If you are fortunate to not need your leak detector for many months, I recommend you schedule a few times per year to start it up and ensure it is still working well. Occasionally, I hear of someone who needed their leak detector after months to a year of disuse who found that it was not working well. Leak detectors, like pumps, should not be neglected indefinitely.
Figure 3. Blower mounted atop pump Source: Dave Deiwert
The Value of Efficiency
While it is possible to identify and repair leaks without a helium leak detector, a team with one is likely to net significant time savings if they operate and maintain it intentionally. An operation with many furnaces typically will have their own leak detector — and probably a spare. Operations with just one or two furnaces may choose to hire a service company to find the leaks in their system; this works well if they rarely encounter leaks on their systems.
“Basics of Vacuum Furnace Leak Detection, Part 2” will cover advancements in helium leak detector technology, operating and maintaining a leak detector, and comparing whether it would make sense to repair vs. replace a leak detector.
About the Author:
Dave Deiwert President Tracer Gas Technologies Source: Dave Deiwert
Dave Deiwerthas over 35 years of technical experience in industrial leak detection gained from his time at Vacuum Instruments Corp., Agilent Vacuum Technologies (Varian Vacuum), Edwards Vacuum, and Pfeiffer Vacuum. He leverages this experience by providing leak detection and vacuum technology training and consulting services as the owner and president of Tracer Gas Technologies.
Operating a hot isostatic press? The stages for HIP processing can become faster and more effective with gas detection technology. Learn about real-time leak detection analysis and continuous monitoring for outgassing.
ThisTechnical Tuesdayarticle byErik Cox, manager of New Business Development at Gencoa, was originally published inHeat Treat Today’sMarch/April 2024 Aerospaceprint edition.
The Problem in HIP
Hot isostatic pressing (HIP) is a widely employed method for densifying powders or cast and sintered parts. It involves subjecting materials to extreme conditions — high pressure (100–200 MPa) and high temperature (typically 1652°F–2282°F, or 900–1250°C) — in a specialized vessel.
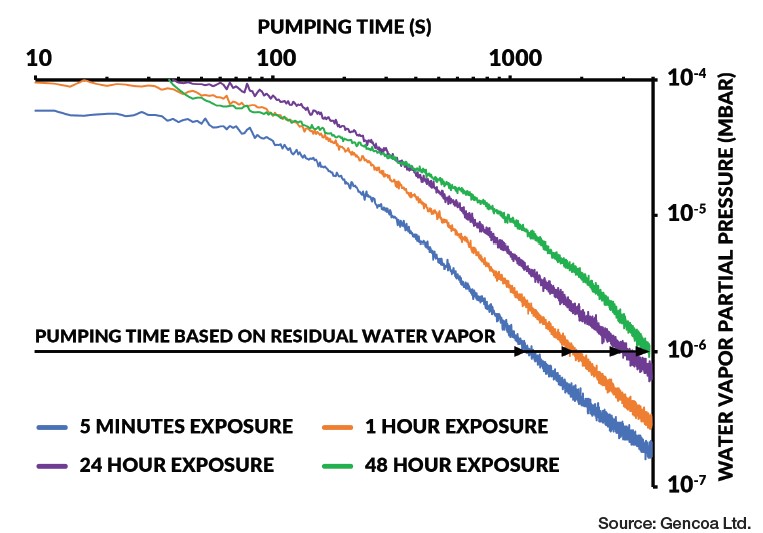
Contact us with your Reader Feedback!Figure 1. Pumping times based on residual water vapor
One aspect of HIP comes before introducing metal or ceramic powders to the vessel: Operators must test for any leaks in the canisters. This ensures that the proper HIP processing can be completed. Secondly, outgassing of the powder must be performed, and thirdly, outgassing the HIP chamber should be done. All three are essential steps that are typically time consuming and inefficient, but new gas detection technology can make this pre-processing stage faster and more effective.
Real-Time Analysis for Leak Detection
Leak detection is normally performed with a helium leak detector, which are expensive and require significant technical knowledge to operate. Some HIP processing providers simply forego leak checking of the canister, fill the HIP canister with powder, and perform the degas; but in this case, any leaks will be identified during the degas process, and powder must then be removed to repair the canister.
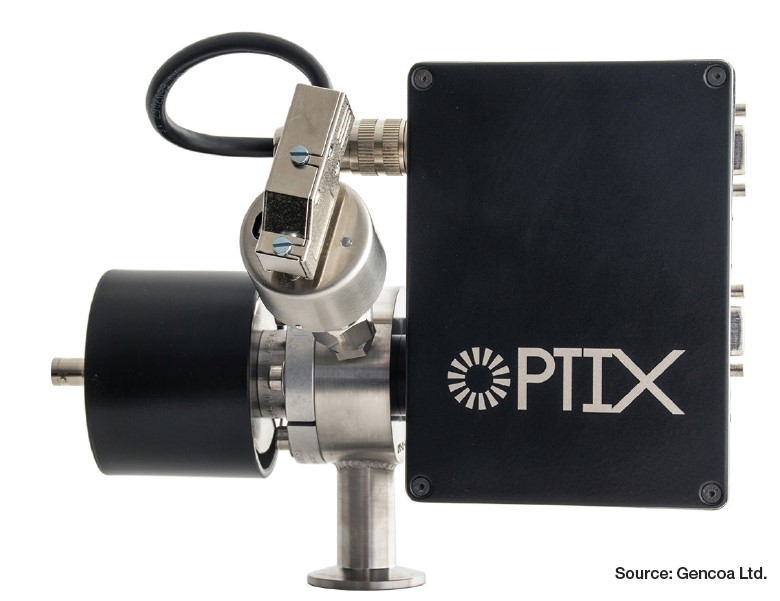
HIP users must look to technology that effectively detects leaks before they proceed to outgassing. One example of this is Gencoa’s Optix gas sensor: As the pumping procedure commences and pressure reaches 0.5 mbar (which typically occurs within 15–30 seconds), the device switches on and employs a sophisticated analysis of the nitrogen that enters the canister from the atmosphere to discern the leak rate of the canisters. When a leak is detected, argon gas can be sprayed around the canister to accurately detect the leak point and allow repair.
Outgassing: Traditional vs. Continuous Monitoring
Outgassing is a critical step in the preconditioning of powders for HIP processed components, involving the removal of adsorbed gases and water vapor from the metal powder through vacuum pumping. Traditionally, the endpoint for this process is not monitored, leading to an overly long vacuum pumping stage of up to several days to ensure that the powders are correctly prepared.
Th is challenge is addressed by providing continuous monitoring throughout the entire degassing process, reducing the time to degas through the ability of the Gencoa Optix gas sensor to precisely determine the degas endpoint.
Figure 2. Gencoa Optix
By offering real-time feedback and notifying users when degassing is complete, this sensor saves time and ensures the production of high-quality components with traceability. With the Optix, one user saw their degas times reduced from 24 hours to 4 hours. The sensor is capable of residual gas analysis, providing a comprehensive solution for improved productivity. Its wide-range pressure measurement capabilities, coupled with efficient leak checking of HIP processing enclosures, further enhance the overall operational efficiency.
Optix operates as a highly sensitive, stand-alone device that utilizes a small plasma (“light”) that detects the gas species present. This design ensures that the detector remains impervious to contamination or vacuum issues, maintaining continuous monitoring and avoiding potential damage. Because the device also eliminates the need for filament replacement or disassembly of components for maintenance, the design will perform at 100% operational uptime even in the harshest environments.
Indispensable Tools for HIP Processing
HIP operators need to maintain equipment efficiently and effectively, and technologies that integrate solutions not only enhance overall productivity, leak detection, and control of the degassing process, but are indispensable to improving the overall quality and traceability of components. Leveraging technologies that allow for early detection and increase uptime will only enhance the future HIP can offer to the AM-focused aerospace industry.
About the Author
Erik Cox, Manager of New Business Development, Gencoa
Dr. Erik Cox is a former research scientist with experience working in the U.S., Singapore, and Europe. Erik has a master’s degree in physics and a PhD from the University of Liverpool. As the manager of New Business Development at Gencoa, Erik plays a key role in identifying industry sectors outside of Gencoa’s traditional markets that can benefit from the company’s comprehensive portfolio of products and know-how.
For more information:
Contact Erik at sales@gencoa.com
Find Heat Treating Products And Services When You Search On Heat Treat Buyers Guide.Com
Let’s discover new tricks and old tips on how to best serve air and atmosphere furnace systems. In this series, Heat Treat Today compiles top tips from experts around the industry for optimal furnace maintenance, inspection, combustion, data recording, testing, and more. Part 3, today's tips, examines AI and record keeping. Look back to Part 1 here for tips on seals and leaks and Part 2 here for burners and combustion tips.
This Technical Tuesday article is compiled from tips in Heat Treat Today's February Air & Atmosphere Furnace Systems print edition. If you have any tips of your own about air and atmosphere furnaces, our editors would be interested in sharing them online at www.heattreattoday.com. Email Bethany Leone at bethany@heattreattoday.com with your own ideas!
1. Use AI To Simplify Your Maintenance
Contact us with your Reader Feedback!
"cloud view of heat treating operation" Source: NITREX
Simplify your maintenance! Today, using artificial intelligence (AI) software allows the “Cloud” to do the hard work. NITREX has introduced QMULUS, a web-based software solution, with each of its nitriding systems, which examines key parameters to determine if your furnace is having any issues. Gas flows, amperage, motors, and cycles are all monitored for health factors. But QMULUS is so much more than that. It also analyzes input usages and calculates the cost of each run; logs all data relevant to running processes more efficiently; and provides an easy and seamless cloud view of heat treating operations.
This is a very simple tip that is often overlooked when customers are focused on meeting production goals instead of the maintenance of their equipment. It is critical to record the operating settings of their furnace systems when parts are coming out at their best, or simply before issues arise. When something goes awry in the process and troubleshooting is required, service technicians hear all too often that there is no record of what the ideal or correct setpoints are for various systems. Nearly every item on a modern heat treating furnace (or in its control panel) has a setpoint or position that can be recorded or physically marked. Now, clearly some items are more critical than others when it comes to air and atmosphere settings. Below are a few items you’ll want to have setpoint/positioning records of before they require troubleshooting:
Flowmeter setpoints (at the furnace and generator)
Blower/pump/motor VFD setpoints (primarily frequency setpoints and ramp rates)
Manual or actuated damper positions on flues
Regulator setpoint (from pressure gauge or in-line test port)
High/low pressure switch setpoints
Any air/gas/atmosphere ratios for various recipe steps
Burnout frequency and duration (if applicable)
An added incentive to record these settings is the preventative maintenance benefit. The best way to avoid supply chain issues and delivery delays is to fix a problem before it grows into a bigger issue. When a setpoint/setting is correct but product quality begins changing, it is a warning sign that consumables may be approaching end of life (such as nickel catalyst in endothermic gas generators) or components require maintenance (such as air inlet filter replacements).
Let’s discover new tricks and old tips on how to best serve air and atmosphere furnace systems. In this series, Heat Treat Today compiles top tips from experts around the industry for optimal furnace maintenance, inspection, combustion, data recording, testing, and more. Part 2, today's tips, examines burner and flame safety. Look back to Part 1 here for tips on seals and leaks.
This Technical Tuesday article is compiled from tips in Heat Treat Today's February Air & Atmosphere Furnace Systems print edition. If you have any tips of your own about air and atmosphere furnaces, our editors would be interested in sharing them online at www.heattreattoday.com. Email Bethany Leone at bethany@heattreattoday.com with your own ideas!
1. Operating with a Multiple Burner System
Contact us with your Reader Feedback!
If a furnace or oven has a multiple burner combustion system with only one valve train, a multi-burner combustion safeguard should be used. This ensures that if one burner fails, they all go out.
Source: Bruce Yates, "Ten Tips for Safeguarding Combustion Processes"
#multiburner #combustion #safety
2. Regularly Inspect Retort Alloys
Source: Nitrex
Retort alloys must be inspected on a regular basis. Hot spots can be identified by bulges. Plastic deformation occurs due to overheating, causing the hotter section to bulge because it is surrounded by stronger metal. Inspect your retorts or radiant tubes for deformations. In addition, constant thermal cycling can cause problems with some alloys. Look for cracks in welds or near welds. Some leak detection methods can also detect alloy issues or overheating.
Localized overheating could indicate a problem with the burner or the heating element. Early detection and correction can save you a lot of money on expensive alloys.
Flame supervision may be defined as the detection of the presence or absence of flame. If a flame is present during the intended combustion period, the supervisory system will allow a fuel flow to feed combustion. If the absence of flame is detected, the fuel valves are de-energized.
This basic definition does not consider the hazard potential during startup or ignition, however. A dangerous combustible mixture within a furnace or oven consists of the accumulation of combustibles (gas) mixed with air, in proportions that will result in rapid or uncontrolled combustion (an explosion). It depends on the quantity of gas and the air-to-fuel ratio at the moment of ignition.
Source: Bruce Yates, "Ten Tips for Safeguarding Combustion Processes"
#flamedetection #combustion #valves
4. Remember that Flame Safety Starts with Purging
The sequence for flame safety starts with purging the furnace or oven. Purge time should allow for four air changes.
Fuel valves can — and do — leak gas. The purpose of purging is to remove combustible gases from the combustion chamber before introducing an ignition source. The four air changes in the combustion chamber are based on a worst-case scenario that includes having a burner chamber that is completely filled with gas.
Once airflow for purge is verified, the proof-of-valve closure is confined and safety limits are proven. Then the purge timer — which may or may not be integral to the combustion safeguard — determines the period of time required to evacuate the combustion chamber.
Source: Bruce Yates, "Ten Tips for Safeguarding Combustion Processes"