What if your vacuum furnace could clean itself? In this Technical Tuesday installment, Bob Hill, FASM, president of Solar Atmospheres of Western PA and Michigan, explores a revolutionary dual roughing pump configuration that eliminates the need for solvents, foil wrapping, and manual pre-cleaning.
This informative piece was first released inHeat Treat Today’sDecember 2025 Annual Medical & Energy Heat Treat print edition.
Vacuum furnaces require an exceptionally clean environment to process critical components, from medical devices to aerospace. But laborious, time-consuming component cleaning to ensure purity of the furnace and parts does not necessarily need to be done by people. With the right pumps, your vacuum furnace can clean itself. Explore what a fully integrated, vacuum-based cleaning cycle could look like by leveraging an innovative dual roughing pump configuration.
In the vacuum heat treating world, where critical components are often near-net-shape with minimal to zero stock removal, the surface aesthetics of the final product are critical to the end user. Across industries like aerospace, medical devices, and power generation, vacuum processing has become increasingly valued — not only for its precision, but also for its ability to eliminate downstream operations, ultimately saving cost and time.
Given these benefits, clients are frequently willing to pay a premium for bright, clean work. To achieve these pristine results, vacuum heat treaters insist that incoming parts must be clean and oil-free. However, what qualifies as “clean” in a manufacturing environment rarely meets the exacting standards required for vacuum thermal processing. As a result, many commercial heat treaters adopt secondary cleaning measures to ensure part cleanliness and to protect their vacuum furnaces from contamination by machining oils, lubricants, Dykem, oxidation, or polishing compounds.
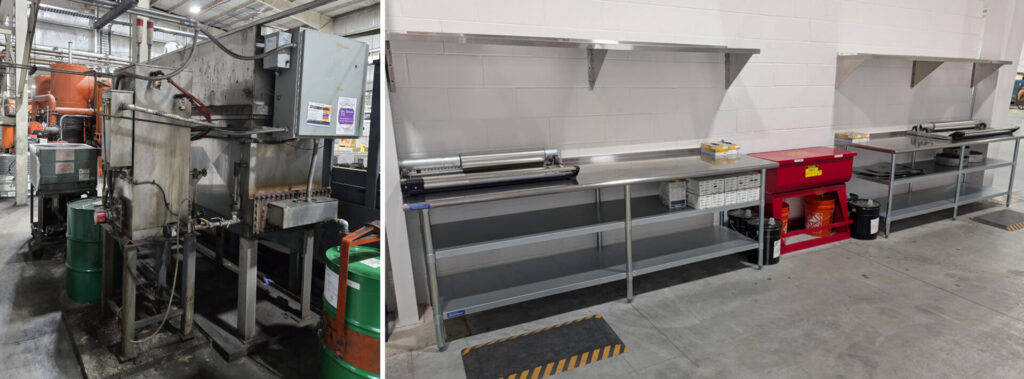
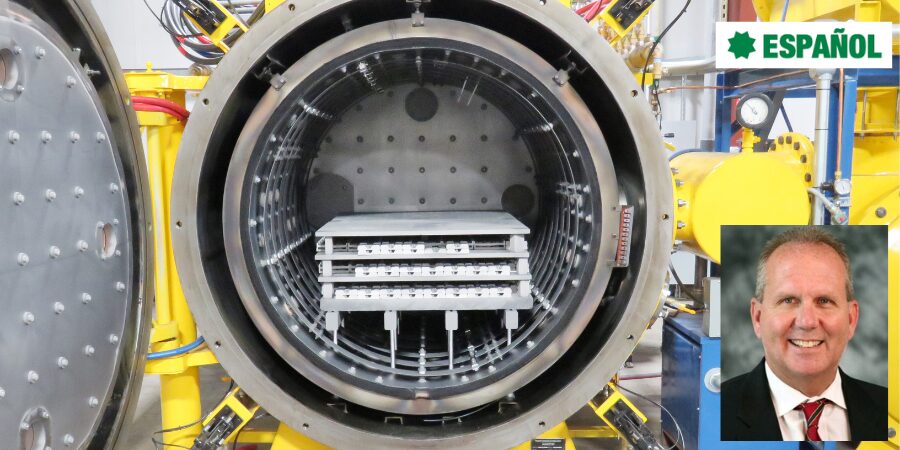
Figure 1. Vacuum degreasing furnace. Source: Solar Atmospheres
Pre-Heat Treatment Cleaning: Traditional Challenges
Before any vacuum heat treatment, components must be thoroughly cleaned to remove organic and inorganic contaminants. Common practices include solvent immersion, drying, and vapor degreasing. This cleaning step is designed to eliminate residues that can volatilize and redeposit within the vacuum furnace, potentially compromising part quality and damaging the vacuum furnace hot zone and cold wall.
However, commonly used cleaning agents are often flammable, toxic, environmentally regulated, and costly to dispose of when spent.
Figure 2. (Left) Vapor degreaser and solvent cleaning and (right) foil wrapping station. Source: Solar AtmospheresFigure 3. As a defensive measure to prevent furnace damage from potential upstream sourced contaminants, parts ready for heating are wrapped in stainless steel foil. Source: Solar Atmospheres
Given that commercial heat treaters process parts from thousands of upstream operations, each introducing its own set of contaminants, cross-contamination becomes a significant risk. Stainless steel foil wrapping is often used as a defensive measure, isolating parts from the furnace environment. While wrapping is often effective, it can be labor-intensive, expensive, and even potentially hazardous. Even with the proper PPE, the foil edges are razor-sharp. Foil wrapping continues to be a top health and safety concern for employees.
The MIM Furnace: A Catalyst for Innovation
Five years ago, Solar Atmospheres of Western Pennsylvania was tasked with sintering pre-sintered metal injection molding (MIM) parts at 2200°F. The binders present in these firearm parts volatilized during processing and heavily contaminated the vacuum furnace, resulting in extensive downtime and maintenance.
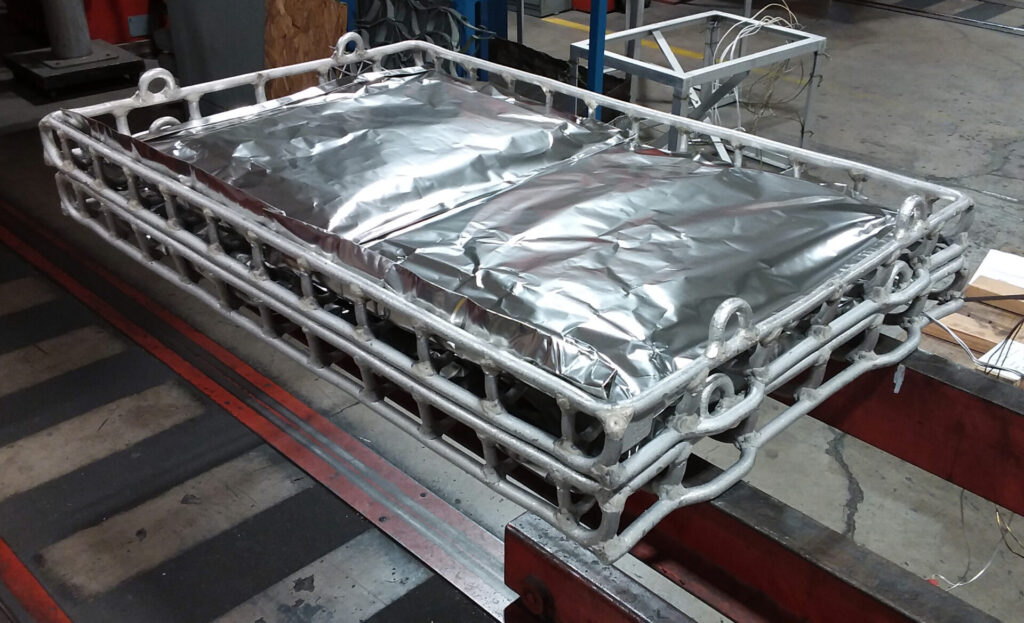
Figure 4. Bright, clean 17-4PH stainless steel parts post heat treatment in a vacuum degreasing furnace. Source: Solar Atmospheres
Instead of constructing a traditional “cold trap” to capture volatiles, CEO William Jones developed a more innovative solution: a “hot trap” designed to divert and capture contaminants before they could deposit inside the furnace. This proactive adaptation has proven to drastically improve part quality while eliminating the laborious and frequent cleaning of hot zones and cold walls.
After that MIM job ended, the underutilized furnace prompted experimentation. This adapted furnace proved to perform well on unwanted binders. So, we set out to test how this same system could be adapted to remove impurities from everyday production parts. After extensive trials using noncritical PH-grade stainless steel components, a fully integrated, vacuum-based cleaning and aging cycle was perfected. This development has since replaced traditional expensive pre-cleaning methods and dangerous foil wrapping, producing consistently clean and bright 17-4 PH aerospace components.
The Self-Cleaning Vacuum Furnace: How It Works
The key innovation lies in a dual roughing pump configuration.
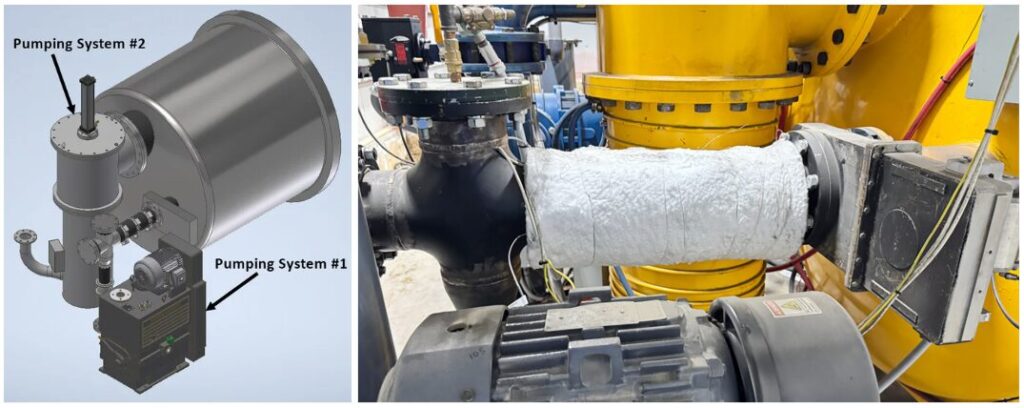
(Left) Figure 5. Two-stage pumping system. (Right) Figure 6. Heated exit port on Pumping System #1. Source: Solar Atmospheres
Pumping System #1 — Initial Pump-Down and Contaminant Removal:
Components are loaded into the furnace unwrapped and uncleaned.
Only Roughing Pump #1 is activated during the initial pump-down.
A slow temperature ramp allows contaminants to vaporize and exit the hot zone through a heated port into Pump #1.
Contaminants are safely trapped in the pump’s oil — the “hot trap.”
Pumping System #2 — Transition to Heat Treatment:
After off gassing is complete, Pump #1 is isolated.
Pump #2 system, which includes a roughing pump, booster, diffusion, and holding pump, takes over.
The chamber is then brought to 1 x 10⁻⁵ Torr and the standard vacuum thermal cycle proceeds.
This two-stage pumping sequence cleans both the parts and the chamber prior to heat treatment without ever opening the furnace door.
Results and Benefits
This newly developed vacuum furnace and process produces the following:
Cleaner parts: Vacuum cleaning penetrates blind holes, threads, and keyways more effectively than traditional solvent or vapor degreasing methods.
Injury reduction: The process eliminates the need for hazardous foil wrapping, significantly improving employee safety.
Environmental and cost advantages: The process reduces or eliminates chemical solvent use, cuts labor associated with pre-cleaning and wrapping, and reduces hazardous waste and disposal costs.
Furnace maintenance improvements: Hot zones and cold walls remain pristine — no weekly teardowns. Pump #1 oil is changed biweekly, eliminating roughing pump seizure concerns due to contaminated oil.
Conclusion: A Breakthrough in Vacuum Processing
Historically, part cleanliness in vacuum heat treating has been a persistent challenge — one often addressed through costly labor, chemicals, and dangerous stainless steel or titanium foil wrapping. Solar Atmospheres’ innovative dual-pump vacuum cleaning system, integrated seamlessly with a standard vacuum heat treatment cycle, redefines industry best practices.
This “self-cleaning furnace” concept not only delivers superior part finishes but also enhances safety, reduces environmental impact, and cuts operating costs. In a world where precision, cleanliness, and sustainability matter more than ever, this advancement may very well create a revolution in clean vacuum processing.
About The Author:
Robert (Bob) Hill, FASM President Solar Atmospheres of Western PA and Michigan Source: Solar Atmospheres
Bob Hill, FASM, president of Solar Atmospheres of Western PA and Michigan, began his career with Solar Atmospheres in 1995 at the headquarters plant located in Souderton, Pennsylvania. In 2000, Mr. Hill was assigned the responsibility of starting Solar Atmospheres’ second plant, Solar Atmospheres of Western PA, in Hermitage, Pennsylvania, where he has specialized in the development of large furnace technology and titanium processing capabilities. Additionally, he was awarded the prestigious Titanium Achievement Award in 2009 by the International Titanium Association. In 2022, Bob became president of his second plant, Solar Atmospheres of Michigan.
For more information: Contact Solar Atmospheres or visit www.solaratm.com.
¿Y si su horno de vacío pudiera limpiarse automáticamente? En esta entrega de Technical Tuesday, Bob Hill, FASM, presidente de Solar Atmospheres of Western PA and Michigan, explora una revolucionaria configuración de bomba de vacío doble que elimina la necesidad de disolventes, envoltura con lámina metálica y prelimpieza manual.
Este artículo informativo se publicó por primera vez en Heat Treat Today’sDecember 2025 Annual Medical & Energy Heat Treat print edition. Traducido por Víctor Zacarías.
Los hornos de vacío requieren un entorno excepcionalmente limpio para procesar componentes críticos, desde dispositivos médicos hasta componentes aeroespaciales. Sin embargo, la limpieza de componentes, laboriosa y que consume mucho tiempo para garantizar la pulcritud del horno y las piezas, no tiene por qué ser necesariamente realizada por personas. Con las bombas adecuadas, su horno de vacío puede limpiarse automáticamente. Descubra cómo sería un ciclo de limpieza al vacío totalmente integrado mediante una innovadora configuración de doble bomba de vacío primario.
En el ámbito del tratamiento térmico al vacío, donde los componentes críticos suelen tener una forma casi final con una mínima o nula eliminación de material, la estética superficial del producto final es fundamental para el usuario final. En sectores como el aeroespacial, el de dispositivos médicos y el de generación de energía, el procesamiento al vacío se ha vuelto cada vez más valioso, no solo por su precisión, sino también por su capacidad para eliminar operaciones posteriores, lo que en última instancia ahorra tiempo y dinero.
Dadas estas ventajas, los clientes suelen estar dispuestos a pagar un precio premium por un trabajo limpio y brillante. Para lograr estos resultados perfectos, las empresas de tratamiento térmico al vacío exigen que las piezas recibidas estén limpias y libres de aceite. Sin embargo, lo que se considera “limpio” en un entorno de fabricación rara vez cumple con los exigentes estándares requeridos para el procesamiento térmico al vacío. Por ello, muchos tratadores térmicos adoptan medidas de limpieza secundarias para garantizar la limpieza de las piezas y proteger sus hornos de vacío de la contaminación por aceites de maquinado, lubricantes, tintas, oxidación o compuestos de pulido.
Figura 1. Horno de desengrasado al vacio. Fuente: Solar Atmospheres
Limpieza previa al tratamiento térmico: desafíos tradicionales
Antes de cualquier tratamiento térmico al vacío, los componentes deben limpiarse a fondo para eliminar contaminantes orgánicos e inorgánicos. Las prácticas habituales incluyen inmersión en disolvente, secado y desengrasado por vapor. Esta limpieza tiene como objetivo eliminar los residuos que pueden volatilizarse y depositarse dentro del horno de vacío, lo que podría comprometer la calidad de la pieza y dañar la zona caliente y la pared fría del horno.
Sin embargo, los productos de limpieza de uso común suelen ser inflamables, tóxicos, estar sujetos a regulaciones ambientales y su eliminación resulta costosa una vez empleados.
Figura 2. (Izquierda) Desengrasante de vapor y limpieza con solvente y (derecha) estación de envoltura con papel aluminio. Fuente: Solar AtmospheresFigura 3. Como medida de protección para evitar daños en el horno por posibles contaminantes procedentes de fuentes anteriores, las piezas listas para el tratamiento térmico se envuelven en papel de aluminio. Fuente: Solar Atmospheres
Dado que las plantas de tratamiento térmico comerciales procesan piezas procedentes de miles de operaciones previas, cada una con su propio conjunto de contaminantes, la contaminación cruzada representa un riesgo significativo. El embalaje con lámina de acero inoxidable se utiliza a menudo como medida de protección, aislando las piezas del ambiente del horno. Si bien el empaque suele ser eficaz, puede ser laborioso, costoso e incluso potencialmente peligroso. Aun con el equipo de protección personal adecuado, los bordes de la lámina son extremadamente filosos. El embalaje con lámina sigue siendo una de las principales preocupaciones en materia de salud y seguridad para los empleados.
El horno para MIM: el catalizador para la innovación
Hace cinco años, Solar Atmospheres, con sede en el oeste de Pensilvania, recibió el encargo de sinterizar piezas pre-sinterizadas mediante moldeo por inyección de metal (MIM) a 1200 °C. Los aglutinantes presentes en estas piezas de armas de fuego se volatilizaron durante el proceso y contaminaron gravemente el horno de vacío, lo que ocasionó largos periodos de inactividad y mantenimiento.
Figura 4. Piezas de acero inoxidable 17-4PH brillantes y limpias tras el tratamiento térmico en un horno de desengrasado al vacío. Fuente: Solar Atmospheres
En lugar de construir una trampa fría tradicional para capturar los volátiles, el director ejecutivo, William Jones, desarrolló una solución más innovadora: una trampa caliente diseñada para desviar y capturar los contaminantes antes de que se depositaran dentro del horno. Esta adaptación proactiva ha demostrado mejorar drásticamente la calidad de las piezas, eliminando la laboriosa y frecuente limpieza de las zonas calientes y las paredes frías.
Tras finalizar ese trabajo de MIM, el horno subutilizado impulsó la experimentación. Este horno adaptado demostró un buen rendimiento con aglutinantes no deseados. Así pues, nos propusimos probar cómo adaptar este mismo sistema para eliminar impurezas de piezas de producción diaria. Tras exhaustivas pruebas con componentes no críticos de acero inoxidable grado PH, se perfeccionó un ciclo de limpieza y envejecimiento totalmente integrado, basado en vacío. Este desarrollo ha sustituido desde entonces a los costosos métodos tradicionales de prelavado y al peligroso envoltorio en aluminio, produciendo componentes aeroespaciales 17-4 PH consistentemente limpios y brillantes.
Horno de vacío autolimpiante: Cómo funciona
La innovación clave reside en una configuración de doble bomba de vacío primario.
(Izquierda) Figura 5. Sistema de bombeo de dos etapas. (Derecha) Figura 6. Salida calefactada del sistema de bombeo n.° 1. Fuente: Solar Atmospheres
Sistema de bombeo n.° 1: Bombeo inicial y eliminación de contaminantes:
Los componentes se cargan en el horno sin envolver ni limpiar.
Durante el bombeo inicial, solo se activa la bomba de vacío primario n.° 1.
Un aumento gradual de la temperatura permite que los contaminantes se vaporicen y salgan de la zona caliente a través de un puerto calefactado hacia la bomba n.° 1.
Los contaminantes quedan atrapados de forma segura en el aceite de la bomba, la «trampa caliente».
Sistema de bombeo n.° 2: Transición al tratamiento térmico:
Una vez completado el bombeo, se aísla la bomba n.° 1.
El sistema de bombeo n.° 2, que incluye una bomba de vacío primario, una bomba de refuerzo, una bomba de difusión y una bomba de mantenimiento, entra en funcionamiento.
A continuación, la cámara se lleva a 1 x 10⁻⁵ Torr y se inicia el ciclo térmico de vacío estándar.
Esta secuencia de bombeo en dos etapas limpia tanto las piezas como la cámara antes del tratamiento térmico sin necesidad de abrir la puerta del horno.
Resultados y beneficios
Este horno de vacío y proceso recientemente desarrollados producen lo siguiente:
Piezas más limpias: La limpieza por vacío penetra en barrenos ciegos, roscas y chaveteros con mayor eficacia que los métodos tradicionales de desengrase con solventes o vapor.
Reducción de lesiones: El proceso elimina la necesidad de envolver con lámina metálica, lo que mejora significativamente la seguridad de los empleados.
Ventajas ambientales y económicas: El proceso reduce o elimina el uso de solventes químicos, disminuye la mano de obra asociada con la limpieza previa y el embalaje, y reduce los costos de disposición de residuos peligrosos.
Mejoras en el mantenimiento del horno: Las zonas calientes y las paredes frías se mantienen impecables, sin necesidad de desmontajes semanales. El aceite de la bomba n.° 1 se cambia cada dos semanas, lo que elimina los problemas de bloqueo de la bomba de vacío debido a la contaminación del aceite.
Conclusión: Un avance revolucionario en el procesamiento al vacío
Históricamente, la limpieza de las piezas en el tratamiento térmico al vacío ha sido un desafío constante, a menudo abordado con mano de obra costosa, productos químicos y el peligroso uso de lámina de acero inoxidable o titanio para su envoltura. El innovador sistema de limpieza al vacío de doble bomba de Solar Atmospheres, integrado a la perfección con un ciclo estándar de tratamiento térmico al vacío, redefine las mejores prácticas de la industria.
Este concepto de “horno autolimpiante” no solo ofrece acabados superiores en las piezas, sino que también mejora la seguridad, reduce el impacto ambiental y disminuye los costos operativos. En un mundo donde la precisión, la limpieza y la sostenibilidad son más importantes que nunca, este avance podría crear una revolución en el procesamiento al vacío limpio.
Acerca del autor:
Robert (Bob) Hill, FASM Presidente Solar Atmospheres de Western Pensilvania y Michigan Fuente: Solar Atmospheres
Bob Hill, FASM, presidente de Solar Atmospheres de Western Pensilvania y Michigan, comenzó su carrera en Solar Atmospheres en 1995 en la planta principal ubicada en Souderton, Pensilvania. En 2000, el Sr. Hill fue designado para la puesta en marcha de la segunda planta de Solar Atmospheres, Solar Atmospheres of Western PA, en Hermitage, Pensilvania, donde se especializó en el desarrollo de tecnología de hornos de gran tamaño y procesamiento de titanio. Además, en 2009 recibió el prestigioso Titanium Achievement Award de la International Titanium Association. En 2022, Bob asumió la presidencia de su segunda planta, Solar Atmospheres de Michigan.
Para más información: Contacte con Solar Atmospheres o visite www.solaratm.com.
Part 1 of this article by Dave Deiwert, owner and president of Tracer Gas Technologies, was published inHeat Treat Today’sNovember 2024 Vacuum Heat Treatprint edition and online and explored finding leaks with and without a leak detector, the best equipment for leak detection, and 10 tips for finding a leak with a helium leak detector. In this week’s Technical Tuesday we bring you part 2, where Dave further addresses leak detection using a helium leak detector including modern advancements in helium leak detector technology, the best place to connect a leak detector, maintaining a leak detector, and discerning whether to repair or replace components with a leak.
This informative piece can be found in Heat Treat Today’sMarch 2025 Aerospace print edition.
Past Challenges in Leak Detector Operation
When I started my career in 1989, helium leak detectors required frequent maintenance, often caused by improper shutdown or power outage. Another problem with the older detectors is how easily someone can improperly disconnect the test line while it is still in test mode. These situations could cause backflow of diffusion pump oil. An improper shutdown or power loss often required a major overhaul of the leak detector before you could use it again.
If an operator or maintenance technician forgot the leak detector was still in test mode and disconnected the test line from the leak detector to the furnace, the inrush of air to the leak detector also would require a major overhaul of the leak detector. Sometimes the inrush of air would cause the filament in the mass spectrometer to burn out. Additionally, in the days of diffusion pump leak detectors, significant backflow of diffusion pump oil could enter the valve block and possibly the mass spectrometer.
Modern Advancements in Helium Leak Detectors
The first major improvement in leak detector design targeting reliability and significantly lowering the cost of ownership was replacing the diffusion pump in the detector with a turbo pump. Replacing the diffusion pump with a turbo pump in modern leak detectors allows that leak detector to get into test mode sooner at a higher crossover pressure.
Figure 1. Evaluating a vacuum furnace for leaks
In addition, the turbo pumped leak detectors are much less at risk for pressure bursts due to opening the test line while still in test mode or operating some process gas valve while the leak detector is in test mode. With diffusion pumped leak detectors, these events cause a significant maintenance event. But with a turbo pumped leak detector, most likely it will drop out of test mode but be ready to go back into it once the pressure burst event has been solved.
A third benefit of the turbo pumped leak detectors is they typically have a much better helium pumping speed during testing which helps with response time, reaching base leak rate sooner, and recovering more quickly after detecting a leak.
Lastly, leak detectors with greater helium pumping speed benefit with a greater signal-to-noise ratio.
The next major advancement in leak detector design was replacing tungsten filaments with thoria-coated iridium; today the whole leak detector industry is using yttria-coated iridium filaments. The newer fi lament materials operate at a lower temperature but the most significant benefit is how much more robust they are to pressure bursts. Tungsten filaments used in older leak detector mass spectrometer designs would “burn out,” creating an open circuit and loss of operational capability of the leak detector. My experience and that of others shows you can expect to get thousands of hours of more use from each modern filament vs. the old tungsten filaments. This development further aided the reliability and cost-effective ownership of leak detectors.
Another advancement is that modern detectors can now respond to sudden rises in test pressure. If an operator accidentally leaves the leak detector in test mode and then proceeds to disconnect the hose from the furnace, the leak detector will likely sense the sudden rise in test pressure, close the test valve, and then turn off the mass spectrometer filaments and amplifier to protect them and the turbo pump from the pressure spike. The leak detector will document the event as an alarm but soon be ready for the next test with no maintenance required.
Older technology leak detectors gave the user no status signals beyond:
Filament on or off
High vacuum for mass spectrometer gauge or status light
Sight glass for the rotary vane pump
Most likely an end user with an older leak detector has to rely on the manufacturer or other third-party service company to repair or provide preventative maintenance.
Newer technology leak detectors have a full range of alarms and status messages for any issues of concern. For example:
Filament on or off
Filament life or condition
Test port pressure
High vacuum gauge
Turbo pump controller status readings
Error messages for any problems detected
Next maintenance date required
Last calibration performed
Many other messages per the manufacturer’s manual
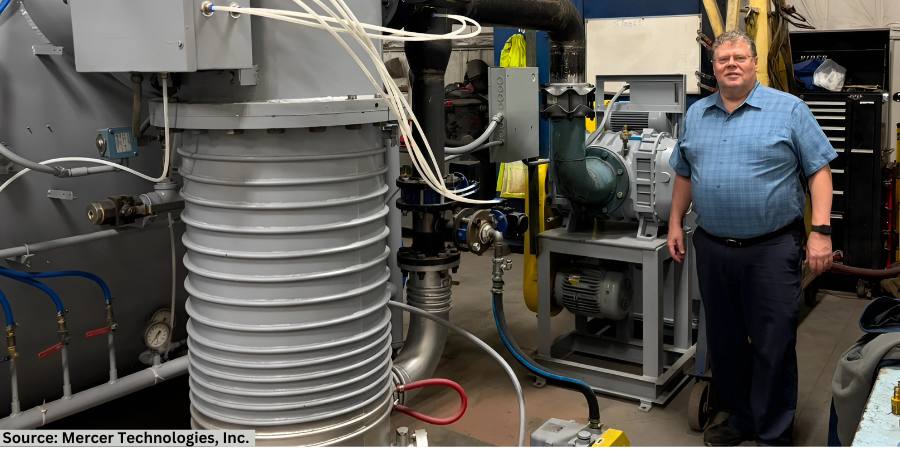
Figure 2. Dave with a vacuum pumping system recently remanufactured by Midwest Vacuum Pumps Inc. in Terre Haute, Indiana
Maintaining an Older vs. Modern Leak Detector
An end user or OEM still using diffusion pumped leak detectors with tungsten filaments is probably overhauling their leak detector every one to two years at best, or multiple times per year at worst. Depending on how much they use it and how knowledgeable their operators are, the obsolete leak detectors are probably costing them at least several thousands of dollars per event, not to mention the time lost in production as they wait to get a leak detector working so they can find the leak in their furnace.
On the other hand, an end user or OEM with a modern helium leak detector may be fortunate enough to have their model still in production by their supplier today. They can most likely go several to many years without maintenance beyond maintaining the oil quality and level in the rotary vane pump of the leak detector.
Where To Connect the Leak Detector
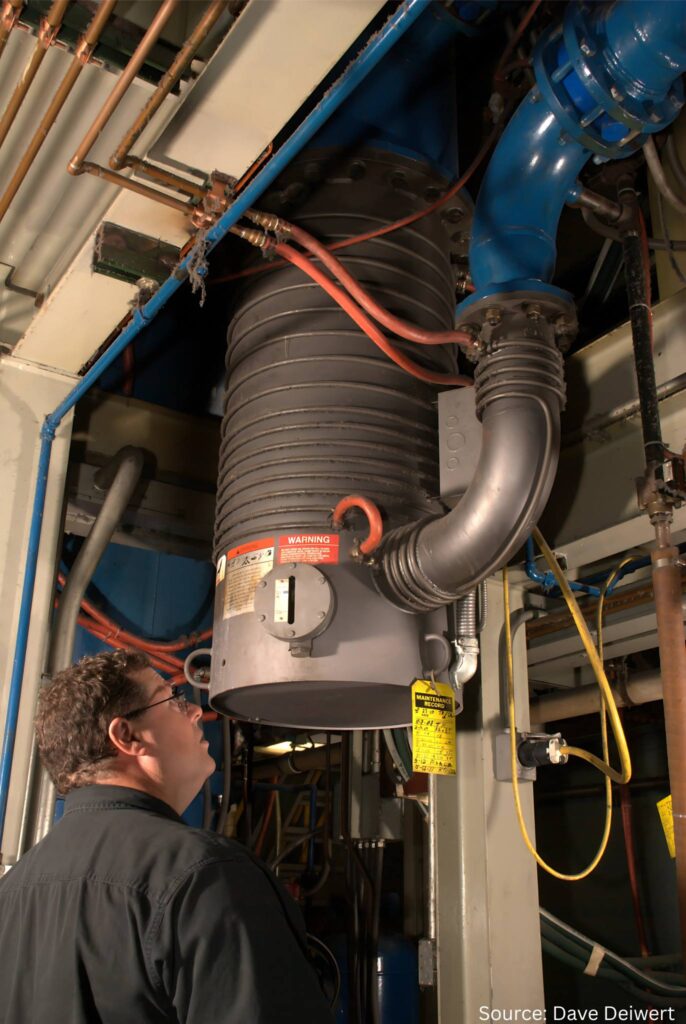
Figure 3. Leak testing a vacuum furnace
Th ere has been much discussion over the years on where to connect the leak detector to a vacuum furnace. Some think that because they are leak testing a furnace they should connect the leak detector directly to the furnace. While you can do that, you are asking a leak detector — typically with an NW25 vacuum connection or some type of hose barb connector — to compete with the typically very large port of the diffusion pump; in systems without a diffusion pump, the leak detector competes with the blower. In molecular flow level of vacuum, the conductance of helium to that 1” target is significantly lower than the conductance to the port of the valve to the diffusion pump or the blower (imagine a 1” vs. a 10” connection, for example).
It is best to connect to a port near the inlet of the blower, which is typically available. You would still be using an NW25 vacuum connection or smaller hose barb fitting, but you will be sampling the flow to the blower. The recommended connections from the leak detection to the blower should all be the same as to the leak detector test port. Using smaller connectors to the leak detector diminishes conductance to the leak detector from the furnace. This, in turn, decreases the performance of the leak detector.
It is also best to have a manually operated NW25 ball valve that is permanently installed at this point, which would be closed normally with a “blank” fitting clamped to the port on that valve. This would facilitate the following recommendation that preventative maintenance leak checks be completed during long furnace processes.
How To Conduct Preventative Maintenance Leak Checks During Operation
While the furnace is under vacuum in a long furnace process, place the leak detector in test mode. While in test mode, the leak detector creates a vacuum to the closed ball valve on the furnace, as previously recommended. Next, place the leak detector momentarily in standby mode. This closes the test valve of the leak detector but does not vent the test port. Then, open the ball valve. This lets the leak detector test port gauge show the current vacuum level now that it’s connected to the furnace. Now put the leak detector back into test mode.
At this point, you are ready to spray helium at potential leak points on the furnace. While many often begin checking with the leak detector hose at the ball valve to ensure they did not create a leak during assembly, then it is best to move to the opposite side of the furnace — to the furthest point of the vacuum system of the furnace — and slowly work back to the pumps.
A common question is how much helium should you spray? People often say they were taught to adjust the helium spray so that they get one or two bubbles in a glass of water per second or to adjust the spray so that they can barely feel it on their lips or tongue. That last one makes some people nervous. Then, it is basically like playing the hot and cold game as you spray the potentially leaking points of the furnace. More information on helium spray technique can be found in part 1 of this article.
Finding a Leak
The closer you get to a leak, the larger and faster the response will be on the leak rate meter of the leak detector. To confirm that you have located a leak, repeatedly spray the point of leakage and ensure that you get the same peak leak rate display and response time with each spray at that leak point.
Earlier we mentioned that you can accomplish preventative maintenance leak checks on furnaces while in a long process. This is because helium is inert, as mentioned in part 1 of this article. Many times, operators have told me they know of a persistent leak and have not been able to repair it; as the leak is so small, they say it does not affect their product quality. Therefore, it is possible for any furnace operator to: (a) do a preventative maintenance leak check and discover a leak they did not know they had, and then (b) have the option of marking or tagging that leak to do a preemptive repair at their convenience, as opposed to discovering it aft er it degrades to the point of causing a production shut down.
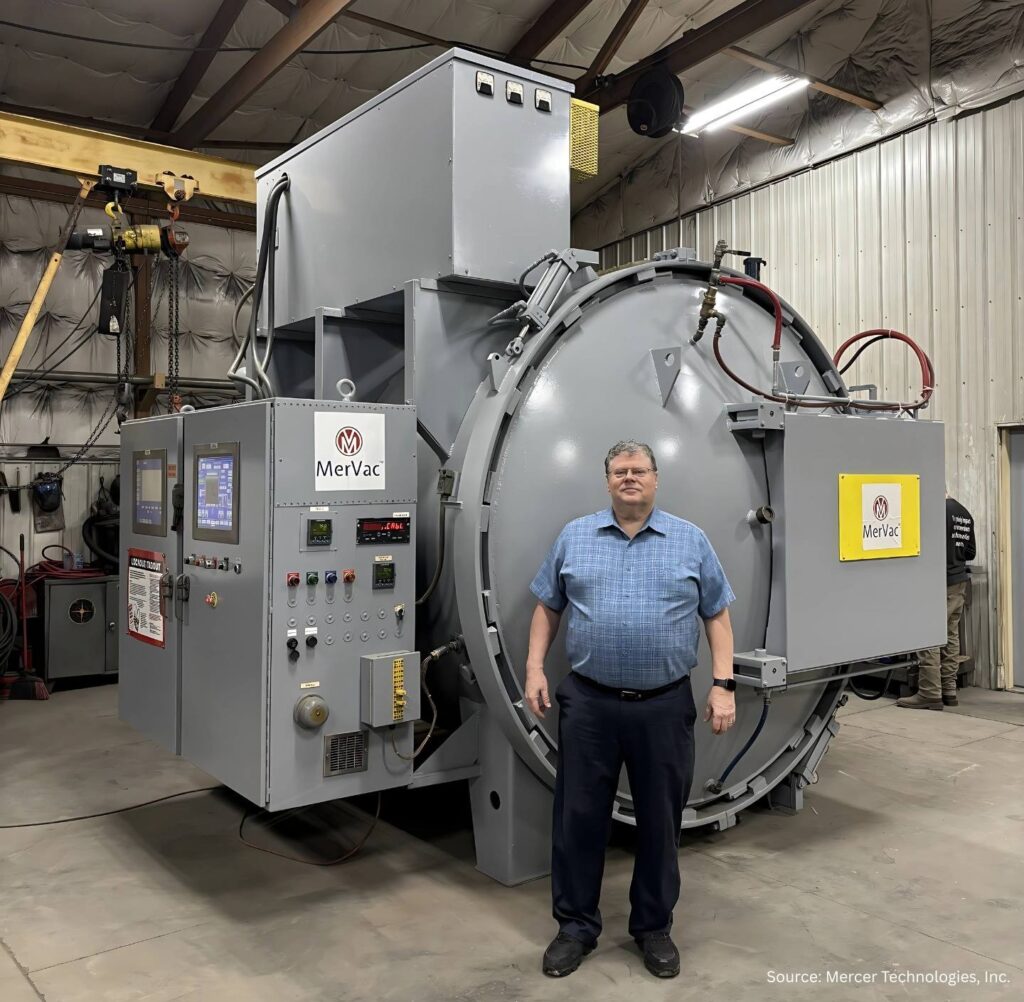
Figure 4. Dave in the front of a vacuum furnace at Mercer Technologies, Inc., in Terre Haute, Indiana
To Repair or Replace?
If you find a leak in a component like a valve, fitting, or thermocouple, you must then consider if the component is something that can be repaired or needs to be replaced. Often components that can be repaired may have a repair kit available from the manufacturer. If you have a leaking door seal, for example, you may be able to clean and, if appropriate, relubricate the seal. If it is damaged or worn, then replacement would be necessary.
The only temporary repairs that come to mind are, for example, a cracked weld or substituting a failed pump with a lower performing pump. For the cracked weld, you may discover that applying some vacuum-appropriate putty or similar material may help the furnace back to approvable vacuum capability. However, a repair like this should only be considered a temporary solution with plans to repair the weld at the earliest opportunity.
For a failed pump, you may replace it with another pump that might not have the same performance but is capable of the same vacuum level. While your process time might be slower, at least you can continue producing product until appropriate repairs can be made to the failed pump or you can replace it with the same type of pump.
Importance of Leak Detection
A leak on a vacuum system introduces air, thereby affecting the quality of the product or even ability to reach the process vacuum level. To ensure the quality of heat treated parts and prevent long delays in production, it is critical that heat treat operations with vacuum furnaces are well-versed in their equipment and leak detection resources, whether they own and operate helium leak detectors or hire a manufacturer or a third-party service company to detect and repair leaks.
About The Author:
Dave Deiwert President Tracer Gas Technologies
Dave Deiwert has over 35 years of technical experience in industrial leak detection gained from his time at Vacuum Instruments Corp., Agilent Vacuum Technologies (Varian Vacuum), Edwards Vacuum, and Pfeiffer Vacuum. He leverages this experience by providing leak detection and vacuum technology training and consulting services as the owner and president of Tracer Gas Technologies. Dave is a Heat Treat Consultant. Click here for more about Dave and other consultantsHeat Treat Today consultants.
In this Heat TreatRadioepisode, Dave Deiwert, a seasoned expert in leak detection, shares key steps to locate leaks in a vacuum furnace. Host Doug Glenn and his guest specifically look at helium as a tracer gas. From Dave’s extensive experience starting as a field service engineer to founding his own company, Tracer Gas Technologies, listen as he identifies systematic approaches, the influence of air currents, and cost-effective strategies for effective leak detection.
Below, you can watch the video, listen to the podcast by clicking on the audio play button, or read an edited transcript.
The following transcript has been edited for your reading enjoyment.
Meet Dave Deiwert (01:10)
Doug Glenn: Welcome to another episode of Heat TreatRadio. We’re talking today about leak detection in vacuum, and we’re happy to have Dave Deiwert with us who is a leak detection expert.
Dave, would you give our listeners a little bit of background about you and your qualifications in the industry, and then we’ll jump into some questions about leak detection?
Dave Deiwert: I’ve been in leak detection since 1989. I started off my career as a field service engineer. I did that for about 10 years, then moved into sales engineering for probably the second third of my career. And for the last number of years, I’ve been a product manager and applications manager, working with several of the major vacuum and leak detection companies in the world. I thoroughly enjoy what I do and helping others with their leak testing applications.
Doug Glenn: And now you’ve got your own company. Could we hear a bit about that?
Dave Deiwert: Sure, Tracer Gas Technologies had its birth in September of this year. My focus will be on providing training and applications assistance to industrial clients, research and development labs, and government and university labs.
Doug Glenn: What’s the best way for people to reach you?
Doug Glenn and Dave Deiwert discuss his new position as president of Tracer Gas Technologies.
Dave Deiwert: We are new and still working on the website, but in the meantime, you can reach me at my phone at (765) 685-3360 or email me at DDeiwert@gmail.com.
Doug Glenn: Dave recently published an article in the November 2024 print issue ofHeat TreatTodaycalled, “Basics of Vacuum Furnace Leak Detection, Part One.” The article includes ten tips for vacuum leak detection using a helium leak detector.
Indicators of Leaks (03:45)
We’re going to cover some of those tips today. But before we get started, what are the most common symptoms that we have a leak when operating a vacuum furnace?
Dave Deiwert: I’ve been helping these clients for a number of years. And typically, one or two things happen: So, the client is following the furnace manufacturer’s recommendations to do a periodic “leak up test,” where they pump the furnace down towards base vacuum; they isolate the pumps to look for the pressure to rise after the pump’s been isolated, and if the pressure rises at a faster rate over a test period of time, which might be ten minutes, then they determine they have a leak that they should be looking for.
It’s either during that test that they discover they have a leak that they should be looking for before it impacts quality. Or the problem develops while they’re using the furnace, and it begins to affect the quality of the product. They start to see a difference in the appearance of the product because there’s some type of contaminant gas from atmosphere, water vapor, or maybe their product is sensitive to oxygen and such. It also could be as simple as they used to pump down to base pressure for the process in “x” amount of time, and it seems like it’s taking longer.
One of those two things will get their attention, and that’s okay. Let’s look for the leaks.
Isolating the Source of the Leak (05:11)
Doug Glenn: Most of the discussion we’re going to have today is going to be on using helium leak detectors. But let’s assume you don’t have a helium leak detector. What would be your checklist of things to run through to try to isolate the source of the leak?
Dave Deiwert: My perception is that end users that only have maybe one or two furnaces might not have their own leak detector, and calling for help might be quite a pricey option. They may try to do some things on their own without the leak detector or help from somebody outside the organization.
The first thing you’re going to do is consider where most leaks typically would be on a furnace. You’re going to think of things like the door is opened and closed on every cycle of the furnace, so the gasket or O-ring type material there can get worn over time.
Or maybe while the door was open, something came to rest on the O-ring: a piece of fuzz, hair, or slag metal. Something may be there that creates a leak path when they close the door. To look at that in greater detail, they get some extra light on it and see if they can determine something there. They may go ahead and remove that O-ring and just clean it up really well. Many might put a light coating with some vacuum grease or some type on it and then reinstall it.
Of course, we recommend that you try not to use vacuum grease. That could be a whole other discussion. But many will try that and see if it’s helpful to them.
The vent valve for the system also opens up after every test. So, there’s another gasket that can get worn or dirty.
Another thing would be process gases. If they filled their furnace with some back stream with argon or something, those process gas valves can leak past the seal.
So they think about each of these things and go through them one at a time and inspect them. And if they’re not quite sure what they’re seeing, they might replace the gasket or seal and then hope that they’re successful. And if they continue to not be successful, they ultimately end up calling for help.
Somebody could get very frustrated looking for leaks if you don’t know for sure that it’s only picking up helium. It’s not reacting to Dave Deiwert’s aftershave or cologne, or something else… the fork truck that went by, or something else. I can say with 100% certainty it’s reacting to helium.
Understanding Leak Detector Technology (07:14)
Doug Glenn: I want to ask for a further explanation on the first tip in this article.You say, “Understand how your leak detector works to the point that you can confirm it is working properly.” How does a company do that?
Dave Deiwert: If you’re going to go to the expense of having a leak detector — which many should — they should understand how it works properly and how to tell that it’s working properly or not before you start spraying helium to look for leaks.
Every manufacturer of leak detectors today, and for quite a number of years, has a leak detector that will let you know whether you’re in the test mode or in a standby mode. If you ever approach somebody that is leak testing and the leak detector is in standby mode and they’re spraying helium, you can suggest, “I bet you haven’t found any leaks yet, have you? Well then, you might want to put your leak detector in test mode.”
Understanding it’s in test mode and understanding how to calibrate the leak detector are good tools to help your success in finding leaks on the system. You have to at least be familiar enough with the leak detector to understand its operation and knowing that it’s sensitive to helium and the calibrating procedure increases and supports this understanding.
Doug Glenn: That makes a lot of sense: Make sure it’s turned on.
Dave Deiwert: Right, turned on and connected to your system. If you don’t have a hose going from the leak detector to the furnace and you’re spraying helium, that’s also going to be a problem.This might sound silly, but sometimes people think, “Hey, this sounds easy. You just spray helium and look for leaks.” They may ask some person who doesn’t really have much experience, “Hey, go over and test the furnace.” They may be embarrassed to say that they don’t know how to use the leak detector, so they may give it a go. Because they don’t understand the leak detector, they might not be successful.
Doug Glenn: That leads me to my next question because I would be that guy that doesn’t really know how they work. When you’re performing a leak detection using a helium leak detector, how does that process work? Where is the leak detector? Where are you spraying the helium?
Dave Deiwert: Sure. In my career I’ve seen people choose a few different points of connection to the furnace, but you’ll find our industry that we teach people that the best place would be to connect the hose from the leak detector to point in front of the blower if they’ve got a blower on their system. If they don’t have one, it’s going to go at a connection point near the inlet of the pump of gas pumping through this system. But you want to sample that flow of gases from the furnace towards the pumps. That way, you can get a sample to the leak detector as you’re spraying the helium.
When you talk about how the leak detectors work… at every class I teach, I think it’s important to at least give enough information so that you have confidence that the leak detector can help you. How’s it sensitive to helium and why? With these leak detectors, no matter who manufactures them, typically you’ll see that inside there’s a mass spectrometer that’s tuned to the gas mass weight of a helium molecule. And because it’s dependent on the mass weight of a helium molecule, not the mass weight of oxygen, nitrogen, argon, or whatever, you can be 100% sure that when the leak detector reacts, it’s getting helium from somewhere.
I stress that because somebody could get very frustrated looking for leaks if you don’t know for sure that it’s only picking up helium. It’s not reacting to Dave Deiwert’s aftershave or cologne, or something else… the fork truck that went by, or something else. I can say with 100% certainty it’s reacting to helium.
You might be surprised how often in my career somebody said, “Dave, the leak detector’s reacting, and I haven’t even started spraying helium yet.” I will tell them helium is coming from somewhere, and it could be the tank of helium that you’ve rolled up to the furnace is spraying helium and you didn’t realize it. Maybe the spray gun is still spraying helium even though the trigger is not pulled. Maybe the regulator’s leaking.
Leak detector hooked up to vacuum furnace Source: Dave Deiwert
And if that furnace has got a leak, it’s the whole reason you brought the leak detector over. You’re not spraying helium yet, but helium is being sprayed by the tank or the regulator. The leak detector is going to react to the helium regardless of how it got into the system. So that can be very frustrating.
Let me back up: If you know beyond the shadow of a doubt the leak detector will only respond to helium and you haven’t sprayed helium yet, you know immediately it’s coming from somewhere.That is to say, I need to figure out what’s going on there. Otherwise I might spin my wheels looking for a leak while something else is a distraction for me.
Does that make sense?
Understanding Helium (11:53)
Doug Glenn: Yes, it does. Let me ask you this, though, because I’ve never done a helium leak detection as a publisher of a magazine — we don’t have a lot of helium in this business. You’ve got this box called the helium leak detector. It’s got a hose. You connect the hose near the blower or someplace close to the vacuum pump. I assume the leak detector is sampling the air as it’s coming towards the pump or towards the blower. Correct?
Dave Deiwert: Absolutely.
Doug Glenn: Then you’re spraying helium on the outside of the furnace somewhere to see if it’s being pulled into the furnace through some hole and therefore heading towards the pump.Correct?
Dave Deiwert: Yes.
Doug Glenn: I wasn’t ever sure how that worked — whether you spray the helium inside the furnace then you’re checking around the outside of the furnace with the leak detector; I know that sounds silly, but I thought that might be how it worked. But the truth is you’re sampling the air inside, and you’re spraying helium on the outside. If that’s the case, with a canister of helium on the outside of the furnace, won’t the detector be detecting the gas because it is going from that helium canister through and into the furnace, right?
Dave Deiwert: Yes, that’s correct.
When we get into the idea of spraying helium — where does the helium go when I spray it? When I started my career way back in 1989 as a field service engineer, I was taught that helium rises because it’s the lightest gas. And so I was taught, as were many other people, to start at the top of the furnace and work your way down.
The problem with teaching that is (remember, there’s five parts per million of helium naturally in the air we breathe) that if I start spraying helium, I can tell you with 100% confidence that the air currents in the room are going to impact that helium. If you can feel the air blowing from your right towards your left, and when someone’s got a floor fan on you can be sure of it, the predominant helium you’re spraying is going to move that way. It’s going to dissipate over time, but starting somewhere methodical to spray the helium is important and to not spray too much.
Be Patient with Leak Detection! (13:14)
Doug Glenn: I did want to ask a little bit about that because in your second and third tip in this article you expressed the need to be patient when doing a leak detection. Just exactly how patient do we need to be, and why do we need to be so patient?
Dave Deiwert: Frequently throughout my career, I’ve run into people who say, “I’m not sure if I’ve got a leak, so I’m going to spray a lot of helium so I can determine it pretty quickly.” But if you spray that helium like you’re trying to dust off the equipment, you will have so much helium in the air the leak detector will definitely react if there’s a leak. However, now you have to wait forever and a day; it could be quite a while until the helium that you just sprayed all over the system and in the room dissipates before you can continue looking for a leak.
I always ask this question when I’m teaching a class with people who have been doing leak testing: “How do you set your helium spray nozzle?” The ones that’ve been doing it for quite a while will say that they’ll get a glass of water, for example, and they’ll put the spray nozzle down in the water and adjust the flow to where they get one bubble every two to three seconds. I see some variation on that, one to ten seconds. But they’ll try to meter it down. Somebody might say, “I’ll put the nozzle up to my lip and spray so I can barely feel it.”
I’ve run into people who say, “I’m not sure if I’ve got a leak, so I’m going to spray a lot of helium so I can determine it pretty quickly.” But if you spray that helium like you’re trying to dust off the equipment, you will have so much helium in the air the leak detector will definitely react if there’s a leak. However, now you have to wait forever and a day.
To those people, I’ll say, “That’s a good start. If you put that nozzle in that glass of water and it looks like a Ken and Barbie jacuzzi, you’re spending way too much helium into that.” I would meter that down to a very small amount, whether it’s a bubble every three seconds or you can barely feel it on your lip is a good place to start.
And because I made the comment that helium doesn’t necessarily rise but can go different directions based on the wind, air currents in the room, and fresh air makeup, eventually somebody says, “Where should I start?” I’ll say, “I don’t have a problem with you starting at the top of the furnace and working your way down. Be methodical.”
Some people will start at the leak detector they just hooked up because they might have put a leak in the bellows connection from the leak detector. You might start there to make sure the assembly you just did is leak tight.
But start somewhere, be methodical as you move across the system, and remember that helium can go up, down, left, back, or forward depending on what the air currents are.
Doug Glenn: I was actually going to ask you about the air currents, because I thought that was an interesting tip that you had made. In fact, I think that’s like tip four and five in this article. I think we’re dealing with air currents and things of that sort. So, we’ll skip over that, because I think you’veaddressed that.
The Dead Stick Method (16:48)
Doug Glenn: You mention an interesting thing called a “dead stick method” in tip number six. Can you explain what that is?
Dave Deiwert: I’m glad you asked that because I looked back on that later and thought I don’t think I elaborated on that enough for somebody that’s never done the dead stick method. That is a term for when you spray just a little squirt of helium away from you and the furnace, and then stop spraying. Then you’re going to rely on the residual helium that’s coming out of the tip of the nozzle for some period of time.
In my training classes, I typically have a plastic bottle that has a little right-angle nozzle on it. You may have used them back in high school in chemistry; it might have had alcohol in it. I will squirt a little helium in that plastic bottle and then screw the cap on; that will last me for two or three days at a trade show or a training event. I don’t have to squeeze the bottle. There’s enough helium coming out of the nozzle that you can detect leaks.
To demonstrate, I’ll put hair on an O-ring on a test for the leak detector. (It’s the cause of my receding hairline.) I can take that nozzle without squeezing the bottle and move it near the hair that I put in there, and it will detect it very impressively every single time, at least over the course of two to three days.
Perspective looking up into the world’s largest vacuum chamber at NASA’s facility in Sandusky, Ohio Source: Dave Deiwert
My point of demoing that is people tend to spray away too much helium. If there’s five parts per million naturally in the air we breathe, you only need enough delta difference so that as you go past where the leak’s at you can see a reaction from the leak detector and pinpoint it.
Backtrack to if somebody sprays a lot of helium to prove they have a leak. Now they have to wait a long time for the helium to dissipate. And by the way it’s not just dissipating from the room. You’ve sprayed a lot of helium that is now feeding that leak. And as it goes through the leak path in the furnace, it expands back out in front of you. It’s got to pump away from the furnace, too. It’s also got to clear the system and go out to the pumps before you get back to baseline so that you can continue leak checking.
Therefore, if you spray just very small amounts,, you have to get close to where the leak is before you start to get a response. This way you have less concern of helium drifting to the opposite side of the furnace and going through a leak path there — that can really distract. You may think you’re near the leak, but it’s really on the other side of the furnace because you’ve sprayed way too much helium.
Spraying little amounts might make you feel like it’s taking longer. But the fact is, when you start to get a reaction at the leak detector, you can be comfortable that you’re getting close to the where the leak is.
Doug Glenn: If you know you’re in a room with air currents in it (let’s just say there’s a flow of some sort from left to right), does it make sense to always start downwind, and then work your way back across the system?
Dave Deiwert: Yes. If I can feel a fan — Joe’s got his fan on because it’s keeping him cool, and it’s blowing over towards where I’m leak testing, I might say, “Hey Joe, could you turn your fan off a little bit while I’m testing?” He may say, “No, it’s making me comfortable.” All right, now I’ve got to work with that. I know that I can feel the air currents moving from my right towards my left. So, yes, starting downwind and working my way up could be helpful. You want to pay attention to what the air is doing if you can tell. It may be a very calm environment, and you’re not sure what the air currents are doing; just be methodical. Pick somewhere to start in the furnace.
Here’s something else about spraying helium: Once you think you know where the leak is at, every time you put the spray nozzle there you should get the same response. You spray the helium, you get a response, you stop spraying and wait until it drops back to baseline, and then you go back to where you think the leak is. If that’s where the leak is, every time you put the probe there, you should get the same response time at the leak detector. If even one time you put the spray gun there and don’t get a response or not nearly the same, then that’s not where the leak is at. Yeah, you should know beyond a shadow of a doubt when you pinpoint the leak.
Doug Glenn: How often do you see more than one leak at a time? Let’s say you isolate a leak, you think you got it, then say you take the gasket off or whatever you do, do the test again, and there’s still a leak.How often does that happen?
Dave Deiwert: It happens most of the time. When I was a field service engineer and somebody called me in to help, I almost never found one leak. That tells me they were working with one leak that maybe wasn’t large enough to affect their quality or the cycle time, and they were living with it. And the day comes where they have a leak that gets their attention or the leak got larger. It can be more challenging if you’ve got more than one leak. It’s a short-lived celebration when you think you found a leak and then you go to start the process, and, oh, it looks like you still have a leak. That wasn’t the one. So, you might make a case for looking to see if you can pinpoint another leak while you’re in the leak testing mode.
Doug Glenn displays the cover of the November 2024 issue of Heat Treat Today, in which Dave Deiwert’s article, “Basics of Vacuum Furnace Leak Detection, Pt 1,” is featured.
Saving on Helium Gas (21:35)
Doug Glenn: Besides the fact that a helium leak detector can save you all kinds of time because typically you can find a leak faster with a helium leak detector then in a process of elimination, you also mentioned a tip for saving money regarding the mixing of the gas. Could you elaborate on that and any other cost savings tips?
Dave Deiwert: I already mentioned that people tend to spray way too much helium at least until they’re sensitive to that concern and cut back. But when they buy the tanks of helium, they’re buying 100% helium. And remember my comment that you just need enough delta increase in the helium that you’re applying to where the leaks at to be able to pinpoint it. The possibility that you could buy your tanks of helium at a lesser percentage, maybe 25% helium and 75% nitrogen, would help you save on some helium and help your efforts to not be spraying too much.
People have not been saying that in this industry, and so that can make folks nervous. “I don’t know, Dave. We’ve never done that before. I’ve never heard anybody else say that before.” I suggest if you are going through a lot of helium, you could cut down how much helium you’re spraying. You could save some significant money, especially these larger facilities with many furnaces and so forth. Give it a try. Buy one tank of it with a mix gas and pick something that you’re comfortable trying, whether it be 25% or 50% helium and buy one bottle. And the next time you test your furnace and find a leak, then try to look at that leak with the lower percentage helium and prove to yourself whether using a lower percentage of helium is going to save you money.
Doug Glenn: You’re suggesting people get themselves comfortable with it, use their 100% until they find the leak, and then try the lower helium.
Dave Deiwert: When they show the proof to themselves, that they can still have the capability to find leaks like that, then they could save a little money. Plus, there’s the added benefit of not spraying so much helium and having to wait as long for the area to clear up before you can start spraying again to continue to pinpoint a leak.
Doug Glenn: And that would save you additional time. Dave, thank you very much. Is there anything else you’d like to add before we wrap up?
Dave Deiwert: Only that if you know you’ve got a leak in the system — it failed the leak up test or quality or whatever, you sprayed it around the entire system, and you can’t find any leaks — then you’re probably looking at an internal leak most likely past the seat of a valve. Or maybe you’ve got a vent valve that’s leaking past the seat, but your plumbing to that vent valve maybe goes out of the building, so you don’t really have an easy access to spray helium past that.
For example, with an argon valve, you may need to disconnect the argon supply from that valve so you can get access to that side of the valve to spray helium to see if you can detect a leak past the seat of that valve.
Doug Glenn: Dave, thanks very much, I appreciate it. I’m sure we’ll be talking again. I know vacuum leak detection is an important thing.
About The Guest
Dave Deiwert President Tracer Gas Technologies
Dave Deiwert has over 35 years of technical experience in industrial leak detection gained from his time at Vacuum Instruments Corp., Agilent Vacuum Technologies (Varian Vacuum), Edwards Vacuum, and Pfeiffer Vacuum. He leverages this experience by providing leak detection and vacuum technology training and consulting services as the owner and president of Tracer Gas Technologies.
If you have the right leak detection equipment, the process of detecting leaks can be more time efficient. In this Technical Tuesday installment, learn more about the practical side of leak detection, from potential sources of leaks to equipment and methods of effective leak detection. Guest columnist Dave Deiwert, president of Tracer Gas Technologies, also provides 10 tips for identifying the most common sources of leaks. Stay tuned for his follow-up article that will focus on operating and maintaining a helium leak detector and repairing the leaks that are found.
This informative piece can be found inHeat Treat Today’sNovember 2024 Vacuum print edition.
When leaks develop in a vacuum furnace, they can inhibit the furnace’s ability to achieve the desired process vacuum level. Without an appropriate leak detector, an operator and maintenance team are limited to guessing where the leak might be, a time-consuming process of elimination evaluating each component or possible leak point one at a time. Alternatively, if you have the right leak detection equipment, the process of detecting leaks can be more time efficient.
First, a team needs to know the possible sources for leaks — especially if they are troubleshooting without a leak detector. Then, selecting the appropriate equipment can speed up the leak detection process. Ultimately, that equipment is most useful if a team is informed on how to best use and maintain the equipment.
Troubleshooting Without a Leak Detector
If a team does not have a leak detector, they first must disassemble potentially leaking components to clean and replace gaskets and seals. For some products, like valves and pumps, they might use a supplier-provided repair kit.
After reassembling, if they discover they still have a leak in their furnace, they will continue to select possible leaking components for maintenance.
The team would then start with the components most likely to be leaking — for example, the door seal. The door to the furnace is opened and closed every cycle of the furnace as the operator removes products that were under process for the previous cycle and then places the next product, or batch of products, into the furnace. This opening and closing of the door creates wear on the gasket and also provides opportunity for foreign materials and debris to land on the seal and cause a leak. As this is just one possible source of a leak, continuing to troubleshoot can become a lengthy process. (See sidebar for more information on possible sources for leaks.)
Selecting Equipment To Support Vacuum Furnace Leak Detection
Having a leak detector on-site allows a team to identify the source of the leak more efficiently. Typically, major OEM furnace suppliers, their field service teams, and major end-users of vacuum furnaces have selected “fixed magnetic sector mass spectrometers” optimized for using helium as a tracer gas to look for leaks in vacuum furnaces. These are also the tool of choice for OEM companies and end-users in other vacuum applications such as glass coaters, solar panel manufacturing, automotive, medical, aerospace, and others. In industrial manufacturing plants and R&D, we commonly call these tools “helium leak detectors.”
Helium leak detectors are the well-established method for leak testing because helium — the second smallest molecule and a safe, inert gas that does not react with other gasses or material — is useful for finding the smallest of leaks.
Figure 1. Leak detector hooked up to vacuum furnace Source: Dave DeiwertFigure 2. Perspective looking up into the world’s largest vacuum chamber at NASA’s facility in Sandusky, Ohio Source: Dave Deiwert
10 Practical Tips for Leak Detection
The following tips for leak detection pertain to using helium leak detectors:
Understand how your leak detector works to the point that you can confirm it is working properly.
A common question is, “How long after I spray a point on the furnace should I wait for a reaction on the leak rate meter to ensure that point doesn’t leak?” The answer is to characterize your system so that you know what the longest time constant can be for a leak to be detected. For example, purposefully apply a leak at the furthest point on the furnace from where the leak detector is installed. Then, spray helium and count the seconds to when the leak detector reacts to helium from the leak. Now you will know that you never have to wait longer than that without a reaction before moving on to the next point of leak testing.
Avoid moving along too quickly around the furnace as you spray helium. If there is a reaction at the leak detector when you stop spraying, you may have passed the point of leakage. After the leak detector leak rate drops back to baseline, you will try respraying the point of concern. If there is no reaction, consider that you may have moved along too quickly, and retrace the area you had sprayed more slowly. If you do not get a reaction again, it is very possible that the air currents of the room had carried the helium towards a point that you have not even reached yet.
Remember: There are naturally five parts per million of helium in the air we breathe. Therefore, when you spray helium, it becomes the victim of the air currents in the air and the fresh air makeup of the room. Helium can go up, down, left, right, away from you, and towards you depending on the air currents of the room.
Because helium spreads so pervasively, it is better to spray very small amounts of helium so that when you get a reaction from the leak detector, you know you are getting closer to the leak. If you spray helium like you are trying to dust off the system at the same time, you will quickly confirm there is a leak but will be forced to wait forever and a day for the helium to clear up in the room to the point that you can continue looking for the leak.
If you have confirmed the location of the leak to a small area, but there are still several points of possibility within it and you are unable to pinpoint the leak, diminish the amount of helium you are spraying. You can try to further restrict the flow of helium by using the “dead stick” method. This is where you spray helium from the spray nozzle away from the area of interest, then you place the nozzle near the potential leak points one at a time, relying on the residual helium that is present at the nozzle. This can still work well because (if you remember that there are 5 parts per million of helium in the air we breathe) there could still be hundreds, if not thousands or more, parts per million of helium present at the tip of the nozzle — at least long enough for using the dead stick method.
If you are looking to minimize the costs of helium, consider buying your tanks of helium at a lower percentage using nitrogen as the balance gas in the cylinder. People already tend to spray too much helium when conducting leak detector tests, and we are not trying to measure the severity of the leaks. So, decreasing the percentage of helium will save money without negatively impacting leak detection. If you are not yet comfortable with this but interested in testing it, simply buy one tank with a lower percentage of helium. Next time you find a leak with your 100% tank of helium, roll the tank with a lower percentage of helium over, spray the same leak on your system, and determine the difference (if any) in the effectiveness of detecting any leaks found.
Learn the “wellness” checks from your leak detector’s manufacturer. This can help you establish preventative maintenance for your leak detector before it has a problem that makes it unavailable for use when your furnace needs a leak check. Your leak detector manufacturer should be able to recommend what points of interest on their leak detector need regular scrutiny.
Calibrate your leak detector when you start it up and check calibration when you are finished to confirm it is working properly.
If you are fortunate to not need your leak detector for many months, I recommend you schedule a few times per year to start it up and ensure it is still working well. Occasionally, I hear of someone who needed their leak detector after months to a year of disuse who found that it was not working well. Leak detectors, like pumps, should not be neglected indefinitely.
Figure 3. Blower mounted atop pump Source: Dave Deiwert
The Value of Efficiency
While it is possible to identify and repair leaks without a helium leak detector, a team with one is likely to net significant time savings if they operate and maintain it intentionally. An operation with many furnaces typically will have their own leak detector — and probably a spare. Operations with just one or two furnaces may choose to hire a service company to find the leaks in their system; this works well if they rarely encounter leaks on their systems.
“Basics of Vacuum Furnace Leak Detection, Part 2” will cover advancements in helium leak detector technology, operating and maintaining a leak detector, and comparing whether it would make sense to repair vs. replace a leak detector.
About the Author:
Dave Deiwert President Tracer Gas Technologies Source: Dave Deiwert
Dave Deiwerthas over 35 years of technical experience in industrial leak detection gained from his time at Vacuum Instruments Corp., Agilent Vacuum Technologies (Varian Vacuum), Edwards Vacuum, and Pfeiffer Vacuum. He leverages this experience by providing leak detection and vacuum technology training and consulting services as the owner and president of Tracer Gas Technologies.
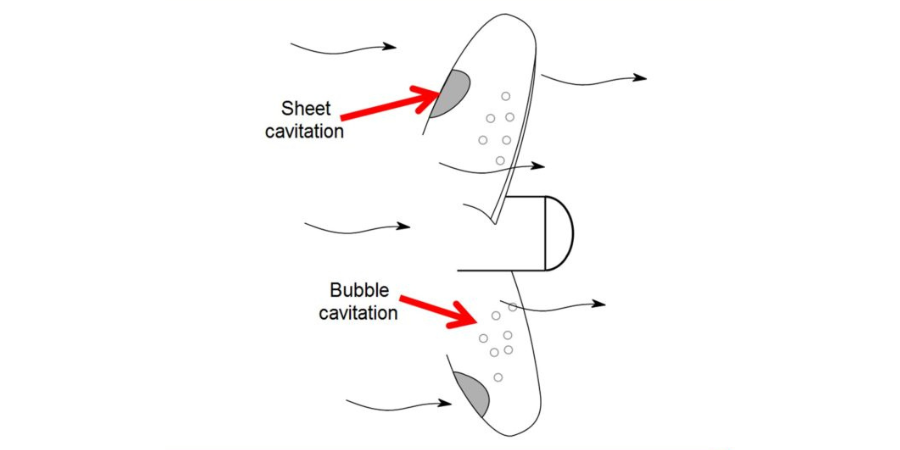
Let's talk about exploding gas bubbles -- or, perhaps more accurately, cavitation erosion and how cavitation can be prevented. If you're facing surface deterioration, this may be the best of the web article for you!
In this technical summary, you'll learn the basics of cavitation erosion such as the following: what it is, why it happens, what influences it, how to prevent it, and more. The three types of adaptations for prevention are must-reads. Additionally, this article provides a visual aid that supplements a quick breakdown on two different types of cavitation erosion.
An excerpt:
[blockquote author="" style="1"]Low temperature carburizing or nitrocarburizing offers a solution to enhance mechanical properties without altering the corrosion resistance. These thermo-chemical diffusion processes form meta-stable carbon or nitrogen S-phase while avoiding precipitation of carbides and nitrides that causes sensitization.[/blockquote]
Do you always feel confident when selecting heat treating equipment? ¿Se siente siempre seguro cuando selecciona equipos de tratamiento térmico?
There are many factors involved when making a purchase. Often, key considerations may be missed. Read this guide on how to select and buy new equipment by Carlos Carrasco, founder of Carrasco Hornos Industriales.
This original content article was originally published inHeat TreatToday’s November 2021 Vacuum Furnaceprint edition in English and Spanish.
Carlos Carrasco Founder Carrasco Hornos Industriales
Why Is This Guide Helpful?
There are many reasons to select industrial furnaces carefully. One is the cost of the furnace. Another is realizing heat treating will affect the product and the bottom line. There is more specialized engineering in heat treating equipment than is apparent from the outside.
The purpose of this guide is to help engineers make the best equipment selection. The decision will affect not only the project, its budget, and results, but will also reflect the buyer’s knowledge. After the heat treating equipment is selected, the realization may occur that perhaps insufficient thought was given to potential maintenance problems or the work required to keep it in top working condition.
The following steps, gathered from more than 50 years of experience in the fields of manufacturing, sales, and maintenance, will be a useful guide to selecting heat treating equipment that will please both management and operators.
Vacuum high-pressure hardening furnace
Step One: Quote Request
When requesting a quote, management knows the exact requirements the heat treated products must have. A reliable supplier should be able to understand all requirements for a quote. Requests must be clear, concise, and contain at least the following information:
Heat treating processes that will be carried out on the equipment
Shape, general dimensions, and weights of the product(s) to be heat treated
Production volumes per hour, day, or month
Number of hours available for heat treating
Part material
Fuel type, or if the heating will be done with electricity
Voltage available in the plant
Space available for installation of equipment
Special considerations for handling loading and unloading
Furnace manufacturers need the above information to begin to create a series of options for the equipment that will be most suitable for the required processes. For example, hourly production defines: the dimensions of the space to heat the load, the type of furnace (continuous or batch), the amount of heat to be released in the furnace, the loading and unloading method, and the devices for accommodating or transporting the load such as trays, baskets, or conveyor belts. All these considerations influence both the initial cost and the operating cost, because in the end, the cost of the proposed equipment and its functionality are directly related to the specifications of the request for a quote.
It is difficult to attempt to use one furnace for all heat treating processes or to attempt to take into account future production needs that may not be necessary. It is impractical to carry out several processes that require different temperatures or have different production volumes. Trying to do so leads to oversized and over-budget equipment.
Vacuum low-pressure carburizing furnace
Step Two: Supplier Selection
Quote requests should only be submitted to manufacturers with the technical capacity and experience to prepare an offer that satisfies the request. Always use references from previous installations with similar quote requirements.
Considering the potential for financial gain, the cost of heat treating equipment can be appealing. The design and construction of heat treating equipment involves a considerable amount of engineering resulting from expensive investments in research and development. This research and development is influenced by user feedback detailing equipment failure. This feedback creates opportunities for manufacturers to fix equipment issues. Without the added benefit of other heat treater’s feedback, equipment failure is more likely. Finding a manufacturer with experience is crucial.
Only suppliers with experience and solid technical capacity will be able to guarantee results from the start. The goal is to receive equipment that requires no corrections after the first load leaves the furnace and to not have to rework the design.
Step Three: Study and Evaluation of Offers
A failed project is too much to risk, and so the responsible supplier will invest time and money in the study and preparation of the offer.
Every responsible supplier has been disappointed by an offer read backwards — when the potential customer reads the price first. Is the overriding need to stay within a certain budget or for heat treating equipment that is capable of processing parts to meet specifications? A careful reading of the offer may justify the cost of the furnace in relation to production needs. If there is a confusing section of the offer, it is important to clarify with the supplier. Investment in production equipment is very important, but it is even more important that the investment be profitable.
The heat treating equipment must satisfy a production need and certain metallographic specifications. Consequently, the dimensions of the space where the parts will be placed may be the main factor in the design of the furnace. This is because metals are only capable of heating up to a certain temperature at a rate that is determined by the heating method, geometry, and load arrangement. Only experienced vendors can make the correct calculations to meet the production needs of the project. Be sure to understand the calculations that lead to the sizing of the proposed system.
How are the parts supported and/or transported within the furnace? This is a point of great importance for the initial cost of these components and for the costs of future maintenance. Keep in mind that any mechanism that works at high temperatures will always be problematic for maintenance and replacement. Cast link belts, for example, have a higher initial cost, but they withstand heavy loads longer than metal mesh belts. However, there is a notable difference in the cost of components made of chromium-nickel alloy and those of carbon steel. Since chromium-nickel materials are able to withstand higher temperatures, their use is recommended and almost essential.
Furnaces tend to deteriorate rapidly where the heat is being lost. Make sure the door design is the best possible to avoid heat loss. Be sure that all doors included in the design are necessary. Doing so will save maintenance costs.
When it comes to quenching, oil or water circulation systems are extremely important, as is tank capacity. Otherwise, the quenching medium may overheat, causing unsatisfactory results.
In an oven intended for low temperature operations 356°F–1,112°F (180°C–600°C), for example tempering processes, it is necessary to have a fan to recirculate the hot air from the furnace. The uniformity of the temperature in the parts and the speed at which they heat up depends on the speed of recirculation, the weight of the air, and the design of the furnace, which must force the passage of air optimally through the load with the use of deflectors, screens, or distribution plenums. In high temperature furnaces, 1,292°F–2,192°F (700°C–1200°C), the heat transfer depends on the radiation toward the load and its exposed surface, so a recirculation fan is not necessary. Heat treatment is a critical process and temperature pyrometers must have the necessary precision.
List any doubts about the offer and ask the supplier to clarify at length in writing. The answers will make it easier to do a second analysis of the offer and compare it with other offers. In addition, the written clarifications will be a record for review by other collaborators on the project. Ask for feedback and observations on the proposals to get a second opinion.
Ask suppliers to provide a list of similar installations. Industry colleagues are generally unbiased in their comments about their experience with a particular supplier.
Finally, make a comparison chart in the most objective way possible. Keep in mind the fact that offers often do not include some subjective issues that may be important for a final selection. For example, some vendors are likely to have greater knowledge and experience in certain processes, simply because they have invested time and money to fi nd the best solutions to the process and those experiences could be beneficial.
Step Four: The Price
Understanding the scope of the received proposals that meet production and quality requirements is not all that goes into selecting heat treating equipment. After all this, there are still significant differences between various suppliers. Price is one of these differences. At this stage, the industrial furnace manufacturer will need to justify costs. It will be easy to tell if the manufacturer is thinking of the buyer as a future satisfied customer, or only of the economic benefits the sale will bring.
Conclusion
There are innumerable cases in which the equipment was poorly selected: “The substation and/or the cooling tower did not have the capacity;” or “The equipment is not what we expected;” or “They never told us that the furnace needed gas in those capabilities.” These are just a few of the possible comments everyone has heard.
Selecting heat treating equipment should be done slowly, analyzing all the options, weighing the differences between providers, and seeking clarification. Ask the supplier for multiple equipment options like requesting spare parts for the first year of operation.
Ultimately, time will tell if the furnace selected was the right choice. These recommendations provide a guide to making that decision. We sincerely hope that these recommendations will guide you in the selection of industrial furnaces for heat treating.
About the Author:
In addition to being the founder of Carrasco Hornos Industriales — furnace experts, consultants, and independent sales representatives for various furnace companies and spare parts — Carlos Carrasco is the founder and former president of ASM International, Mexico Chapter with more than 50 years of experience in the heat treat industry.
¿Se siente siempre seguro cuando selecciona equipos de tratamiento térmico? Do you always feel confident when selecting heat treating equipment?
There are many factors involved when making a purchase. Read this guide on how to select and buy new equipment by Carlos Carrasco, founder of Carrasco Hornos Industriales. The Spanish version is below, or you can check out both the Spanish and the English translation of the article where it was originally published: Heat Treat Today'sNovember 2021 Vacuum Furnaceprint edition.
¿Se siente siempre seguro cuando selecciona equipos de tratamiento térmico? Hay muchos factores involucrados cuando se hace una compra. Consulte este artículo para conocer los pautas que lo ayudarán en el proceso de selección y compra. Autor: Carlos Carrasco, fundador de Carrasco Hornos Industriales.
Carlos Carrasco Fundador Carrasco Hornos Industriales
¿Por qué es conveniente esta guía?
Este artículo ayuda a los ingenieros a comprar equipos de tratamiento térmico. Hay muchas razones para seleccionar cuidadosamente los hornos industriales. Uno, es el costo del horno en sí y otro, es que el producto que se está tratando térmicamente afectará los resultados de su empresa.
En un equipo para tratamiento térmico, hay más ingeniería especializada de lo que parece en el exterior. Hay varias y muy sólidas razones, para hacer una cuidadosa selección de estos equipos, pues sus componentes son inherentemente de alto precio y en la mayoría de los casos, los resultados del tratamiento térmico tienen un importante efecto en la economía de su empresa.
El objetivo de esta guía es el de tratar de ayudarle a hacer la mejor selección del equipo; porque su decisión afectará no sólo al proyecto, su presupuesto y resultados, sino también a su capacidad como ejecutivo. No será la primera vez que escuche usted comentarios respecto a equipos adquiridos por la empresa en etapas anteriores a la suya o en la misma, y es común en la industria, tanto nacional como internacional, que los operadores o el personal de mantenimiento, comenten: “Cuando adquirieron este horno, nadie pensó en los problemas de mantenimiento [. . .] Como ellos no son los que lo usan día con día, no se dieron cuenta de cuánto trabajo se requiere para mantenerlo o bien para trabajar confi ablemente con él”.
Déjese ayudar, pues como ingenieros consultores en hornos y experiencia de más de 50 años en este ramo; tanto en la fabricación, venta y mantenimiento, con buenos resultados, los comentarios siguientes seguramente pensamos le serán útiles.
Horno de temple al vacío
Primer paso: solicitud de la cotizacion
Al solicitar una cotización, nadie mejor que Ud. puede conocer los requisitos que deben tener sus productos tratados térmicamente. Un proveedor confiable, debe ser capaz de entender todas sus necesidades de tratamiento térmico a partir de la solicitud de cotización que le presente. Consecuentemente, su solicitud deberá ser clara, concisa y tendrá como mínimo los siguientes datos:
Proceso de tratamiento térmico a efectuarse en el equipo.
Forma, dimensiones generales y pesos del (los) producto(s) a tratar térmicamente.
Volúmenes de producción por hora, día o mes.
Número de horas disponibles para el trabajo de tratamiento térmico.
Material del que están construidas las partes.
Combustible disponible o en su caso, si la calefacción será por medio de electricidad.
Tensión eléctrica disponible en la planta.
Espacio disponible para la instalación del equipo.
Consideraciones especiales del manejo de la carga y la descarga.
Es conveniente que Ud. sepa que los fabricantes de hornos necesitan la información anterior para empezar a definir una serie de opciones del equipo que podría ser el más adecuado para sus procesos. Por ejemplo, la producción horaria define: Las dimensiones del espacio para calentar la carga, el tipo de horno, continuo o por lotes, la cantidad de calor a ser liberada en el horno, así como el método de carga y descarga y los dispositivos para acomodar o transportar la carga como charolas, canastillas o bandas transportadoras. Todo lo anterior influye, tanto en el costo inicial como en el de operación, porqué, a fin de cuentas, el costo del equipo propuesto y su funcionalidad, están en relación directa a las especificaciones de su solicitud de cotización.
Ah, y por favor, no trate de llevar a cabo todos los procesos de tratamiento térmico habidos y por haber en un único horno, ni tampoco quiera tomar precauciones de futuras necesidades de producción, de las cuales no tiene ahora ninguna certeza, ya que es difícil llevar a cabo en un solo horno varios procesos que involucran diferentes temperaturas, volúmenes de producción, etc. Un enfoque en este sentido conduce a equipos sobredimensionados y posiblemente fuera de su presupuesto.
Horno de vacío para carburizado a baja presión
Segundo paso: selección de proveedores
Presente su solicitud de cotización, solamente a quien tenga la capacidad técnica y experiencia para preparar una oferta, que satisfaga dicha solicitud. Utilice siempre referencias de instalaciones previas, y de preferencia similares, o mejor aún, iguales a la que usted requiere.
El costo de los equipos para tratamiento térmico es elevado y representa un atractivo a empresas e individuos que consideran la posibilidad de obtener beneficios económicos. La verdad, es que el diseño y construcción de estos equipos involucra una considerable cantidad de ingeniería, resultado de costosas inversiones en investigación y desarrollo con retroalimentación de casos prácticos (los fracasos enseñan) que han sido aprovechados en beneficio de los clientes potenciales. En suma, no permita que sus necesidades sean el método de aprendizaje de un proveedor. Aquí es donde no hay sustituto a la experiencia.
De hecho, el proveedor con experiencia y sólida capacidad técnica es el único que estará en posibilidad de garantizar resultados desde el principio. Desde luego, a Ud. le interesa obtener resultados dentro de especificaciones, desde la primera carga que sale del horno, y no comprar excusas, promesas y retrabajos para corregir lo que de inicio está mal hecho. Quizá, con buenas intenciones, pero poca y en algunos casos, nula experiencia.
Tercer paso: estudio y evaluación de las ofertas
El proveedor responsable invertirá tiempo y dinero en el estudio y preparación de la oferta, porque no puede correr el riesgo de que su proyecto no cumpla su cometido. Ahora la responsabilidad de evaluar las propuestas recae sólo en Ud.
No hay proveedor responsable, que no haya sufrido la decepción de que su oferta sea leída de atrás para adelante. Nos referimos a que el precio es la primera línea que lee el cliente potencial. Hágase una pregunta: ¿Su necesidad primordial es, un precio o un equipo de tratamiento térmico que sea capaz de procesar las piezas para que cumplan sus especificaciones de su tratamiento térmico? La lectura cuidadosa de la oferta, le dará la respuesta a sus necesidades de producción y a la justificación del costo del horno. Si hubiese alguna sección que no sea de su completa comprensión, no dude en llamar al proveedor para que haga las aclaraciones correspondientes. Por favor, no malentienda. La inversión en equipos de producción es muy importante, pero más importante será que la inversión sea rentable.
El equipo para tratamiento térmico debe satisfacer una necesidad de producción y de ciertas especificaciones metalográficas. Consecuentemente, las dimensiones del espacio en donde serán colocadas las partes, quizá sea el factor principal en el diseño del horno. Esto se debe, a que los metales sólo son capaces de calentarse hasta una cierta temperatura, a una razón que está determinada por el método de calefacción, la geometría y acomodo de la carga. Sólo los proveedores experimentados, pueden hacer los cálculos correctos para que su propuesta satisfaga las necesidades de producción del proyecto, del que Ud. es responsable. Solicite al proveedor le muestre y explique la memoria de cálculo que conduce al dimensionamiento del sistema propuesto.
¿Cómo se soportan y/o transportan las partes dentro del horno? Éste es un punto de gran importancia, por el costo inicial de estos componentes y también por los costos del mantenimiento futuro. Conviene tener en cuenta que, cualquier mecanismo que trabaje a alta temperatura, siempre será problemático su mantenimiento y reposición. Las bandas de eslabones fundidos, por ejemplo, (de mayor costo inicial) soportan mejor y durante mayor tiempo, cargas pesadas en comparación con las bandas de malla metálica. Sin embargo, hay notable diferencia en los costos de componentes de aleación Cromo-Níquel, comparados con los de acero al carbón, pero su uso es prácticamente imperativo.
Los hornos tienden a deteriorarse rápidamente en cualquier lugar en donde haya fuga del calor. Asegúrese de que el diseño de las puertas sea el mejor posible para evitar esta fuga de calor y también de que su horno no tenga puertas que no necesita. Esto le ahorrará costos de mantenimiento.
Por lo que respecta al temple, los sistemas de circulación de agua o aceite son de extrema importancia, lo mismo que la capacidad del tanque. De lo contrario, el medio de temple puede sobrecalentarse y los resultados de su proceso, podrían no ser satisfactorios.
En un horno destinado a operaciones de baja temperatura (180 a 600° C), por ejemplo, procesos de revenido, es necesario disponer de un ventilador para la recirculación del aire caliente del horno. La uniformidad de la temperatura en las partes y la rapidez a la que se calientan las mismas, depende de la velocidad de la recirculación, del peso del aire y del diseño del horno que debe forzar el paso del aire en forma óptima, a través de la carga, con la utilización de mamparas deflectoras o plenos de distribución. En los hornos de alta temperatura (700 a 1200° C), la transferencia de calor depende de la radiación de éste hacia la carga y su superficie expuesta, por lo que un ventilador de recirculación no es necesario. El tratamiento térmico, es un proceso crítico en lo que se refiere a temperatura. Los pirómetros reguladores de temperatura deben tener la precisión necesaria.
Escriba sus dudas sobre la oferta y pida al proveedor que las aclare en forma extensa y por escrito. Las respuestas le facilitarán el hacer un segundo análisis de la oferta y compararla con otras ofertas; además, tendrá un registro para revisión por parte de otros colaboradores en el proyecto. Pida opinión sobre sus observaciones a las propuestas, pues uno tiende a pensar en círculos.
Solicite a los proveedores, le entreguen una lista de instalaciones similares a la suya en las que hayan intervenido. Generalmente, los colegas industriales se muestran imparciales en sus comentarios sobre la experiencia que hayan tenido con un determinado proveedor.
Finalmente, haga un cuadro comparativo, en la forma más objetiva posible. No pierda de vista que, frecuentemente las ofertas no incluyen algunas cuestiones subjetivas, que pueden ser importantes para una selección final. Por ejemplo, es probable que algunos proveedores tengan mayores conocimientos y experiencia en ciertos procesos, sencillamente porque han invertido tiempo y dinero para encontrar las mejores soluciones al proceso y Ud. podría verse beneficiado con esas experiencias.
Cuarto paso: el precio
Seguramente, ahora que ha comprendido el alcance de las propuestas que ha recibido y que cumplen con sus necesidades de producción y calidad, se dará cuenta que aún así habrá diferencias entre sus distintos proveedores que podrían llegar a ser significativas.
Este es el momento en que un fabricante de hornos industriales podrá justificar sus costos. Y usted sabrá si ha realizado su oferta pensando en Ud. como un futuro cliente satisfecho o únicamente en los beneficios económicos que la venta le reportará.
Conclusiones
Son innumerables los casos en que los equipos fueron mal seleccionados: “La sub-estación y/o la torre de enfriamiento no tuvieron capacidad”, “El equipo no es lo que esperábamos”, “Nunca nos dijeron que el horno necesitaba gas en esas capacidades”. Estos son sólo algunos de los comentarios que todos hemos escuchado.
Tómese todo el tiempo que requiera para analizar sus opciones, piense el porqué hay diferencias de un proveedor a otro y solicite que le sean aclaradas. Pida a sus proveedores las opciones a las que puede acceder con el equipo que está solicitando y que éstas sean cotizadas como eso: opciones. No se olvide de solicitar las refacciones que pudieran ser utilizadas durante el primer año de operación de su horno.
Para finalizar, sólo el tiempo dirá si al seleccionar sus hornos, éstos funcionaron como se esperaba.
Sinceramente, esperamos que estas recomendaciones le orienten en la selección de hornos industriales para tratamiento térmico y estamos seguros, que así será. Seguro que debe haber más preguntas relacionadas con este tema, no dude en contactarnos para obtener ayuda.
Sobre el autor:
Expertos en hornos. Representantes de diversas compañías fabricantes de hornos industriales, partes de refacción y equipo de combustión. Con más de 55 años de experiencia en la industria y consultores. Carlos Carrasco es fundador y expresidente del capítulo México de la ASM International.
With the popularity of dry pumps in furnace operations, vacuum furnace operators need to "have a handle" on how to operate them.
In this best of the web feature, the author explains the principles of operation, screw pump design, and various other screw pump characteristics. Learn about the 5 phases of dry pump operation and more in this succinct article.
An excerpt:
"Dry pumps represent a technology that is of interest to many heat treaters as they strive to increase performance and minimize cost and downtime. The advantages of these pumps are comparable to their oil sealed rotary vane cousins, and in certain applications, offer distinct advantages."
Vacuum pumps. What are they used for? Specifically, rotary vane oil sealed vacuum pumps. What goes on inside these machines? Where did they come from? If you know what we mean by the “slap-slap” or “clack-clack” noise, can you also list the pros and cons of this feature?
In the words of today’s best of the web, “This article discusses one and two-stage ‘medium vacuum’ oil sealed rotary vane vacuum pumps that can produce a catalog ultimate vacuum of about 1 x 10⁻² Torr (0.01 Torr or 10 microns) for a one stage model and about 1 x 10⁻³ Torr (0.001 Torr or 1 micron) for a two-stage model.”
An excerpt:
[blockquote author=”VAC AERO International” style=”1″]The last improvement that the direct drive pump has over the VBD pumps is the ability to use the oil pressure to open and close a valve at the inlet of the pump. In VBD pumps the problem of oil ‘suck back’ into the vacuum system…[/blockquote]