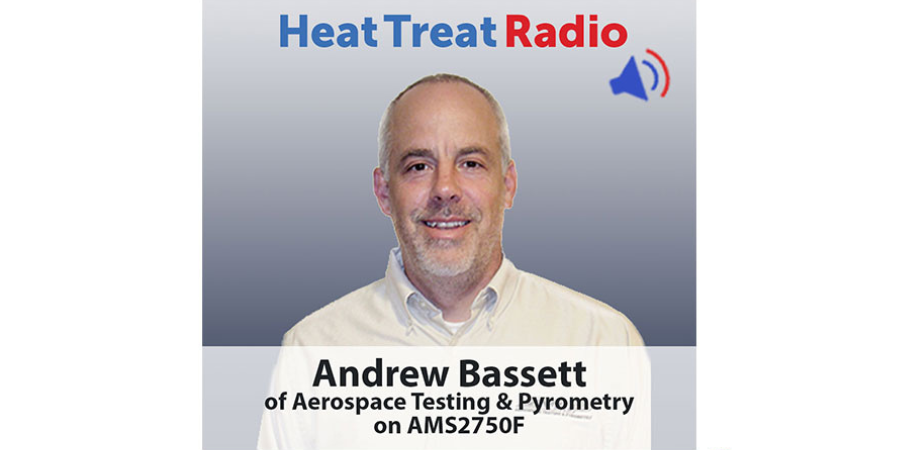
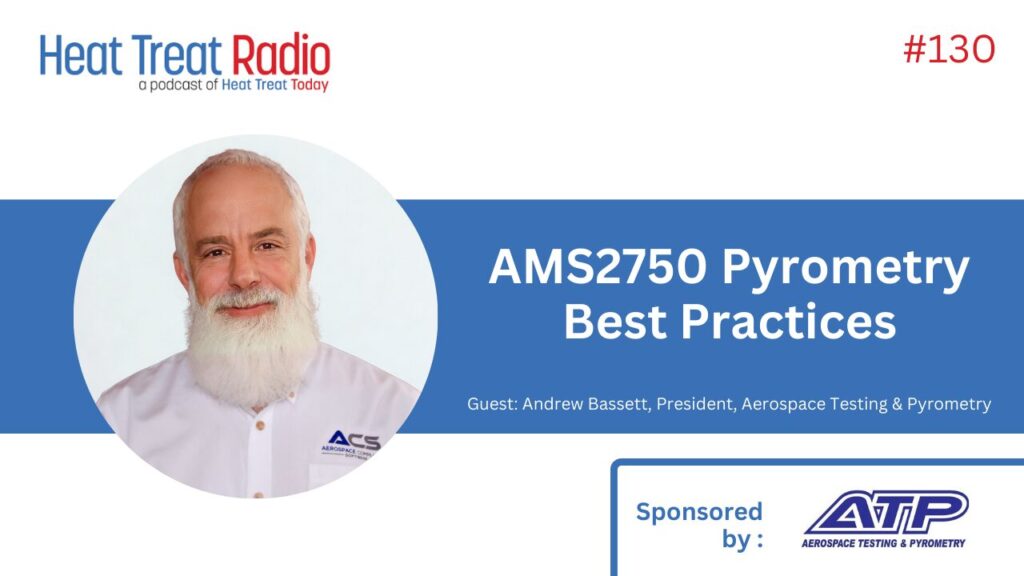
 In this first of a three-episode series on AMS2750F,Heat Treat Radio host, Doug Glenn, discusses Andrew Bassett of Aerospace Testing & Pyrometry discusses the significant changes in the specification in the areas of thermocouples and calibrations.
Below, you can either listen to the podcast by clicking on the audio play button, or you can read an edited version of the transcript.
Click the play button below to listen.
The following transcript has been edited for your reading enjoyment.
Doug Glenn (DG): This past June AMS2750 released revision F, but what does that mean to you? We caught up with AMS2750F committee participant, Andrew Bassett, to find out. Our conversation about this revision will stretch over 3 episodes with the first dealing with thermocouples and sensors, the second dealing with system accuracy tests and the third, temperature uniformity surveys. This first episode will be all about thermocouples, sensors and calibration.
Andrew, welcome to Heat Treat Radio. We're excited to have you to discuss this AMS2750F revision. If you don't mind, why don't you take a minute and introduce yourself to our listeners?
Andrew Bassett (AB): I'm president and owner of Aerospace Testing & Pyrometry, headquartered out of beautiful Bethlehem, Pennsylvania. I've been in the aerospace pyrometry field for going on 30 years, after graduating from college at Davis and Elkins college in Elkins, West Virginia with a degree in communications. I discovered by myself that I would end up starving in radio broadcasting, which my field was, and got involved with a company called Pyrometer Equipment Co., a family owned pyrometry business. They needed some help as they were expanding operations, and it was the father of my girlfriend (at the time)—now my wife--who had started that business in 1956. That's how I got my break into pyrometry.

(photo source: dewv.edu)
This was also the time when NADCAP was starting to put its foothold on the aerospace industry. I kind of self-taught myself in the ways of aerospace pyrometry. I spent many years getting to know the specification and understanding what the requirements were, dealing with the auditors themselves, and having them teach me about what they look for during audits. I've taken that knowledge with me for the last 26 years.
After I left the family business, I worked for another start-up company in the field of pyrometry, left that company, and worked for a large commercial heat treat company based in the Southeast as their pyrometry director. At that time I started to feel like I wanted to start my own pyrometry business. So, in 2007, I started Aerospace Testing and Pyrometry (ATP). I was doing it part-time for a while, but then in 2009, I decided to go full force. To this day, it is not just me anymore: there are 16 of us in the company which is spread from coast to coast to take care of pyrometry services as well as other things we have branched off in with ATP. I call it our four headed monster. We have our pyrometry services, which includes calibration and testing of thermal processing equipment. We do get involved with other testing as well, like vacuum measuring systems for vacuum furnaces. We've also done humidity pressure gauges and gotten involved with different types of calibrations as well. Additionally, we have our laboratory, which is based in Ohio, where we do calibrations of secondary standards and field test equipment. Finally, we have our consultant and training arm, with which we have a full-time ex-NADCAP auditor on staff who is able to assist our customers with pre-assessments of NADCAP audits.
 AMS2750 is the main aerospace material specification in pyrometry. If you actually try to do a Webster's Dictionary search on pyrometry, you'll find it is a made-up word. We've interpreted it as the calibration and testing of thermal processing equipment; that is, heat treating equipment and any type of thermal processing will fall under this specification when it comes to testing.
AMS2750 has also now been adopted by others; it is not just a heat treating specification anymore. Two years ago, the FDA adopted AMS2750. Those facilities that are heat treating medical implants or dental drill bits will now have to follow the requirements of AMS2750. The one industry that walked away from this specification is the automotive industry. They have their own requirements called CQI-9. I always make a joke that the one good thing about AMS2750 in dealing with aircraft is that we don't see planes falling out of the sky, but we do see a few more recalls on automobiles and automotive parts.
DG: Just as a little preview for our listeners, Heat Treat Radio will be doing probably a two to four-part series, similar to what we're doing here with Andrew, on CQI-9, so stay tuned for that.
Andrew, how exactly did your company get involved with AMS2750?
AB: So, they had started to revise—and this goes back several revisions ago—revision C to create revision D. Revision C, I always said, was the Bible: You can give it to 100 different people and you would get 100 different interpretations. It was a much-needed change that was needed in revision D. At this time in my career, I only had about 8 years experience in pyrometry, but I had to live and breathe this document day-in and day-out. So, I approached several members from the AMS2750B team to get involved with the spec. I didn't have the great experience like some of the other members of the team who were from Boeing, Bodycote, and Carpenter Technology and other folks, and they said, “Well, we kind of have our team set into place. We'll ask you questions if we need anything.” I didn't hear much from them, but one of the team members did keep me posted of some of the changes.
 Then when it came to the rev. E, I heard rumblings that they were going to revise the spec again, and it was at this time that I decided to attend an AMEC meeting. AMEC is basically the think tank of all of the AMS specifications that are dealt with. AMEC stands for the Aerospace Metals Engineering Committee. The various segment specifications fall under various commodity groups, I believe it's A thru H. AMS2750 is actually owned by committee B for NSAE. So AMS guys write the specifications, the commodity committees own the specifications and that's how this process works.
I did attend my first AMEC meeting and the chairman at the time was a gentleman from Lockheed Martin. Anybody can join the AMEC meetings and be a part of them, but at that meeting he asked who I was and my background. I told him and said that I wanted to get involved with this specification and he said, “By all means you need to get involved with this specification. Since you do this for a living, I think we'd like to have that perspective.” So that's how I got on the AMS2750 team for rev. E. I'm still young enough, and dumb enough, to keep going on to this revision of rev. F and will probably be around for the next revision after that.
I did have my inputs in both the specs. We had a great team for rev. F which included myself, Doug Matson from Boeing, who has since just retired, Marcel Cuperman, who is a staff engineer for heat treating for PRI NADCAP, Cyril Vernault from Safran Aerospace, (he is also the heat treat task group chairman in NADCAP), Brian Reynolds from Arconic, Douglas Shuler from Pyro Consulting and a NADCAP auditor, and James LaFollette from GeoCorp. Our team has consisted of people across various parts of the industry. From Arconic’s standpoint, we were looking from the raw material producers. Obviously, with GeoCorp, it was from the thermocouple side of things. And from Cyril Vernault based in France, we wanted the European influence of what's going on over there. So, a good, broad range of people from various sectors of the industry are involved with the specification.
[blocktext align="left"]“I'm an end-user, so I'm able give my input and say, ‘Hey, this doesn't make sense. What you want to add into the spec is not real world.’”[/blocktext]One of the things I always had in my mind when I first got involved with the specification was that the specifications were written by the aerospace "primes," but that's not the case; it involves people, such as myself, who are end-users of this specification. I'm an end-user, so I'm able give my input and say, “Hey, this doesn't make sense. What you want to add into the spec is not real world.” It’s nice that people such as us get involved with these specifications.
DG: Let's talk about the main sections of this specification. If you break them down, what are the main sections?
AB: There are really only five sections of the specification. You can break it down into thermocouples, calibrations and thermal processing classification, SAT (system accuracy testing), TUS (temperature uniformity surveys), and the very last five or six paragraphs are on the quality provisions (what happens if you have a failed test). Those are the 5 main sections of AMS2750.
DG: So focusing on the topic of this episode, thermocouples and sensors, let's highlight some of the profound changes that have been made in rev. F. First, what are the biggest changes regarding thermocouples and sensors?
AB: The bigger changes relate to how we address some different thermocouple types that were not addressed in previous revisions of the spec. In rev. F, we added and gave a thermocouple designation, type M, to Nickel/Nickel-Moly thermocouple. These thermocouples have been around for a long period of time. We do know that they're being used in aerospace application, especially at very high, elevated temperatures. It's more cost-effective than going into the platinum or the noble-based thermocouples. Type M was one of the newer thermocouples we added.
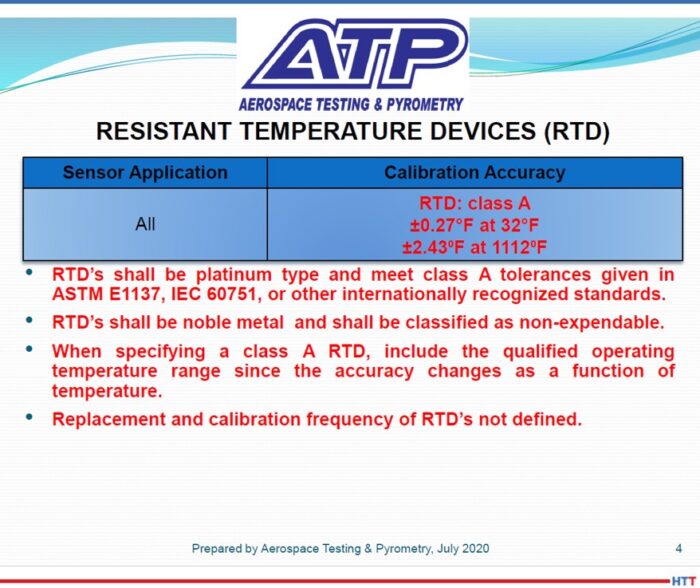
We also addressed the use of RTDs, which is, again, something that we had seen in the aerospace industry for quite a while. As I mentioned before, this is also a crossing over from the heat treat world into the chem-processing world. A lot of these chem-processing tanks use RTDs to measure chem temperatures, so we thought we better address these type of thermocouples.
Then we also added refractory thermocouples, which people weren't all that familiar with, unless you're dealing with the hot isostatic pressing (HIP) process. We're seeing more and more of the HIP furnaces out there now, with all of the additive manufacturing that is going on. We see people adding HIP furnaces everywhere, and a lot of those HIP furnaces are coming with type C thermocouples, because they are rated for these elevated temperatures that the HIP processes do. I think the type C thermocouples are rated close to 4,000 degrees Fahrenheit. We had to add some of these extra sensors that have been around for a while, but we wanted to bring them out a little bit further.
One of the other changes that was pretty significant—though I don't think it will affect the industry all that much—is that now we require thermocouples to be accurate to what's called “special limits of error.” The previous revision allowed for two different types: You were allowed special limits of error, which the accuracy is + or –2 degrees Fahrenheit, or .4% of reading. That was only required for a system accuracy test sensor or for a sensor that was being put in a Class 1 or 2 furnace. All other sensors, such as TUS of load sensors, and class 3-6, we allowed for standard limits of air, which was + or –4 or .75% of reading, whichever is greater.
We did some polling of major thermocouple suppliers out there. With my personal experience and that of some of the other people on the committee, we kind of said, “Hey, you know what? No one really orders the junky stuff, the standard limits; everyone orders special limits of error.” James LaFollette said, “Come to think of it, I don't think I've ever seen a purchase order that says give me the crappy stuff. We all order special limits.” So that's what we discovered – that no one was ordering the bare minimum because there wasn't a price difference between the two. Everyone had already been ordering the good stuff, so we just made that a little bit of a tighter requirement. Again, I don't think it's going to affect any suppliers out there.
I think the biggest change, when it came to thermocouples and sensors, was a big restriction that we put on what's called “expendable test sensors.” This was dealing with the base metal thermocouples. Base metal thermocouples are type K, type J, type T, type N, type M, and a couple other type base metals.
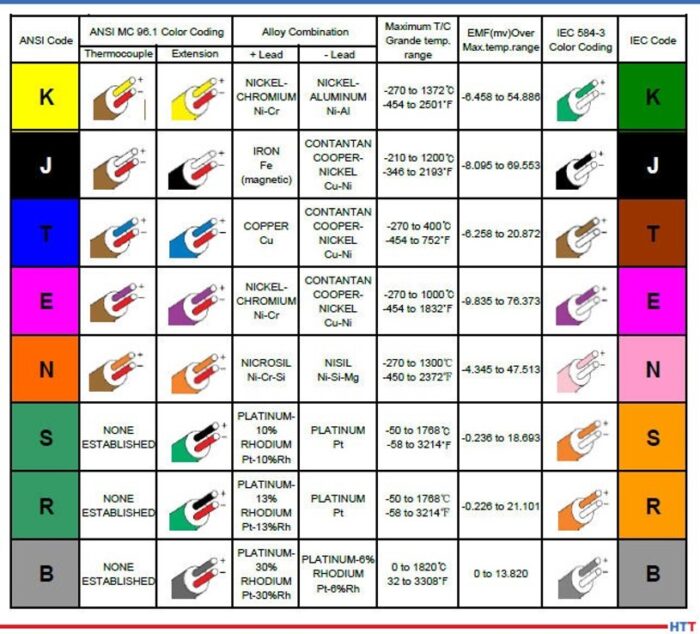
Primarily in the heat treating and thermal processing world, you pretty much see the K, J, N, and T. We had done some studies as a sub-team within 2750 to look at the drifting of thermocouples, that is, where thermocouples start to lose their accuracy. In the previous revision, we had some provisions in place that allowed people to use these expendable thermocouples that were attached to a temperature uniformity survey rack and were preserved. They could use them up to three years or 90 uses when below 1200 degrees. We thought that seemed kind of excessive on a 20-gauge wire that is covered with fiberglass coating. They're probably not going to hold up, but maybe we should see if there is any drifting of these thermocouples. So, we had one of the major thermocouple suppliers, Cleveland Electric Lab, run some drift studies on type K thermocouples, and we found out that these wires were actually starting to drift after three or four runs. The drift study included a cycling test where they ran it up to temperature and back down 30 different times. We asked, “Why don't we try to simulate how these thermocouples are going to interact coming in and out of thermal processing equipment? Why not pull them out every single time and do it that way?” Again, we found that thermocouples were drifting even further and even quicker.
At this point we decided we better put a restriction on this, and that gave the biggest uproar regarding the reuse of these thermocouples. Previous drafts before the final release of the spec was, if it's used above 500, your expendable wire is one and done above 500 degrees. A lot of the suppliers out there came screaming and said this is going to cost us millions and millions of dollars more in thermocouples. But we stood firm and said, “Hey look, if you're using these test thermocouples to validate your furnaces, either through a system accuracy test or uniformity survey, you really do not know what your error of that wire is after the first use.”
Most of the major thermocouple suppliers will even state on certifications that they will only guarantee accuracy at the time of calibration. Once it goes in a furnace, atmosphere and different conditions of the furnace will affect the wire. We stood our ground, but we ended up backing off a little bit. If you were using them strictly below 500, you're allowed to use them for 3 months (90 days) and you're going to have to keep a log. If you're using them between 500 and 1200, we're going to allow you to use them for 90 days, but now you're only restricted to five usages. And then again, above 1200, you use it once and throw it away. That was probably the biggest hassle, trying to get that. We did finally compromise on that three month or five usages. I do see the burden on the suppliers because they were used to three years or 90 usages, so now it's down to three months or five usages.
DG: I see on the chart that I've got here in front of me that base metal types of M, T, K, and E are all the three month or five use, but you've also got base metal type J and N which is three months or 10 uses. But all of them, above 1200, one and done.
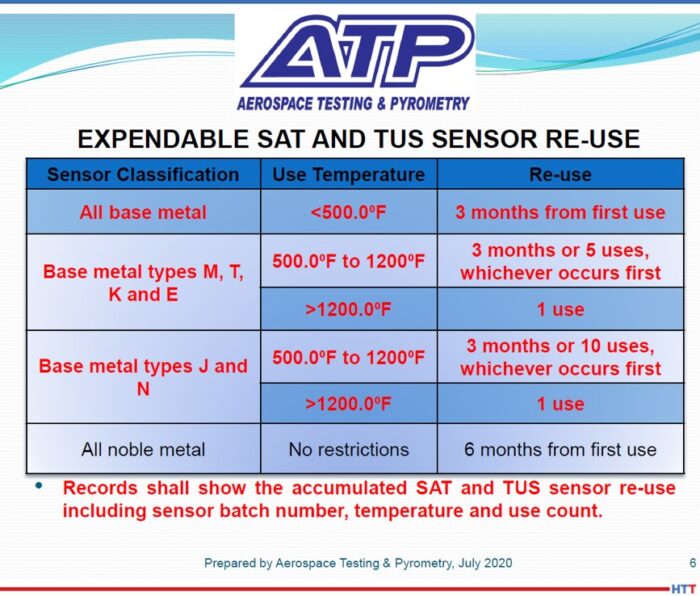
AB: Correct. That's one of the things I was trying to explain to some of the suppliers that were having heartache about the original change of 500 one-and-done. We only left it to the types M, T, K, and E; we always left this out of types J and N. My personal experience with type J has been (and we've switched over to type J wire a while ago for testing below 1200 degrees),that it's a little bit cheaper in price than the type K wire, and there was always this allowance for doubling the amount of usage if you just switch over to type J or type N.
DG: We have a few significant changes in the area of calibrations. What's another area of change in this section?
AB: One of the big things which really surprised me when we wrote it into the standard, but which was kind of overlooked by some of the suppliers, was the requirement of test instruments to have a .1 readability. So when it deals with test instruments and also now data acquisition systems. Now, if you have a chart recorder that is on your furnace (most people are going to data acquisition systems, some sort of SCADA systems), that recorder must have a .1 readability. That caused an uproar since that may create big changes.
Now, we don't put out these changes because we think it's a good idea; AMEC is data driven. The big thing with the .1 readability is that we were actually fixing a flaw that has been in the spec since the first day it was written, when it was just rev. A. We allowed for percentages of readings for your accuracy requirements. Let's say, for instance, on your instruments that are on your furnace calibrated controller an if it's in Fahrenheit, you're allowed + or –2, but if it's in Celsius, it has to be + or – 1.1. And if your instrumentation doesn't show .1 readability, how can you show compliance? That question is one of the reasons—that is, fixing a flaw in specification.
But we also allow for percentage of reading, which is + or –2 Fahrenheit or 1.1 Celsius or .2 % of reading, whichever is greater. Let's say you have a calibration point at 1400 degrees, you're actually allowed an error of 2.8. If you can't show that decimal point readability, how can you show compliance? That was one of the biggest issues.
Originally, the first draft said all digital instruments need to be .1 readability and then we backed that off to only say that the data acquisition system had to be .1 readability. At the end of the day, the recorders or the data acquisition system is the proof. As long as that shows the tenth of degree of readability, and it meets the requirements, then you're good to go there.
We did look at how many customers are already using digital data acquisition systems through NADCAP. There's actually a NADCAP checklist question that talks about chart speed verification, and if you answer that “N/A” then you obviously have digital data acquisition. At that time, we did look at that data and 78% of the NADCAP heat treating suppliers out there already had paperless systems. On top of that, two years after the release of 2750F, so as of June 29, 2022, you're not allowed to have paper chart recorders anymore. Everything is pushed to a digital data acquisition system 2 years after the release of this spec. I'd say, that's another one of the bigger changes when it deals with the instrumentation.
So the biggest changes are the .1 readability for your chart papers and the two years after the release requirement to go with a paperless system.
DG: Now question three: What are the changes that were made in the calibration section?
AB: There were a few changes when it came to calibration.
One of the things we added this time was the calibration of timing devices. A lot of facilities have timers or clocks that they're basing their times and temperatures, and again, there was no requirement to calibrate this. Therefore, we added a whole section on calibration of timing devices.
There was some push back on that. Certain people, who have suppliers who use certain control operated by computers and which are always synchronized in their server systems, asked if they were going to have to go out and buy calibrated stopwatches and sit at their PC to make sure it's within these new requirements. We finally said, no, you don't have to do that, but if you can procedurally address how that whole system works—that your server is always verified—you would be okay as long as you procedurally address that.
Again, we were loose on the accuracy requirements. Some of these external devices that you have only need to be calibrated every two years. Comparing it to people's standards that they use—we personally do calibration of timers as well, and our standards are required to be calibrated every two years—we ended up just tossing these devices away because it's more expensive to send them back for recalibration than it is to buy new ones. So, we gave some of the suppliers an easier way out. But we just wanted to address, again, something that has never been brought up in the specifications, which, though not technically dealing in the pyrometry world, does sit on furnaces. We need to get these things looked at every now and then as well.
“So, we gave some of the suppliers an easier way out. But we just wanted to address, again, something that has never been brought up in the specifications, which, though not technically dealing in the pyrometry world, does sit on furnaces.”
Some of the other changes come in the documentation. We did change some things that need to be required for the documentation of your calibration results. One of the things was that we need you to document the sensor that you're calibrating for that particular piece of equipment. For instance, you have a vacuum furnace and most vacuum furnace control sensors are a noble metal type S or type R thermocouple, but then the load thermocouples that measure the parts inside might be set as type K or type N. We just want you to denote that the control system is type S and the load thermocouples are type K. Not real big game changers, it's not going to cause too many issues out there from the supplier base, it's just adding basically another column in your calibration reports to say what sensor you're calibrating.
We didn't go too overly crazy on the calibration portion. The one thing, kind of in the calibration field, is we did add a new instrumentation type. When you look at thermal processing equipment, it's broken down into two different sections. You have your furnace classification which is your uniformity tolerance and then you have what's called your instrumentation type. You have class 1 - 6 and you have instrumentation A – E, now instrumentation D+. This was more for Safron Aerospace. Cyril Vernault was very adamant that we add this D+ instrumentation because Safron's specifications state that they want this extra sensor that is basically 3 inches away from the controlling sensor, so they can measure if there is a big difference between these two sensors to determine if there is drifting of your thermocouples. So we added this new D+ instrumentation. We didn't realize this was big over in Europe, but it was nice to have someone like Cyril say that a lot of European suppliers use this and that he’d like to see it in AMS2750. Again, having this broad range of people on the specification helped us find out what's going on in different parts of the world.
DG: How about we close with the fourth part of thermocouples? Could you delve into the expanded section on offsets?
AB: Absolutely. Always one of the areas, especially when it comes to NADCAP audits, is the use of offsets. We basically broke it down into two different types of offsets that are allowed. We have what's called a correction offset, which is basically either a manual or electronic means to bring an instrument back to a nominal temperature. And we have a modification offset, which is just the opposite. It takes either a manual or electronic offset or a shift in the temperature to bring it away from nominal. There are different ways that people have used these offsets. For instance, let’s say you go into a facility and you're doing your calibration of a controller, and the instrument is off linear by two degrees. People would use the offset to bring the instrument back a nominal temperature. Instead of maybe doing a full factory calibration, they would just go into the instrument, hit some magic buttons, and (say I need to offset it -2 because my instrument was two degrees high) set a two degree correction offset.
A modification offset generally is only going to be used for when you're doing a temperature uniformity survey. Let's say it is skewed to one side of your temperature median. For instance, (I always like to use this in my pyrometry training class), we know temperature uniformity and I go in and do a temperature uniformity on your furnace at 1000 degrees. I have to hold it to be + or –10. When I get my final results and I look at everything with all my calculations, I have a survey that actually comes out to be 992 – 998 degrees. It's well within the + or –10, but it’s skewed down to the lower end.
So, there's different things you can do to try to correct that. Maybe change air flow, or thermocouple location, but a lot of time, what happens is you get a furnace that was made in the 1940s and you're trying to make it comply to 2020 specifications. The only thing you can do is go in and shift the controller away from the nominal to actually make it read hotter. In this example that I'm giving you, what I would do is go in and put in an electronic offset and tell the controller to read colder now, as I will drive more heat into the furnace. So, I go in and put a -5 degree offset into the control and now, in theory, when you do the survey, you're shifting that temperature up by five degrees. Now if you look at that split, it would be 997 – 1003—it’s more centered around your set point temperature. That would be what's called a modification offset. You're taking that TUS distribution and skewing it to better center around the set point.
We really did some “spelling” on this: we put some maximums, the amount of offsets that are allowed as we don't want people to go too crazy on these things, so we did put some offsets in there. But I think we did a great job of trying to spell out what these offsets are being used for, how you're supposed to document them, and make sure that you're consistent with your practice every time. Again, procedures will have to be written to fully understand how you're going to do the offset. Am I going to put it electronically? Am I going to do a manual offset, just shift my temperature up five degrees because I know my furnace is cold by five degrees? I think with that whole new section in there, I think we did a good job of spelling that out for the suppliers.
DG: Thanks so much, Andrew for joining us on the podcast.
AB: Thanks for having me, Doug. Looking forward to chatting more with you about AMS2750F.
You can reach out to Andrew Bassett at https://www.atp-cal.com/contact/.
To find other Heat Treat Radio episodes, go to www.heattreattoday.com/radio and look in the list of Heat Treat Radio episodes listed.


